Tag - ReadyNAS

Bacula database cleanup

By Stephane Carrez

Bacula maintains a catalog of files in a database. Over time, the database grows and despite some automatic purge and job cleanup, some information remains that is no longer necessary. This article explains how to remove some dead records from the Bacula catalog.

Bacula maintains a list of backup jobs that have been executed in the job table. For each job, it keeps the list of files that have been saved in the file table. When you do a restore, you somehow select the job to restore and pick files from that job. There should not exist any file entry associated with a non existing job. Unfortunately this is not the case. I've found that some files (more than 2 millions entries) were pointing to some job that did not exist.

Discovering dead jobs still referenced

The first step is to find out which job has been deleted and is still referenced by the file table. First, let's create a temporary table that will hold the job ids associated with the files.

mysql> create temporary table job_files (id bigint);

The use of a temporary table was necessary in my case because the file table is so big and the ReadyNAS so slow that scanning the database takes too much time.

Now, we can populate the temporary table with the job ids:

mysql> insert into job_files select distinct file.jobid from file;
Query OK, 350 rows affected (8 min 53.26 sec)
Records: 350  Duplicates: 0  Warnings: 0

The list of jobs that have been removed but are still referenced by a file is obtained by:

mysql> select job_files.id from job_files
 left join job on job_files.id = job.jobid
 where job.jobid is null;
+------+
| id   |
+------+
| 2254 | 
| 2806 | 
+------+
2 rows in set (0.05 sec)

Deleting Dead Files

Deleting all the file records in one blow was not possible for me because there was too many files to delete and the mysql server did not have enough resources on the ReadyNAS to do it. I had to delete these records in batch of 100000 files, the process was repeated several times (each delete query took more than 2mn!!!).

mysql> delete from file where jobid = 2254 limit 100000;

Conclusion

This cleanup process allowed me to reduce the size of the file table from 10 millions entries to 7 millions. This improves the database performance and speeds up the Bacula catalog backup process.

How to expand disk capacity on a ReadyNAS Duo from 1 TB to 2 TB

By Stephane Carrez 3 comments

This article describes the process to increase the disk capacity of a ReadyNAS Duo configuration from 1 TB to 2 TB In my case, my X-RAID configuration was broken due to a faulty disk. I took the opportunity to repair the redundancy and also to increase the capacity. The process is simple but very long. It took me 4 days, several reboots and many disk synchronisation.

To replace the 1TB disks, I bought two Seagate ST2000DL003-9VT166 hard disks which offer 2TB (they are referenced in the hardware compatibility list). I then followed the following process :

  1. Upgrade to the latest RAIDiator firmware (4.1.7)
  2. Replace a first disk by the new larger disk (in my case the faulty disk)
  3. Wait until the disks are fully synchronized (Status should be Redundant)
  4. Shutdown properly and restart the ReadyNAS
  5. Make sure the disks are fully synchronized. If not, wait for synchronization to finish.
  6. Replace the second disk by the larger disk
  7. Wait until the disks are fully synchronized (Status should be Redundant)
  8. Shutdown properly and restart the ReadyNAS
  9. After the reboot, the ReadyNAS triggers a disk expand
  10. Another reboot is necessary after which ReadyNAS triggers the file system expansion

ReadyNAS Disk Expansion

The disk expansion happens at the very end and is fairly quick. Before the disk expansion, and when the new disks are installed, you will see that the disk partition table has not changed. The fdisk /dev/hdc command reports:

Device Boot   Start      End      Blocks   Id  System
/dev/hdc1         1      255     2048000   83  Linux
/dev/hdc2       255      287      256000   82  Linux swap
/dev/hdc3       287   121575   974242116    5  Extended
/dev/hdc5       287   121575   974242115+  8e  Linux LVM

Since ReadyNAS uses LVM to manage the disks, you can use pvdisplay to look at the available space. At this stage, everything is used.

nas-D2-24-F2:/var/log/frontview# pvdisplay
  --- Physical volume ---
  PV Name           /dev/hdc5
  VG Name           c
  PV Size           929.09 GB / not usable 0   
  Allocatable       yes (but full)
  PE Size (KByte)   32768
  Total PE          29731
  Free PE           0
  Allocated PE      29731
  PV UUID           huL1xb-0v0O-vJ6K-LqaK-P4kf-q4Wm-SFeYCX

After the reboot, the ReadyNAS will start the disk expand process. It will do this only if the two disks are redundant. After expand, the partition looks as follows:

Device Boot    Start       End      Blocks   Id  System
/dev/hdc1        1       255     2048000   83  Linux
/dev/hdc2      255       287      256000   82  Linux swap
/dev/hdc3      287    243201  1951200343    5  Extended
/dev/hdc5      287    121575   974242115+  8e  Linux LVM
/dev/hdc6   121575    243200   976950032   8e  Linux LVM

Once the partition table is fixed, you are asked to reboot:

The first stage of the in-place volume expansion is done.
Please reboot the device to complete the volume expansion.

After the reboot, the LVM volumes are increased. You can check with pvdisplay which now reports the new disk partition and with lvdisplay which takes into account the two physical volumes.

nas-D2-24-F2:~# pvdisplay
  --- Physical volume ---
  PV Name               /dev/hdc5
  VG Name               c
  PV Size               929.09 GB / not usable 0   
  Allocatable           yes (but full)
  PE Size (KByte)       32768
  Total PE              29731
  Free PE               0
  Allocated PE          29731
  PV UUID               huL1xb-0v0O-vJ6K-LqaK-P4kf-q4Wm-SFeYCX
   
  --- Physical volume ---
  PV Name               /dev/hdc6
  VG Name               c
  PV Size               931.69 GB / not usable 0   
  Allocatable           yes (but full)
  PE Size (KByte)       32768
  Total PE              29814
  Free PE               0
  Allocated PE          29814
  PV UUID               TOqmR2-fYOq-jf0q-n1ka-N9K1-B2CB-oyU23Y

nas-D2-24-F2:~# lvdisplay
  --- Logical volume ---
  LV Name                /dev/c/c
  VG Name                c
  LV UUID                2CzUXf-uzSD-DGcS-KePF-6elz-XveS-xePwHf
  LV Write Access        read/write
  LV Status              available
  # open                 2
  LV Size                1.82 TB
  Current LE             59545
  Segments               2
  Allocation             inherit
  Read ahead sectors     0
  Block device           254:0

The last step is now to resize the file system. The ReadyNAS reports the following alter the LVM volume is expanded:

Your system will now begin online expansion. 
Please do not reboot until you receive notification that the expansion is complete.

And while the expansion is in progress, you will see that the ReadyNAS uses resize2fs to grow the file system. If you look at the running processes, you will see the following:

root 1371  ?  S    21:41   0:00 /bin/bash /frontview/bin/expand_online
root 1537  ?  Ss   21:41   0:00 /frontview/bin/blink_expand
root 1538  ?  S    21:41   0:42 resize2fs -pf /dev/c/c

Data volume has been successfully expanded to 1853 GB.

nas-D2-24-F2:~# df -h
Filesystem            Size  Used Avail Use% Mounted on
/dev/hdc1             1.9G  590M  1.3G  30% /
tmpfs                  16k     0   16k   0% /USB
/dev/c/c              1.8T  888G  966G  48% /c

Problems and hints

  • If at some point, the ReadyNAS enter in re-synchronization after a reboot even if disks are already synchronized. Check that the disks are in good health. Look at the /etc/rc3.d directory and make sure the rc3 script is called only once through the Sxxx symbolic links (See Frontview shows 100% disk usage)
  • If you suspect something wrong, use ssh to connect to the ReadyNAS and look at /var/log/messages or /var/log/kern.log to see if there is not some hardware issue.
  • Check the file /etc/frontview/raid.conf and verify that the two lines are similar and indicate the reference of your new disk (this file is rebuilt after each reboot).
  • Look at the /proc/xraid/configuration file. It indicates a lot of information about the current X-RAID status and synchronisation process.
  • At the last resort, read and understand the /etc/hotplug/sata.agent script which contains the details of the resynchronisation and expansion process.
3 comments
To add a comment, you must be connected. Login to add a comment

Using phpMyAdmin with a remote mysql on the ReadyNAS Duo

By Stephane Carrez

This article explains how to setup and use phpMyAdmin with a MySQL server running on the ReadyNAS duo. This configuration does not require installing phpMyAdmin on the ReadyNAS. Instead it provides a secure configuration while allowing to administer the database remotely. The idea is to use an SSH tunnel to establish a secure connection to the MySQL server. This article deals with the ReadyNAS duo but it can be applied to any MySQL server (I've used this mechanism for the administration of Planzone).

Creating the SSH Tunnel

The ssh tunnel is created when we use the ssh -L option. The first port (3307) specifies the local port and localhost:3306 specifies the MySQL port on the remote endpoint. The tunnel is active only when we are connected with ssh. This is useful to guarantee that nobody can access the MySQL server while we are not connected. The MySQL traffic will also be encrypted by SSH. On your host, type the following command (replace pollux by your ReadyNAS host name).

$ ssh -L 3307:localhost:3306 -l root pollux
root@pollux's password: 
Linux nas-D2-24-F2 2.6.17.8ReadyNAS #1 Tue Jun 9 13:59:28 PDT 2009 padre unknown
nas-D2-24-F2:~#

Keep this connection open until you don't need the tunnel any more. As soon as you exit, the tunnel will be closed.

Setting up MySQL server

By default the MySQL server does not listen on any TCP/IP port but instead it uses Unix sockets (Unix sockets are faster and listening on TCP/IP ports could create security leaks if not done correctly). For the ssh tunnel to work, the MySQL server must listen on the a TCP/IP port on the localhost address.

Look at the configuration file /etc/mysql/my.cnf and make sure it contains the following lines (uncomment bind-address and comment the skip-networking):

socket        = /var/run/mysqld/mysqld.sock

port          = 3306
bind-address  = 127.0.0.1
#skip-networking

You should then restart MySQL if you changed the configuration file:

nas-D2-24-F2:/ # /etc/init.d/mysql stop
nas-D2-24-F2:/ # /etc/init.d/mysql start

Setting up mysql grant

A grant definition is necessary so that we can connect to MySQL server on the TCP/IP port. From the MySQL server point of view, the connection is from the localhost (the tunnel endpoint on the ReadyNAS). Connect to MySQL and type the following commands (you can use pwgen to make a password on Ubuntu):

mysql> grant all privileges on *.* to 'root'@'127.0.0.1' identified by 'Lugo6cho';
Query OK, 0 rows affected (0.04 sec)

mysql> flush privileges;
Query OK, 0 rows affected (0.02 sec)

Testing the connection

On another terminal window, try to connect to the MySQL server through the tunnel.

zebulon $ mysql -u root --host 127.0.0.1 --port 3307

If the client fails with Can't connect to MySQL server on '127.0.0.1' (111), verify that the tunnel is up and that the port is correct. If the client fails with Access denied for user 'root'@'127.0.0.1' , verify the MySQL access rights and update the grant.

Update phpMyAdmin configuration

Now, we just need to add the tunnel local endpoint to the phpMyAdmin configuration. For this, add the following lines to the phpMyAdmin configuration file (/etc/phpmyadmin/config.inc.php on Ubuntu).

$cfg['Servers'][$i]['host'] = '127.0.0.1'; 
$cfg['Servers'][$i]['port'] = '3307';
$cfg['Servers'][$i]['connect_type'] = 'tcp'; 
$cfg['Servers'][$i]['AllowNoPassword'] = FALSE;

$i++;

Now, connect to your phpMyAddmin and login on the 127.0.0.1:3307 configuration. Once you are logged in, you'll administer the remote MySQL server.

To add a comment, you must be connected. Login to add a comment

Connecting to a ReadyNAS duo using SSH

By Stephane Carrez 6 comments

Having acquired a ReadyNAS duo for my new backup system, I wanted to explore the system that runs on it and see if I could run more services on it. There is nothing terrific in this article as many people have already done

Read more
6 comments
To add a comment, you must be connected. Login to add a comment

Tuning mysql configuration for the ReadyNAS duo

By Stephane Carrez

After installing mysql server on a Ready NAS duo, it is necessary to tune the configuration to make the server run well on this small hardware. This article describes a possible configuration for tuning the Mysql server.

Mysql Temporary directory

Mysql uses files in the temporary directory to store temporary tables. Depending on your database and your queries, temporary tables could be quite large. To avoid problems in the /tmp partition becomming full, the best thing is to use a directory in the /c partition

tmpdir          = /c/backup/tmp

Make sure the directory exist before starting mysql:

# mkdir -p /c/backup/tmp

Mysql storage engine

After playing with a reasonably big database and the MyISAM storage engine, it turns out that the mysql server was sometimes crashing and barking at some corrupted myisam tables. I switched to the InnoDB storage engine, which is better for transactions anyway. Since the readynas does not have a lot of memory I've used the following configuration:

default_storage_engine = InnoDB
thread_cache_size = 0

innodb_buffer_pool_size = 6M
innodb_thread_concurrency = 1

Other mysql settings

To reduce the resources used by the mysql server to the minimum, I changed the max number of connections to a small number.

key_buffer_size = 16k
sort_buffer_size = 100k
max_connection = 10

I'm using these settings for almost 6 months now; my bacula database now contains a table with 5 milions of rows. Of course you can't expect big performance but the mysql server is stable.

To add a comment, you must be connected. Login to add a comment

Installing Mysql server on a ReadyNAS duo

By Stephane Carrez 11 comments

Being able to connect to my ReadyNAS duo using SSH (See Connecting to a ReadyNAS duo using SSH), the next step for setting up a Bacula backup solution was to setup a MySQL server. Th

Read more
11 comments
To add a comment, you must be connected. Login to add a comment

Simple mysql database backup for ReadyNAS duo

By Stephane Carrez

With a mysql database running on the ReadyNAS duo, it becomes necessary to put in place a backup of the database. This article describes a simple method to automatically backup the mysql database.

All actions described here require that you are connected to your ReadyNAS duo using SSH (See Connecting to a ReadyNAS duo using SSH)

ssh -l root pollux
root@pollux's password:
Last login: Sat Jan  9 12:59:54 2010 from zebulon
Last login: Sat Jan  9 15:34:19 2010 from zebulon on pts/0
Linux nas-D2-24-F2 2.6.17.8ReadyNAS #1 Fri Mar 20 04:41:57 PDT 2009 padre unknown
nas-D2-24-F2:~#

Backup Directory Preparation

First, we have to create a protected directory which will contain the backups:

nas-D2-24-F2:# mkdir /c/backup-mysql
nas-D2-24-F2:# chmod 700 /c/backup-mysql

Mysql Backup User

To make the backup, a special user should be used to restrict the rights to the minimum. Basically, the user only needs the SELECT and LOCK TABLES privileges. The database access should be protected with a password.

nas-D2-24-F2:# mysql -u root -p
Enter password:
Welcome to the MySQL monitor.  Commands end with ; or \g.
Your MySQL connection id is 7
Server version: 5.0.32-Debian_7etch5~bpo31+1-log Debian etch distribution

Type 'help;' or '\h' for help. Type '\c' to clear the buffer.

mysql> GRANT SELECT, LOCK TABLES ON *.* 
    TO 'dump'@'localhost' identified by 'XXXX';
Query OK, 0 rows affected (0.04 sec)

mysql> flush privileges;
Query OK, 0 rows affected (0.02 sec)

mysql> quit
Bye

Backup Script

To make the backup, you have to write a simple script which uses mysqldump and compresses the backup file. This script is written in /etc/cron.daily directory. This way it will be run automatically by the cron daemon each day at 6:25am (Look at the /etc/crontab file).

Create the file /etc/cron.daily/backup-mysql and put the content below.

#!/bin/sh
D=`date --iso-8601`
BKP_DIR=/c/backup-mysql
DB_LIST="bacula mysql"
for i in $DB_LIST; do
  mysqldump --user=dump \
    --password=XXXX \
    --opt $i | gzip -c > $BKP_DIR/$i-$D.sql.gz &&
  chmod 400 $BKP_DIR/$i-$D.sql.gz
done

You have to update the DB_LIST variable to put the name of the databases you want to backup.

You have to protect the script because it contains the password of our backup user. The script must be executable.

nas-D2-24-F2:# cd /etc/cron.daily
nas-D2-24-F2:# chmod 700 backup-mysql

Test the script

It's necessary to execute the script at least once to make sure it backups what you need.

nas-D2-24-F2:# ./backup-mysql

Then, check that a backup file was created correctly.

Test the database backup or restore

You may also test that the backup SQL file is correct by creating a fake database and importing the file. You can do this with the following command:

nas-D2-24-F2:# mysql -u root -p 
create database test-backup;

Then decompress the backup file and import it with the mysql command into new test (or the real database if you want to restore it).

nas-D2-24-F2:# gzip -c \
-d /c/backup-mysql/xxx.sql.gz | \
mysql --force --force -u root -p test-backup

Conclusion

This process remains simple and is very easy to put in place. However, it has some limitations because it is best to make sure no applications are writing to the database when the backup is running. Otherwise you may backup data which are not consistent.

To add a comment, you must be connected. Login to add a comment

One year of data backup with Bacula on a ReadyNAS duo

By Stephane Carrez

After one year of daily and weekly backup using Bacula on a ReadyNAS duo, I wanted to share information about this success story. Bacula is a network backup solution that I installed on a ReadyNAS duo. Bacula allows to make full as well as incremental backups of remote machines. It uses a MySQL database that also runs on the ReadyNAS (see Installing Mysql server on a ReadyNAS duo) and it stores backups on media such as tapes, CDs, DVDs or files.
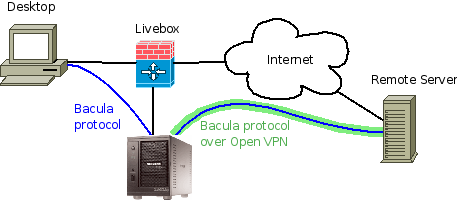
Backup Architecture

The Bacula software is running directly on the ReadyNAS duo. The backup is configured to backup my desktop which is accessed locally, and it also backups a server running on the Internet (vacs.fr). Since the ReadyNAS is behind my Livebox, it connects to the Internet server by using a secure tunnel with OpenVPN.

Network Backup with Bacula on a ReadyNAS

The ReadyNAS duo has two 1To hard disks configured as RAID 1 mirrors.

  • Bacula director and bacular storage daemons are running on the ReadyNAS duo
  • Bacula client is running on each machine that must be backed up (Desktop and Remote Server).

Backup Pools and Strategy

Bacula is configured to create backups on file tapes. Each tape is a flat file stored on the ReadyNAS duo in some directory. I've configured file tapes so that they do not extend 4.3G (so that copying and burning DVDs could be possible).

File tapes are grouped in several pools. Each pool represent a class of backup. My primary backup strategy is split in 3 backup grades:

A-Grade backups represent critical files that must not be lost at all. They represent the files that I really care and for which I want to have one year of backup. The retention policy is set to one year with one full backup per month. In short, it means I can restore the data I had anytime during the last year. Basically it contains my full desktop home directory as well as specific directories (private photos and so on).

B-Grade backups represent less critical files for which I may not need to restore an old version. The retention policy is 180 days. This backup grade is used for software or files that I download from Internet.

C-Grade backups have a 65-days retention policy and they are used for the system. Basically, re-installation of a server or desktop from scratch is always possible but keeping the configuration files in the backup is very helpful.

A Pool is defined for each of these grades:

# A-Grade pool: 1 year retention, 12 full backups (1 full bkp/month)
Pool {
  Name = A-Full-Pool
  Pool Type = Backup
  # Bacula can automatically recycle Volumes
  Recycle = yes 
  AutoPrune = yes # Prune expired volumes
  Volume Retention = 360 days
  Label Format=A-Full-
  # 100 volumes of 4G (expecting 8 volumes/full backup)
  Maximum Volumes=100
}

# B-Grade pool: 6 months retention, 3 full backups (1 full bkp/2 months)
Pool {
  Name = B-Full-Pool
  Pool Type = Backup
  Recycle = yes
  AutoPrune = yes # Prune expired volumes
  Volume Retention = 180 days
  Label Format=B-Full-
  Maximum Volumes=40
}

# C-Grade pool: 2 months retention, 2 full backups (1 full bkp/45 day)
Pool {
  Name = C-Full-Pool
  Pool Type = Backup
  Recycle = yes
  AutoPrune = yes
  Volume Retention = 65 days # 2 months
  Label Format=C-Full-
  # 5 volumes of 4G (expecting 2 volumes/full backup)
  Maximum Volumes=5
}

In addition to these pools, an incremental and a differential pool must be defined.

Bacula FileSet

The Bacula FileSet represent the file patterns that have to be backed up. I have defined one FileSet for each machine and backup grade combination. The filesets are compressed. Files matching some patterns are excluded (*.o, *.log, *.bak, *~). The FileSet below is for my desktop and for the A-Grade backup. Directories /home, /data and /photos will be taken into account in the backup.

# List of files to be backed up
FileSet {
  Name = "Zebulon A-Grade"     
  Include {                    
  Options {                  
      signature=SHA1           
      compression=GZIP         
      verify = pins1           
      onefs = yes              
      WildFile = "*~"          
      WildFile = "*.bak"       
      WildFile = "*.log"       
      WildFile = "*.o"         
      Exclude = yes            
    }
    File = /home
    File = /data
    File = /photos
  }
}

Other FileSets are defined for the same machine but for different files. They will be used for other backup grades.

Backup Schedule

The schedule defines when the backup has to be executed. Each backup grade has its own schedule. This allows to run B-Grade and C-Grade backups less frequently than A-Grade.

The A-Grade backups have a full backup schedule the first Saturday of each month. A full backup of the desktop takes arround 5 hours and uses 57Go (compressed). A differential backup takes arround 2 hours and uses 10Go (compressed). The incremental backup uses 2-4Go (compressed) and 5 to 15 minutes. (these numbers depend on what is being backed up). The schedule hours are defined according to this.

Schedule {
  Name = "Weekly-A-Grade"
  Run = Full 1st sat at 23:05
  Run = Differential 2nd-5th sun at 22:10
  Run = Incremental sun-fri at 22:10
}
Schedule {
  Name = "Weekly-B-Grade"
  Run = Full jan 1st sat at 23:05
  Run = Full mar 1st sat at 23:05
  Run = Full may 1st sat at 23:05
  Run = Full jul 1st sat at 23:05
  Run = Full sep 1st sat at 23:05
  Run = Full nov 1st sat at 23:05
  Run = Differential 2nd-5th sun at 22:10
  Run = Incremental wed at 22:10
}
Schedule {
  Name = "Weekly-C-Grade"
  Run = Full jan 1st sat at 2:05
  Run = Full mar 1st sat at 2:05
  Run = Full may 1st sat at 2:05
  Run = Full jul 1st sat at 2:05
  Run = Full sep 1st sat at 2:05
  Run = Full nov 1st sat at 2:05
  Run = Differential 2nd-5th sat at 2:10
  Run = Incremental sat at 2:10
}

Bacula Job

The Bacula Job describes what must be backed up (FileSets), when (Schedule) and where (Pools). There is one job definition for each fileset.

Job {
  Name = "Zebulon-A"
  Type = Backup
  Client = zebulon-fd
  FileSet = "Zebulon A-Grade"
  Schedule = "Weekly-A-Grade"
  Storage = File
  Messages = Standard
  Pool = Default
  Full Backup Pool = A-Full-Pool
  Incremental Backup Pool = Incr-Pool
  Differential Backup Pool = Diff-Pool
  Priority = 8
}

Some Statistics

After more than one year of backups, the total storage space used is now 599G, each tape is 4.3G. The storage space used by file pools is as follows:

A Grade Full Tapes  73  313Go
B Grade Full Tapes  28  120Go
C Grade Full Tapes   4   17Go
Differential tapes  22   94Go
Incremental tapes   13   55Go

The MySQL database has grown a lot and is quite large. The InnoDB database file only contains the bacula database and it has grown up to 2Go now. The filename table references 885527 records and the path table references 546784 rows.

Conclusion

Bacula is not easy to configure but when you do it right it provides a performant backup solution. To learn more about the configuration, have a look at Bacula Documentation. Installed on a ReadyNAS duo, it proved to be a robust solution for a backup of a small set of machines. You cannot expect big performances during backup or restore. The performance bottleneck is the MySQL database which runs on the ReadyNAS.

Restoring files from the backup is quite easy but this is another story...

To add a comment, you must be connected. Login to add a comment