Tag - Ubuntu

Ubuntu 14.04 LTS Ada build node installation

By Stephane Carrez 2 comments

This short article is a reminder to know the steps and actions in order to add a Ubuntu 14.04 build machine for Jenkins.

The steps are very similar to what I've described in Installation of FreeBSD for a jenkins build node. The virtual machine setup is the same (20G LVM partition, x86_64 CPU, 1Gb memory) and Ubuntu is installed from the ubuntu-14.04.1-server-i386.iso image.

Packages to build Ada software

The following commands install the GNAT Ada compiler with the libraries and packages to build various Ada libraries and projects including AWA.

# GNAT Compiler Installation
sudo apt-get install gnat-4.6 libaws2.10.2-dev libxmlada4.1-dev gprbuild gdb

# Packages to build Ada Utility Library
sudo apt-get install libcurl4-openssl-dev libssl-dev

# Packages to build Ada Database Objects
sudo apt-get install sqlite libsqlite3-dev
sudo apt-get install libmysqlclient-dev
sudo apt-get install mysql-server mysql-client

# Packages to build libaws2-2-10
sudo apt-get install libasis2010-dev libtemplates-parser11.6-dev
sudo apt-get install texinfo texlive-latex-base \
 texlive-generic-recommended texlive-fonts-recommended 

The libaws2-2-10 package was not functional for me (see bug 1348902) so I had to rebuild the Debian package from the sources and install it.

Packages to create Debian packages

When the Ada build node is intended to create Debian packages, the following steps are necessary:

sudo apt-get install dpkg-dev gnupg reprepro pbuilder debhelper quilt chrpath
sudo apt-get install autoconf automake autotools-dev

Packages and setup for Jenkins

Before adding the build node in Jenkins, the JRE must be installed and a jenkins user must exist:

sudo apt-get install openjdk-7-jre subversion
sudo useradd -m -s /bin/bash jenkins

Jenkins will use ssh to connect to the build node so it is good practice to setup a private/public key to allow the Jenkins master node to connect to the slave. On the master, copy the jenkins user's key:

ssh-copy-id target-host

The Ada build node is then added through the Jenkins UI in Manage Jenkins/Manage Nodes.

Jenkins jobs

The jenkins master is now building 7 projects automatically for Ubuntu 14.04: Trusty Ada Jobs

2 comments
To add a comment, you must be connected. Login to add a comment

New debian repository with Ada packages

By Stephane Carrez

I've created and setup a Debian repository to give access to several Debian packages for several Ada projects that I manage. The goal is to provide some easy and ready to use packages to simplify and help in the installation of various Ada libraries. The Debian repository includes the binary and development packages for Ada Utility Library, Ada EL, Ada Security, and Ada Server Faces.

Access to the repository

The repository packages are signed with PGP. To get the verification key and setup the apt-get tool, you should run the following command:

wget -O - http://apt.vacs.fr/apt.vacs.fr.gpg.key | sudo apt-key add -

Ubuntu 13.04 Raring

A first repository provides Debian packages targeted at Ubuntu 13.04 raring. They are built with the gnat-4.6 package and depend on libaws-2.10.2-4 and libxmlada4.1-dev. Add the following line to your /etc/apt/sources.list configuration:

deb http://apt.vacs.fr/ubuntu-raring raring main

Ubuntu 12.04 LTS Precise

A second repository contains the Debian packages for Ubuntu 12.04 precise. They are built with the gnat-4.6 package and depend on libaws-2.10.2-1 and libxmlada4.1-dev. Add the following line to your /etc/apt/sources.list configuration:

deb http://apt.vacs.fr/ubuntu-precise precise main

Installation

Once you've added the configuration line, you can install the packages:

sudo apt-get update
sudo apt-get install libada-asf1.0

For the curious, you may browse the repository here.

Disabling overlay scrollbar fixes the Thunderbird scrollbar position issue on Ubuntu 12.04

By Stephane Carrez

Since Ubuntu 12.04 upgrade, the Thunderbird scrollbar position were not visible any more. The scrollbar works but you have no visual feedback to know where you are in your long lists. Annoying!!! It turns out that this was a feature of the overlay scrollbar.

To restore the Thunderbird scrollbar, remove the following packages which are causing these troubles:

sudo apt-get remove overlay-scrollbar liboverlay-scrollbar-0.2-0 liboverlay-scrollbar3-0.2-0

Since I've disabled it, I realized many others have the issue. The How do I disable overlay scrollbars? Q&A gives other hints.

To add a comment, you must be connected. Login to add a comment

How to fix GNAT symbolic traceback crash on Ubuntu

By Stephane Carrez

When you use the GNAT symbolic traceback feature with gcc 4.4 on Ubuntu 10.04, a segmentation fault occurs. This article explains why and proposes a workaround until the problem is fixed in the distribution.

Symbolic Traceback

The GNU Ada Compiler provides a support package to dump the exception traceback with symbols.

with Ada.Exceptions;
  use Ada.Exceptions;
with GNAT.Traceback.Symbolic;
  use GNAT.Traceback.Symbolic;
with Ada.Text_IO; use Ada.Text_IO;
...
exception
  when E : others =>
    Put_Line ("Exception: " & Exception_Name (E));
    Put_Line (Symbolic_Traceback (E));

GNAT Symbolic Traceback crash

On Ubuntu 10.04 and probably on other Debian distributions, the symbolic traceback crashes in convert_addresses:

Program received signal SIGSEGV, Segmentation fault.
0xb7ab20a6 in convert_addresses () from /usr/lib/libgnat-4.4.so.1
(gdb) where
#0  0xb7ab20a6 in convert_addresses () from /usr/lib/libgnat-4.4.so.1
#1  0xb7ab1f2c in gnat__traceback__symbolic__symbolic_traceback () from /usr/lib/libgnat-4.4.so.1
#2  0xb7ab2054 in gnat__traceback__symbolic__symbolic_traceback__2 () from /usr/lib/libgnat-4.4.so.1

The problem is caused by a patch that was applied on GCC 4.4 sources and which introduces a bug in convert_addresses function. Basically, the function is missing a filename argument which causes other arguments to be incorrect.

void convert_addresses (const char* filename,
         void* addrs[], int n_addr,
         char* buf, int*  len)

Since convert_addresses is provided by the libgnat-4.4.so dynamic library, we can easily replace this function by linking our program with the correct implementation. Get the convert_addresses.c, compile it and add it when you link your program:

$ gcc -c convert_addresses.c
$ gnatmake -Pproject -largs convert_addresses.o
To add a comment, you must be connected. Login to add a comment

How to repair the USB connection problem on Android Samsung phones

By Stephane Carrez 31 comments

Several Samsung Galaxy phones seem to have USB connection problems. Sometimes the USB connection stops working and even rebooting the phone does not solve the problem. This article gives the symptoms and explains how to fix that.

Symptoms

It took me a long time to figure out and fix the problem (looking at many forums, trying many solutions that never worked). The problem was not a driver problem on the PC, nor some dust on the USB connector but really a software/configuration problem on the Android phone itself. The symptoms were the following:

  • The phone is correctly configured in Settings -> Applications -> Development to USB mode (no development)
  • Plugging and unplugging the USB cable does not produce any event on the phone (it is as though you plug the charger: no USB icon in the status bar)
  • Rebooting the phone has no effect. USB is still not recognized (the USB icon does not appear in the status bar).
  • Rebooting the phone with the USB cable connected to the PC is better. The USB icon appears but it never disappears after unplug and the connection still does not work.
  • Under Windows, Samsung Kies tries to connect but the connection process never ends. Windows sees the USB device.
  • Under Ubuntu, the dmesg command reports an error when the USB cable is plugged:
[62752.296029] usb 2-6: new high speed USB device using ehci_hcd and address 38
[62752.429897] usb 2-6: configuration #1 chosen from 1 choice
[62752.431442] hub 2-6:1.0: bad descriptor, ignoring hub
[62752.431450] hub: probe of 2-6:1.0 failed with error -5
[62752.431543] cdc_acm 2-6:1.0: ttyACM0: USB ACM device
[62752.432560] hub 2-6:1.2: bad descriptor, ignoring hub
[62752.432567] hub: probe of 2-6:1.2 failed with error -5
  • However the device is recognized. Indeed, you can see it with lsusb.
  • You can even use the lsusb -D command to look at the details of the device. BUT, this command reports an error (can't get hub descriptor: Broken pipe) within its output:
$ lsusb -D /dev/bus/usb/002/014 
Device: ID 04e8:6601 Samsung Electronics Co., Ltd Z100 Mobile Phone
Device Descriptor:
  bLength                18
  bDescriptorType         1
  bcdUSB               2.00
  bDeviceClass            9 Hub
  bDeviceSubClass         0 Unused
  bDeviceProtocol         0 Full speed (or root) hub
  bMaxPacketSize0        64
  idVendor           0x04e8 Samsung Electronics Co., Ltd
  idProduct          0x6601 Z100 Mobile Phone
 ...
can't get hub descriptor: Broken pipe
Device Qualifier (for other device speed):
  bLength                10
  bDescriptorType         6
  bcdUSB               2.00
 ...

Resolution

1. Unplug the USB cable

2. On the cell phone, dial the following number: *#7284#

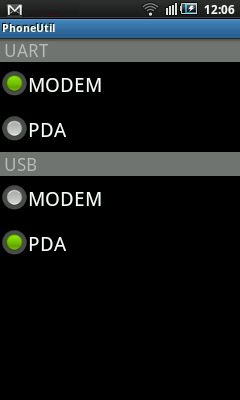
Once the last # is hit, the PhoneUtil application is launched. Choose USB -> Modem and then USB -> PDA mode.

The good mode should be PDA. Even if the mode is PDA, switch to Modem and then back to PDA.

3. Plug the USB cable.

Android PhoneUtil

Results

Once the cable is plugged, the USB device is recognized and the following messages are reported by dmesg:

[62941.921435] usb 2-6: new high speed USB device using ehci_hcd and address 39
[62942.054057] usb 2-6: configuration #2 chosen from 1 choice
[62942.086841] Initializing USB Mass Storage driver...
[62942.087128] scsi8 : SCSI emulation for USB Mass Storage devices
[62942.087310] usbcore: registered new interface driver usb-storage
[62942.087314] USB Mass Storage support registered.
[62942.087340] usb-storage: device found at 39
[62942.087344] usb-storage: waiting for device to settle before scanning
[62947.084396] usb-storage: device scan complete
[62947.085230] scsi 8:0:0:0: Direct-Access     SAMSUNG  GT-I5800 Card    0000 PQ: 0 ANSI: 2
[62947.088053] sd 8:0:0:0: Attached scsi generic sg4 type 0
[62947.096526] sd 8:0:0:0: [sdd] Attached SCSI removable disk

The lsusb -D command should now work without any problem (the can't get hub descriptor: Broken pipe error has gone).

Mounting the sdcard

Before mounting the sdcard, activate the USB mount connection on the phone by clicking on the USB icon in the status bar. Once this is done, dmesg will report more messages such as:

[66309.394438] sd 8:0:0:0: [sdd] 3862528 512-byte logical blocks: (1.97 GB/1.84 GiB)
[66309.394934] sd 8:0:0:0: [sdd] Assuming drive cache: write through
[66309.396297] sd 8:0:0:0: [sdd] Assuming drive cache: write through
[66309.396301]  sdd: sdd1

On Ubuntu, the sdcard is mounted with the following command:

$ sudo mount -t vfat /dev/sdd1 /mnt/storage

Android Device Development

For Android development, it is necessary to configure the udev (dynamic device management) service. It should be done before connecting the device. For this you have to create a rules file for udev. Create the following file /etc/udev/rules.d/51-android.rules and put:

SUBSYSTEM=="usb", ATTR{idVendor}=="0bb4", MODE="0666"
SUBSYSTEM=="usb", ATTR{idVendor}=="04e8", MODE="0666"

Make sure the file is readable:

# chmod a+r /etc/udev/rules.d/51-android.rules

Then, restart udev with

# service udev restart

References

Update 2017

Seven years after this initial post, people still have many problems with their USB connection. The solution presented here may not work anymore for some of you. You may checkout the following article that gives you more Android secret codes:

31 comments
To add a comment, you must be connected. Login to add a comment

Fixing the blank screen on Ubuntu 10.04 with an ATI Radeon HD5450 after a distribution upgrade

By Stephane Carrez

After upgrading my Ubuntu desktop with sudo apt-get upgrade, the X11 server was unable to start. Indeed, the AMD Catalyst driver was made unusable due to a missing symbol.

If this happens to you, check the file /var/log/kdm.log and if you see some error such as:

/usr/bin/X: symbol lookup error: /usr/lib/xorg/modules/drivers/fglrx_drv.so: undefined symbol: GlxInitVisuals2D
xinit /etc/gdm/failsafeXinit /etc/X11/xorg.conf.failsafe -- /usr/bin/X  -br -once -config /etc/X11/xorg.conf.failsafe -logfil
e /var/log/Xorg.failsafe.log

Then you have to re-install the proprietary AMD Catalyst driver (AMD just released a new driver yesterday).

After re-installation and a reboot, the dual screen configuration was running again. To configure the dual screen, it may be necessary to launch the AMD Catalyst Control Center with:

$ sudo amdcccle

Check out my xorg.conf file in case of problem.

To add a comment, you must be connected. Login to add a comment

Migration of KVM virtual machine image to a raw disk partition

By Stephane Carrez 4 comments

This article explains how to move a KVM virtual disk image file from a plain file to a raw hard disk partition. It then explains how to grow the virtual disk to use the full partition size.

Why using a disk partition for the virtual machine image

Using a plain file for a virtual machine disk image is the easiest configuration when you setup some virtual machine environment. It allows to start quickly for the setup and you can copy easily the virtual machine for a backup.

However, using a raw disk partition for the virtual machine provides better performance in general. The overhead of the guest file system is avoided as we have a direct access to the partition.

Copy the virtual machine image on the partition

To copy the virtual machine image on our partition, the easiest way is to use the dd command. This step assumes that the virtual machine is stopped. In the example, the partition is /dev/sdb10, this partition is bigger than the image file (if this is not the case, the image will be truncated).

$ sudo dd if=windows-xp.img of=/dev/sdb10 bs=1048576
5120+1 records in
5120+1 records out
5368709121 bytes (5.4 GB) copied, 331.51 s, 16.2 MB/s

Resize the virtual disk to the full partition size

The virtual disk partition should be changed to use the full disk space provided by our /dev/sdb10 partition. For this, we can use the fdisk command:

$ sudo fdisk /dev/sdb10
Command (m for help): p
Disk /dev/sdb10: 22.0 GB, 22019042304 bytes
...
     Device Boot      Start         End      Blocks   Id  System
/dev/sdb10p1   *           1         651     5229126    7  HPFS/NTFS

You can easily change the partition to use the full disk by deleting the partition and creating it again so that you get something such as:

Device Boot Start End Blocks Id System

/dev/sdb10p1 1 2676 21494938+ 7 HPFS/NTFS

Now, we have to resize the file system on the virtual disk partition /dev/sdb10p1. For this, we will use kpartx to get access to the disk partitions provided by our /dev/sdb10 partition:

$ sudo kpartx -v -a /dev/sdb10
add map sdb10p1 (251:1): 0 42989877 linear /dev/sdb10 63

After the partitions are mapped, we can look at the filesystem before resizing it with the ntfsresize command. We use this command to know the good size for resizing the file system.

$ sudo ntfsresize --info /dev/mapper/sdb10p1
ntfsresize v2.0.0 (libntfs 10:0:0)
Device name        : /dev/mapper/sdb10p1
NTFS volume version: 3.1
Cluster size       : 4096 bytes
Current volume size: 5354623488 bytes (5355 MB)
Current device size: <b>22010817024</b> bytes (22011 MB)
Checking filesystem consistency ...
100.00 percent completed
Accounting clusters ...
Space in use       : 4786 MB (89.4%)
Collecting resizing constraints ...
You might resize at 4785565696 bytes or 4786 MB (freeing 569 MB).
Please make a test run using both the -n and -s options before real resizing!

And we can do the resize by using the Current device size as the new file system size.

$ sudo ntfsresize -s 22010817024 /dev/mapper/sdb10p1
ntfsresize v2.0.0 (libntfs 10:0:0)
Device name        : /dev/mapper/sdb10p1
NTFS volume version: 3.1
Cluster size       : 4096 bytes
Current volume size: 5354623488 bytes (5355 MB)
Current device size: 22010817024 bytes (22011 MB)
New volume size    : 22010810880 bytes (22011 MB)
Checking filesystem consistency ...
100.00 percent completed
Accounting clusters ...
Space in use       : 4786 MB (89.4%)
Collecting resizing constraints ...
WARNING: Every sanity check passed and only the dangerous operations left.
Make sure that important data has been backed up! Power outage or computer
crash may result major data loss!
Are you sure you want to proceed (y/[n])? y
Schedule chkdsk for NTFS consistency check at Windows boot time ...
Resetting $LogFile ... (this might take a while)
Updating $BadClust file ...
Updating $Bitmap file ...
Updating Boot record ...
Syncing device ...
Successfully resized NTFS on device '/dev/mapper/sdb10p1'.

At this stage, our virtual machine disk image was moved from a plain file to a raw disk partition that it uses entirely.

Change the virtual machine definition

The virtual machine definition must now be changed to use our partition. You can do this by copying the XML definition to another file, thus creating a new virtual machine. This is the best thing to do so that you can still use the old configuration. If you do such copy, you have to change the uuid as well as the network mac address.

The disk type parameter must be changed to block and the dev parameter must now point to the device partition.

<domain type='kvm'>
  ...
    <disk type='block' device='disk'>
      <source dev='/dev/sdb10'/>
      <target dev='hda' bus='ide'/>
    </disk>
    ...
</domain>

After this, start the virtual machine!

The next step is to setup virtio to boost performance by using paravirtualization.

4 comments
To add a comment, you must be connected. Login to add a comment

IPSec Meshed Network Configuration on the Cloud

By Stephane Carrez 3 comments

Having to manage several servers on the Internet, I needed a way to create a secure internal network. Our servers are somewhere in the cloud and the solution that was adopted was to setup the GNU/Linux IPsec stack and an IP-IP tunnel between each server.

The following article describes how to setup the IPSec network and IP-IP tunnel. These steps were executed on 9 servers running Ubuntu 8.0.4 and one server running Ubuntu 10.0.4.

IPSec Configuration

We must install the following packages. The ipsec-tools package provides the utilities to setup and configure the IPSec stack and the racoon package provides the IKE server to manage the security associations.

$ sudo apt-get install ipsec-tools racoon tcpdump

Configure /etc/ipsec-tools.conf

The /etc/ipsec-tools.conf configuration file must define the policy entries (SPD) that describe which traffic has to be encrypted. We must define one SPD for each direction (two SPDs for each tunnel).

On the 90.1.1.1 server and to setup the IPSec tunnel to 201.10.10.10, the configuration looks like:

spdadd 90.1.1.1 201.10.10.10 any -P out ipsec
    esp/transport//require
    ah/transport//require;

spdadd 201.10.10.10  90.1.1.1 any -P in ipsec
    esp/transport//require
    ah/transport//require;

Configure Racoon

The Racoon configuration is defined in /etc/racoon/racoon.conf. Racoon can use several authentication mechanisms to verify that an IPSec association can be created with a given peer. To make the configuration simple and identical on every server, I have used RSA certificate. RSA certificates are very easy to manage and they provide a really good authentication.

remote anonymous {
   exchange_mode main,base;
   lifetime time 12 hour ;

   certificate_type plain_rsa "/etc/racoon/ipsec.key";
   peers_certfile plain_rsa "/etc/racoon/ipsec.pub";
   proposal {
      encryption_algorithm 3des;
      hash_algorithm sha256;
      authentication_method rsasig;
      dh_group modp1024;
  }
  generate_policy off;
}

sainfo anonymous {
  pfs_group modp1024;
  encryption_algorithm 3des;
  authentication_algorithm hmac_sha256;
  compression_algorithm deflate;
}

RSA Key Generation

The RSA public and private keys have to be generated using the plainrsa-gen tool.

plainrsa-gen -b 4096 -f /etc/racoon/ipsec.key

The public key part must be extracted from the generate key file and is identified by : PUB. You must extract that line and, remove the # start character and put the line in the ipsec.pub file.

# : PUB 0sXXXXXXX

Test

To verify the configuration, connect to one server and run a ping command to the second server. Connect to the second server and run a tcpdump to observe the packets coming from the other server:

$ sudo  tcpdump -n host 
tcpdump: verbose output suppressed, use -v or -vv for full protocol decode
listening on eth0, link-type EN10MB (Ethernet), capture size 96 bytes
17:34:47.377153 IP 90.1.1.1 > 201.10.10.10: AH(spi=0x0c57e022,seq=0xab9): ESP(spi=0x093415ec,seq=0xab9), length 100
17:34:47.377316 IP 201.10.10.10 >90.1.1.1: AH(spi=0x02ff6158,seq=0x9e3): ESP(spi=0x01375aa7,seq=0x9e3), length 100
17:34:48.379033 IP 90.1.1.1 > 201.10.10.10: AH(spi=0x0c57e022,seq=0xaba): ESP(spi=0x093415ec,seq=0xaba), length 100
17:34:48.379186 IP 201.10.10.10 > 90.1.1.1: AH(spi=0x02ff6158,seq=0x9e4): ESP(spi=0x01375aa7,seq=0x9e4), length 100

IP-IP Tunnels

Now that the servers can connect with each other using IPSec, we create a local network with private addresses that our internal services are going to use. Each server will have its public IP address and an internal address.

In other words, the IP-IP tunnel simulates a local network.

Setup the endpoint (90.1.1.1)

Create the tunnel interface. The Linux kernel must have the tun module installed. The following command creates a tunnel on the host 90.1.1.1 to the remote host 201.10.10.10.

ip tunnel add tun0 mode ipip \
    remote  201.10.10.10 local 90.1.1.1

Bind the tunnel interface to an IP address and configure the target IP (10.0.0.1 is our local address, 10.0.0.2 is the remote endpoint):

ifconfig tun0 10.0.0.1 netmask 255.255.255.0 \
     pointopoint 10.0.0.2 

Setup the client (201.10.10.10)

Create the tunnel interface. The Linux kernel must have the tun module installed. The following command creates a tunnel on the host 201.10.10.10 to the remote host 90.1.1.1.

ip tunnel add tun0 mode ipip \
    remote 90.1.1.1 local 201.10.10.10

Bind the tunnel interface to an IP address and configure the target IP (10.0.0.2 is our local address, 10.0.0.1 is the remote endpoint):

ifconfig tun0 10.0.0.2 netmask 255.255.255.0 \
    pointopoint 10.0.0.1

Test

Once the tunnel is created, you should get the tun0 interface and be able to ping the remote peers in the 10.0 network.

$ ping 10.0.0.1
PING 10.0.0.1 (10.0.0.1) 56(84) bytes of data.
64 bytes from 10.0.0.1: icmp_seq=1 ttl=64 time=0.707 ms
64 bytes from 10.0.0.1: icmp_seq=2 ttl=64 time=0.541 ms
64 bytes from 10.0.0.1: icmp_seq=3 ttl=64 time=0.630 ms

Firewall Configuration

With the IPsec stack and tunnels in place, it is still necessary to get a good firewall configuration to allow the IPsec traffic, block the non-IPsec traffic (in case of miss-configuration) and protect the server.

The IPSec traffic needs the IKE protocol (UDP port 500) to establish the security associations. The ah protocol will be used to authenticate the peers and the esp protocol to encrypt the payload. The IPsec traffic is controlled by the following rules (for the 201.10.10.10 server):

ip=90.1.1.1
iptables -A INPUT -p ah -i eth0 -s $ip -j ACCEPT
iptables -A INPUT -p esp -i eth0 -s $ip -j ACCEPT
iptables -A INPUT -p udp --sport 500 --dport 500 \
           -s $ip -j ACCEPT

iptables -A OUTPUT -p ah -o eth0 -d $ip -j ACCEPT
iptables -A OUTPUT -p esp -o eth0 -d $ip -j ACCEPT
iptables -A OUTPUT -p udp --sport 500 --dport 500 \
          -d $ip -j ACCEPT

The IP-IP tunnel brings another problem to the firewall configuration. Once extracted, the packets have to match the firewall rules. The iptables ipsec policy is used to accept the packets that are associated with an IPSec policy.

iptables -A INPUT -m policy --pol ipsec --dir in \
           -p 4 -j ACCEPT
iptables -A OUTPUT -m policy --pol ipsec --dir out \
           -p 4 -j ACCEPT

Troubles

Setting up the IPsec stack is not easy and does not work immediately. The Linux kernel does not bring any clue to spot the issue.

  1. Make sure there is no firewall that block the AH/ESP/IKE packets (disable any firewall if necessary)
  2. Make sure the SPD associations correspond to the peers (Check /etc/ipsec-tools.conf on both servers)
  3. Make sure Racoon daemon is running and that it does not report any error (Check /var/log/daemon.log)
3 comments
To add a comment, you must be connected. Login to add a comment

Upgrading Symfony projects to release 1.2

By Stephane Carrez 3 comments

Symfony is a PHP framework for building web application. I have two projects that use Symfony 1.1 and I wanted to upgrade to the new 1.2 release. This article lists some issues that I found and

Read more
3 comments
To add a comment, you must be connected. Login to add a comment

Install Epson Stylus PX700W printer with CUPS on Ubuntu 8.10

By Stephane Carrez 6 comments

Printing with an Epson PX700W printer from Ubuntu is a real challenge. No driver really work out of the box. After looking at many places, digging in dozen of forums and other answers sites, no real solution emerged. The article describes some steps to ma

Read more
6 comments
To add a comment, you must be connected. Login to add a comment

Server configuration management: track changes with subversion and be notified

By Stephane Carrez 1 comment

Tracking changes in a server configuration can be critical to understand problems, identify security breaches and repair a server. When several people are in charge of administering one or several servers, sharing the configuration changes is helpful to i

Read more
1 comment
To add a comment, you must be connected. Login to add a comment

Audit errors reported by linux kernel - why you must care

By Stephane Carrez

On Ubuntu 8.04 running a Linux 2.6.24 kernel, you may see some strange error logs reported by dmesg. First you will look at them, you'll wonder where they come from and you will soon ignore them. You should better fix the problem, in most cases they p

Read more
To add a comment, you must be connected. Login to add a comment

Restoring a complete system after a hard disk failure: bacula to the rescue!!!

By Stephane Carrez

Last day the main disk of by computer stopped to work. My Western Digital 150Gb raptor hard disk was no longer recognized by the system: it was simply dead after one year of work. The 10000 rpm di

Read more

Ubuntu Server and Ubuntu Desktop

By Stephane Carrez

After having used a RedHat distribution (1998-2002), a Mandrake distribution (2002-2005) and then a Debian distribution (2005-2006), I have switch my systems to an Ubuntu Server and Ubuntu Desktop distribution. Is it worth to switch, well may be. But, st

Read more