OpenAI has recently emerged, and its usage has increased in various areas. It was time to make it available to Ada programs using the Ada OpenAI library. The library provides an Ada API to make requests on the GPT-4, GPT-3, DALL.E and other AI models. The article does not assess the merits and drawbacks of using such technologies but instead focuses on the technical aspects of utilizing them within an Ada application.
Tag - Tutorial
Unlocking the Power of OpenAI in Ada programs
By Stephane Carrez2023-10-01 16:33:41
Read more
To add a comment, you must be connected.
Login to add a comment
IO stream composition and serialization with Ada Utility Library
By Stephane Carrez2022-03-05 22:48:00
IO stream composition is a powerful mechanism that has been provided by Java platform since its early days. It allows one or more transformations to be performed when reading or writing some content. Doing such transformation is transparent to the reader or the writer. For example, in the reading process, it allows to first decode the content in Base64, then decrypt the binary stream and then decompress that decrypted binary stream, all this in a transparent manner. The writing process would first compress what is written, then encrypt and encode in Base64. All these transformations are activated by connecting one stream object to another. In Ada, such IO stream composition is possible with Ada Utility Library.
To add a comment, you must be connected.
Login to add a comment
Easy reading and writing files with Ada Utility Library
By Stephane Carrez2020-08-09 20:49:00
Reading a file to get its content in a String is a simple operation that is often used in a project. Although this is not complex to do, sooner or later you often have to implement such operation.
To add a comment, you must be connected.
Login to add a comment
Ada Stemmer Library
By Stephane Carrez2020-05-16 07:55:00
The Ada Stemmer Library provides several stemming algorithms that can be used in natural language analysis to find the base or root form of a word.
To add a comment, you must be connected.
Login to add a comment
Using the Gnome and KDE Secret Service API in Ada
By Stephane Carrez2017-06-25 17:00:00
The Gnome and KDE desktop environments have designed a shared service API to allow applications to protect, retrieve and manage their secret data such as passwords and private keys. The Secret Service API defines the mechanisms and operations that can be used by applications to use the service.
To add a comment, you must be connected.
Login to add a comment
Using the Ada Wiki Engine
By Stephane Carrez2016-04-30 16:07:00
The Ada Wiki Engine is a small Ada library that parses a Wiki text in several Wiki syntax such as MediaWiki, Creole, Markdown and renders the result either in HTML, text or into another Wiki format.
To add a comment, you must be connected.
Login to add a comment
Using Ada LZMA to compress and decompress LZMA files
By Stephane Carrez2015-12-16 10:25:00
liblzma is a public domain general-purpose data compression library with a zlib-like API. liblzma is part of XZ Utils which includes a gzip-like command line tool named xz and some other tools. XZ Utils is developed and maintained by Lasse Collin. Major parts of liblzma are based on Igor Pavlov's public domain LZMA SDK. The Ada LZMA library provides an Ada05 thin binding for the liblzma library and it allows to use all the operations provided by the compression and decompression library.
To add a comment, you must be connected.
Login to add a comment
Review Web Application: Listing the reviews
By Stephane Carrez2014-07-20 14:00:00
After the creation and setup of the AWA project and the UML model design we have seen how to create a review for the review web application. In this new tutorial, you will understand the details to list the reviews that have been created and published.
To add a comment, you must be connected.
Login to add a comment
Review Web Application: Creating a review
By Stephane Carrez2014-06-14 18:29:00
In previous tutorials we have seen how to create and setup the project, design the UML model to generate the Ada implementation and the database schema. In this tutorial we will see how to design the page to create a review, implement the operations to create and populate the database with the new review.
To add a comment, you must be connected.
Login to add a comment
Ada Web Application: Building the UML model
By Stephane Carrez2014-05-18 12:42:00
In the Ada Web Application: Setting up the project we have seen how to create a new AWA project. In this second article, we will see how to design the UML model, generate the Ada code and create the database tables from our UML design.
Introduction
A Model driven engineering or MDE promotes the use of models to ease the development of software and systems. The Unified Modeling Language is used to modelize various parts of the software. UML is a graphical type modelling language and it has many diagrams but we are only going to use one of them: the Class Diagram.
The class diagram is probably the most powerful diagram to design, explain and share the data model of any application. It defines the most important data types used by an application with the relation they have with each other. In the class diagram, a class represents an abstraction that encapsulates data member attributes and operations. The class may have relations with others classes.
For the UML model, we are going to use ArgoUML that is a free modelization tool that works pretty well. For the ArgoUML setup, we will use two profiles:
- The Dynamo profile that describes the base data types for our UML model. These types are necessary for the code generator to work correctly.
- The AWA profile that describes the tables and modules provided by AWA. We will need it to get the user UML class definition.
These UML profiles are located in the /usr/share/dynamo/base/uml directory after Dynamo and AWA are installed. To configure ArgoUML, go in the Edit -> Settings menu and add the directory in the Default XMI directories list. Beware that you must restart ArgoUML to be able to use the new profiles.

Modelize the domain model in UML
The UML model must use a number of Dynamo artifacts for the code generation to work properly. The artifact describes some capabilities and behavior for the code generator to perform its work. Stereotype names are enclosed within markers. Dynamo uses the following stereotypes:
- The
DataModelstereotype must be applied on the package which contains the model to generate. This stereotype activates the code generation (other packages are not generated). - The
Tablestereotype must be applied to the class. It controls which database table and Ada type will be generated. - The
PKstereotype must be defined in at most one attribute of the class. This indicates the primary key for the database table. The attribute type must be an integer or a string. This is a limitation of the Ada code generator. - The
Versionstereotype must be applied on the attribute that is used for the optimistic locking implementation of the database layer.

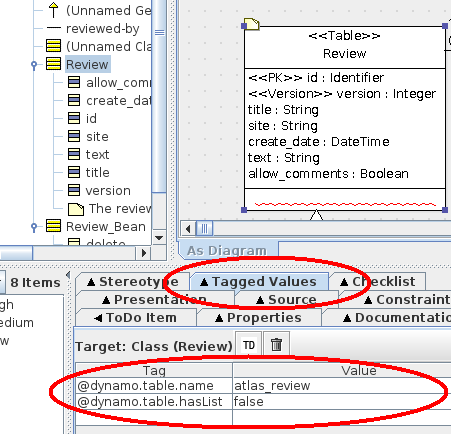
In our UML model, the Review table is assigned the Table stereotype so that an SQL table will be created as well as an Ada tagged type to represent our table. The id class attribute represents the primary key and thus has the PK stereotype. The version class attribute is the database column used by the optimistic locking implementation provided by ADO. This is why is has the Version stereotype. The title, site, create_date, text and allow_comments attributes represent the information we want to store in the database table. They are general purpose attributes and thus don't need any specific stereotype. For each attribute, the Dynamo code generator will generate a getter and a setter operation that can be used in the Ada code.
To tune the generation, several UML tagged values can be selected and added on the table or on a table attribute. By applying a stereotype to the class, several tagged values can be added. By selecting the Tagged Values tab in ArgoUML we can edit and setup new values. For the Review table, the dynamo.table.name tagged value defines the name of the SQL database table, in our case atlas_review.
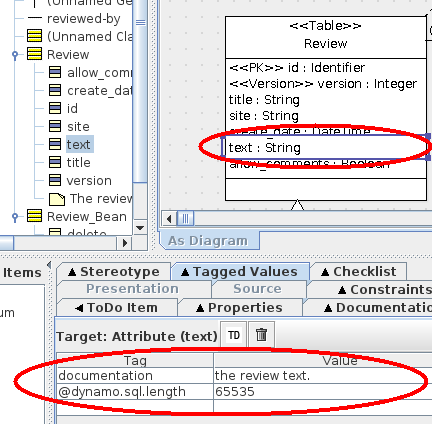
The text attribute in the Review table is a string that can hold some pretty long text. To control the length of the SQL column, we can set the dynamo.sql.length tagged value and tell what is that length.
Once the UML model is designed, it is saved in the project directory uml. Dynamo will be able to read the ArgoUML file format (.zargo extension) so there is no need to export the UML in XMI.
The Review application UML model
The final UML model of our review application is fairly simple. We just added a table and a bean declaration. To benefit from the user management in AWA, we can use the AWA::Users::Models::User class that is defined in the AWA UML model. The reviewed-by association will create an attribute reviewer in our class. The code generator will generate a Get_Reviewer and Set_Reviewer operation in the Ada code. The SQL table will contain an additional column reviewer that will hold the primary key of the reviewer.
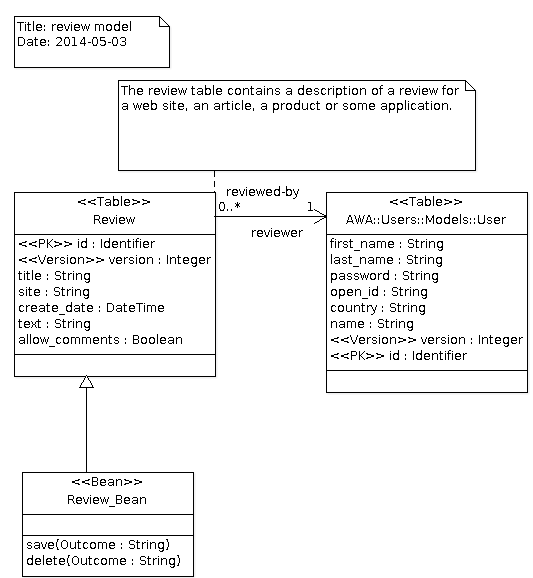
The Review_Bean class is an Ada Bean abstract class that will be generated by the code generator. The Bean stereotype activates the bean code generator and the generator will generate some code support that is necessary to turn the Review_Bean tagged record into an Ada Bean aware type. We will see in the next tutorial that we will only have to implement the save and delete operation that are described in this UML model.
Makefile setup
The Makefile.in that was generated by the Dynamo create-project command must be updated to setup a number of generation arguments for the UML to Ada code generator. Edit the Makefile.in to change:
DYNAMO_ARGS=--package Atlas.Reviews.Models db uml/atlas.zargo
The --package option tells Dynamo to generate only the model for the specified package. The db directory is the directory that will contain the SQL model files.
Once the Makefile.in is updated, the Makefile must be updated by using the following command:
./config.status
Or if you prefer, you may run again the configure script to re-configure the whole project.
We need the code!!
To run the generator, we can use the generate make target:
make generate
The Dynamo code generator reads the file uml/atlas.zargo and the UML model it contains and generates:
- the Ada package
Atlas.Reviews.Modelswhich contains the definition of theReviewtable. The model files are created in the directorysrc/modelswhich is separate from your Ada sources. - the SQL files to create the MySQL or SQLite database. Depending on the AWA modules which are used, the generated SQL files will contain additional tables that are used by the AWA modules. The SQL files are generated in the
db/mysqlanddb/sqlitedirectories.
Let's create the database
Until now we designed our application UML model, we have our Ada code generated, but we need a database with the tables for our application. We can do this by using the create-database command in Dynamo. This command needs several arguments:
- The directory that contains the SQL model files. In our case, this is
db. - The information to connect to the database, the database name, the user and its password. This information is passed in the form of a database connection string.
- The name of the database administration account to connect to the server and create the new database.
- The optional password for the database administration account.
If the MySQL server is running on your host and the admin account does not have any password, you can use the following command:
dynamo create-database db 'mysql://localhost/demo_atlas?user=demo&password=demo' root
The create-database creates the database (demo_atlas) with the tables that are necessary for the application. It also creates the demo user and give it the necessary MySQL grants to connect to the demo_atlas database.
The Review Web Application UML video
To help you in building the UML model and see who the whole process looks like in reality, I've created the following short video that details the above tutorial steps.
Conclusion
Thanks to ArgoUML and Dynamo, generating the Ada model and database tables becomes a simple and fun task. We have not written any line of code yet in this Review Web Application project, everything has been generated but we achieved a big progress:
- The Review Web Application server is built and can be launched,
- The database is initialized and contains our application data model schema.
The next tutorial will explain how to design the review form, implement the operations to create and populate the database with the new review.
To add a comment, you must be connected.
Login to add a comment
Ada Web Application: Setting up the project
By Stephane Carrez2014-05-10 15:48:00
Ada Web Application is a complete framework that allows to write web applications using the Ada language. Through a complete web application, the tutorial explains various aspects in setting up and building an application by using AWA. The tutorial is split in several articles and they are completed by short videos to show how easy the whole process is.
The tutorial assumes that you have already installed the following software on your computer:
- The GNAT Ada compiler,
- The Eclipse and GNATbench plugin,
- The ArgoUML modelization tool,
- The Ada Web Application framework and its associated dependencies (XML/Ada and AWS),
- The Dynamo code generator.
The review web application
The review web application allows users to write reviews about a product, a software or a web site and share them to the Internet community. The community can read the review, participate by adding comments and voting for the reviewed product or software.
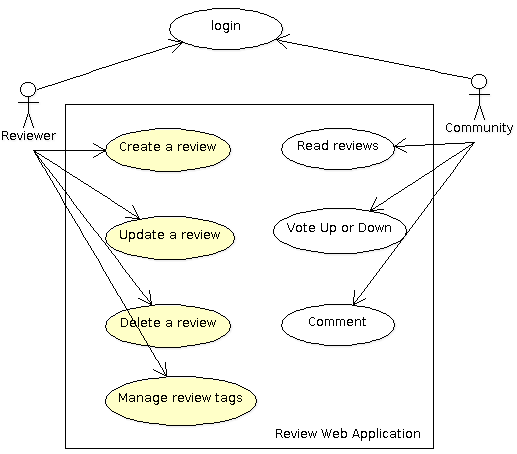
The AWA framework provides several modules that are ready to be used by our application. The login and user management is handled by the framework so this simplifies a lot the design of our application. We will see in the tutorial how we can leverage this to our review application.
Because users of our review web application have different roles, we will need permissions to make sure that only reviewers can modify a review. We will see how the AWA framework leverages the Ada Security library to enforce the permissions.
The AWA framework also integrates three other modules that we are going to use: the tags, the votes and the comments.
Since many building blocks are already provided by the Ada framework, we will be able to concentrate on our own review application module.
Project creation with Dynamo
The first step is to create the new project. Since creating a project from scratch is never easy we will use the Dynamo tool to build our initial review web application. Dynamo is a command line tool that provides several commands that help in several development tasks. For the project creation we will give:
- the output directory,
- the project name,
- the license to be used for the project,
- the project author's email address.
Choose the project name with care as it defines the name of the Ada root package that will be used by the project. For the license, you have the choice between GPL v2, GPL v3, MIT, BSD 3 clauses, Apache 2 or some proprietary license.
dynamo -o atlas create-project -l apache atlas Stephane.Carrez@gmail.com
(Of course, change the above email address by your own email address, this is an example!)
The Dynamo project creation will build the atlas directory and populate it with many files:
- A set of configure, Makefile, GNAT project files to build the project,
- A set of Ada files to build your Ada web application,
- A set of presentation files for the web application.
Once the project is created, we must configure it to find the Ada compiler, libraries and so on. This is done by the following commands:
cd atlas
./configure
At this step, you may even build your new project and start it. The make command will build the Ada files and create the bin/atlas-server executable that represents the web application.
make generate
make
bin/atlas-server
Once the server is started, you may point your browser to the following location: http://localhost:8080/atlas/index.html
Creating the review module with Dynamo
With the Ada Web Application framework, a web application is composed of modules where each module brings a specific functionality to the application. AWA provides a module for user management, another for comments, tags, votes, and many others. The application can decide to use these modules or not. The AWA module helps in defining the architecture and designing your web application.
For the review web application we will create our own module dedicated for the review management. The module will be an Ada child package of our root project package. From the Ada point of view, the final module will be composed of the following packages:
- A
Modulespackage represents the business logic of the module. It is provides operations to access and manage the data owned by the module. - A
Beanspackage holds the Ada beans that make the link between the presentation layer and business logic. - A
Modelspackage holds the data model to access the database content. This package is generated from UML and will be covered by a next tutorial.
To help in setting up a new AWA module, the Dynamo tool provides the add-module command. You just have to give the name of the module, which is the name of the Ada child package. Let's create our reviews module now:
dynamo add-module reviews
The command generates the new AWA module and modifies some existing files to register the new module in the application. You can build your web application at this stage even though the new module will not do anything yet for you.
Eclipse setup
Launch you Eclipse and create the new project by going to the File -> New -> Project menu. Choose the Ada Project and uncheck the Use default location checkbox so that you can browse your file system and select the atlas directory.
That's it. If everything went well, you should be able to see the projects files in the Eclipse project explorer.

The Review Web Application setup video
To help you in setting up and see how the whole process looks like in reality, I've created the following short video that details the above tutorial steps.
Conclusion
The whole process takes less than 3 minutes and gives you the basis to setup and build your new web application. The next tutorial will explain how to use the UML to design and generate the data model for our Review Web Application.
To add a comment, you must be connected.
Login to add a comment
Reading a program symbol table with Ada BFD
By Stephane Carrez2012-11-11 09:26:00
The GNU Binutils provides support for reading and writing program files in various formats such as ELF, COFF. This support is known as the BFD, the Binary File Descriptor library (or the Big F*cking Deal). This article illustrates how an Ada application can use the BFD library to have access to a program symbol table.
Declarations
The Ada BFD library provides a set of Ada bindings that give access to the BFD library. A binary file such as an object file, an executable or an archive is represented by the Bfd.Files.File_Type limited type. The symbol table is represented by the Bfd.Symbols.Symbol_Table limited type. These two types hold internal data used and managed by the BFD library.
with Bfd.Files;
with Bfd.Sections;
with Bfd.Symbols;
...
  File    : Bfd.Files.File_Type;
  Symbols : Bfd.Symbols.Symbol_Table;
Opening the BFD file
The Open procedure must be called to read the object or executable file whose path is given as argument. The File_Type parameter will be initialized to get access to the binary file information. The Check_Format function must then be called to let the BFD library gather the file format information and verify that it is an object file or an executable.
Bfd.Files.Open (File, Path, "");
if Bfd.Files.Check_Format (File, Bfd.Files.OBJECT) then
    ...
end if;
Loading the symbol table
The symbol table is loaded by using the Read_Symbols procedure.
Bfd.Symbols.Read_Symbols (File, Symbols);
The resources used by the symbol table will be freed when the symbol table instance is finalized.
Looking for a symbol
Once the symbol table is loaded, we can use the Get_Symbol function to find a symbol knowing its name. If the symbol is not found, a Null_Symbol is returned.
Sym  : Bfd.Symbols.Symbol := Bfd.Symbols.Get_Symbol (Symbols, "_main");
...
if Sym /= Bfd.Symbols.Null_Symbol then
   --  Symbol found
end if;
Each symbol has the following set of information:
- A name (it may not be unique),
- A set of flags that describe the symbol (global, local, weak, constructor, TLS, ...),
- A symbol value,
- A section to which the symbol belongs.
Sec   : constant Bfd.Sections.Section := Bfd.Symbols.Get_Section (Sym);
Flags : constant Bfd.Symbol_Flags     := Bfd.Symbols.Get_Flags (Sym);
Value : constant Bfd.Symbol_Value     := Bfd.Symbols.Get_Value (Sym);
Before interpreting and using the symbol value returned by Get_Value, you must look at the section to check for an undefined symbol. Indeed, undefined symbols being not yet resolved by the linker they have no value and no section. You can check that by using the Is_Undefined_Section function:
if Bfd.Sections.Is_Undefined_Section (Sec) then
   Ada.Text_IO.Put_Line ("undefined symbol");
end if;
When the symbol is defined, you must look at the flags and also the section information to know more about it.
if (Flags and Bfd.Symbols.BSF_GLOBAL) /= 0 then
  Ada.Text_IO.Put_Line ("global symbol in section "
               & Bfd.Sections.Get_Name (Sec)
               & " := " & Bfd.Symbol_Value'Image (Value));

elsif (Flags and Bfd.Symbols.BSF_LOCAL) /= 0 then
  Ada.Text_IO.Put_Line ("local symbol in section "
               & Bfd.Sections.Get_Name (Sec)
               & " := " & Bfd.Symbol_Value'Image (Value));

else
  Ada.Text_IO.Put_Line ("other symbol in section "
                                     & Bfd.Sections.Get_Name (Sec)
                                     & " := " & Bfd.Symbol_Value'Image (Value));
end if;
Conclusion and references
Reading an executable symbol table has been made fairly simple with the use of the Ada BFD library. Furthermore, the library allows to scan the sections, read their content and even use the BFD disassembler.
To add a comment, you must be connected.
Login to add a comment
Using the Facebook API
By Stephane Carrez2012-06-05 21:59:07
Through this article you will learn how to use the OAuth 2.0 framework to let an application access service provider APIs such as Facebook API, Google+ API and others. Althought this article uses Ada as programming language and Facebook as service provider, most part also applies to other programming languages and other service providers.
Overview
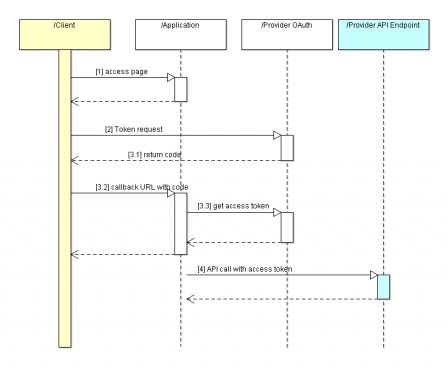
OAuth 2.0 is an open standard for authorization. It is used by service providers as authorization mechanism for most of their APIs. The authorization workflow is depicted below:
- [1], first a user goes in the application which displays a link to the OAuth API provider asking the user to grant access to his data for the application,
- [2], the user clicks on the authenticate link and grants access to the application,
- [3.1], The OAuth server redirects the user to a callback URL and it provides an application grant code,
- [3.3], The application ask the API provider to transform the grant code to an access token,
- [4] The application invokes the API provider with the access token
Registering the application
The first step is to register the application in the service provider (Facebook, Google+, Twitter, ...). This registration process is specific to the provider. From this registration, several elements will be defined:
- An application id is allocated, This identifier is public. This is the
client_idparameter in OAuth 2.0. - An application secret is defined. It must be kept private to the application. This is the
secretparameter in OAuth 2.0. - A callback URL or domain name is registered in the service provider. As far as I'm concerned, I had to register the domain
demo.vacs.fr.
Facebook OAuth
For the OAuth authorization process, we will use the Ada Security library and its Application type. We will extend that type to expose some EL variables and an EL method that will be used in the authorization process. The Ada Server Faces Application Example part 3: the action bean explains how to do that and many details will no be covered by this article.
type Facebook_Auth is new Security.OAuth.Clients.Application
     and Util.Beans.Basic.Readonly_Bean
     and Util.Beans.Methods.Method_Bean with private;

FB_Auth      : aliased Facebook.Facebook_Auth;
Before anything we have to initialize the Application type to setup the application identifier, the application secret, the provider URL and a callback URL.
FB_Auth.Set_Application_Identifier ("116337738505130");
FB_Auth.Set_Application_Secret ("xxxxxxxxxxx");
FB_Auth.Set_Application_Callback ("http://demo.vacs.fr/oauth/localhost:8080/demo/oauth_callback.html");
The first step in the OAuth process is to build the authorization page with the link that redirects the user to the service provider OAuth authorization process. The link must be created by using the Get_State and Get_Auth_Params functions provided by the Application type. The first one generates a secure unique key that will be returned back by the service provider. The second one builds a list of request parameters that are necessary for the service provider to identify the application and redirect the user back to the application once the authentication is done.
Id : constant String := "...";
State  : constant String := FB_Auth.Get_State (Id);
Params : constant String := FB_Auth.Get_Auth_Params (State, "read_stream");
For a Facebook authorization process, the URI would be created as follows:
URI : constant String := "https://www.facebook.com/dialog/oauth?" & Params;
For another service provider, the process is similar but the URL is different.
OAuth callback
When the user has granted access to his data, he will be redirected to the callback defined by the application. Most service providers will require that the OAuth callback be a public URL. If you want to run you application on localhost (which is the case when you are developing), you will need a second redirection. If you are using the Apache server, you can easily setup a rewrite rule:
RewriteRule ^/oauth/localhost:([0-9]+)/(.*) http://localhost:$1/$2 [L,R=302]
With the above rewrite rule, the callback given to the OAuth provider would look like:
http://demo.vacs.fr/oauth/localhost:8080/demo/oauth_callback.html
The OAuth provider will first redirect to the public internet site which will redirect again to localhost and port 8080.
Getting the OAuth access token
The next step is to receive the code parameter from the callback which grants the application access to the service provider API. For this, we will use an XHTML view file and a view action that will be executed when the page is displayed. When this happens, the EL method authenticate will be called on the facebook bean (ie, our FB_Auth instance).
<f:view xmlns:f="http://java.sun.com/jsf/core">
    <f:metadata>
        <f:viewAction action="#{facebook.authenticate}"/>
    </f:metadata>
</f:view>
The Authenticate procedure extracts from the request the OAuth state and code parameters. It verifies that the state parameter is a valid key that we submitted and it makes a HTTP POST request on the OAuth service provider to transform the code into an access token. This step is handled by the Ada Security library through the Request_Access_Token operation.
procedure Authenticate (From    : in out Facebook_Auth;
                        Outcome : in out Ada.Strings.Unbounded.Unbounded_String) is
   use type Security.OAuth.Clients.Access_Token_Access;

   F       : constant ASF.Contexts.Faces.Faces_Context_Access := ASF.Contexts.Faces.Current;
   State : constant String := F.Get_Parameter (Security.OAuth.State);
   Code  : constant String := F.Get_Parameter (Security.OAuth.Code);
   Session : ASF.Sessions.Session := F.Get_Session;
begin
   Log.Info ("Auth code {0} for state {1}", Code, State);
   if Session.Is_Valid then
      if From.Is_Valid_State (Session.Get_Id, State) then
         declare
            Acc : Security.OAuth.Clients.Access_Token_Access
              := From.Request_Access_Token (Code);
         begin
            if Acc /= null then
               Log.Info ("Access token is {0}", Acc.Get_Name);
               Session.Set_Attribute ("access_token",
                                      Util.Beans.Objects.To_Object (Acc.Get_Name));
            end if;
         end;
      end if;
   end if;
end Authenticate;
The access token must be saved in the user session or another per-user safe storage so that it can be retrieved later on. The access token can expire and if this happens a fresh new access token must be obtained.
Getting the Facebook friends
Until now we have dealt with the authorization process. Let's look at using the service provider API and see how the Ada Utility Library will help in this task.
Defining the Ada beans
To represent the API result, we will use an Ada bean object that can easily be used from a presentation page. For the Facebook friend, a name and an identifier are necessary:
type Friend_Info is new Util.Beans.Basic.Readonly_Bean with record
   Name : Util.Beans.Objects.Object;
   Id   : Util.Beans.Objects.Object;
end record;
type Friend_Info_Access is access all Friend_Info;
Having a bean type to represent each friend, we will get a list of friends by instantiating the Ada bean Lists package:
package Friend_List is new Util.Beans.Basic.Lists (Element_Type => Friend_Info);
Mapping JSON or XML to Ada
The Ada Utility library provides a mechanism that parses JSON or XML and map the result in Ada objects. To be able to read the Facebook friend definition, we have to define an enum and implement a Set_Member procedure. This procedure will be called by the JSON/XML parser when a given data field is recognized and extracted.
type Friend_Field_Type is (FIELD_NAME, FIELD_ID);

procedure Set_Member (Into : in out Friend_Info;
                      Field : in Friend_Field_Type;
                      Value : in Util.Beans.Objects.Object);
The Set_Member procedure is rather simple as it just populates the data record with the value.
procedure Set_Member (Into : in out Friend_Info;
                      Field : in Friend_Field_Type;
                      Value : in Util.Beans.Objects.Object) is
begin
   case Field is
      when FIELD_ID =>
         Into.Id := Value;

      when FIELD_NAME =>
         Into.Name := Value;

   end case;
end Set_Member;
The mapper is a package that defines and controls how to map the JSON/XML data fields into the Ada record by using the Set_Member operation. We just have to instantiate the package. The Record_Mapper generic package will map JSON/XML into the Ada record and the Vector_Mapper will map a list of JSON/XML elements following a given structure into an Ada vector.
package Friend_Mapper is
  new Util.Serialize.Mappers.Record_Mapper (Element_Type        => Friend_Info,
                                            Element_Type_Access => Friend_Info_Access,
                                            Fields              => Friend_Field_Type,
                                            Set_Member          => Set_Member);

package Friend_Vector_Mapper is
   new Util.Serialize.Mappers.Vector_Mapper (Vectors        => Friend_List.Vectors,
                                             Element_Mapper => Friend_Mapper);
Now we need to control how the JSON/XML fields are mapped to our Ada fields. For this we have to setup the mapping. The Facebook JSON structure is so simple that we can use the default mapping provided by the mapper. For this we use the Add_Default_Mapping procedure. We also have to tell what is the JSON mapping used by the friend vector mapper.
Friend_Map        : aliased Friend_Mapper.Mapper;
Friend_Vector_Map : aliased Friend_Vector_Mapper.Mapper;
...
   Friend_Map.Add_Default_Mapping;
   Friend_Vector_Map.Set_Mapping (Friend_Map'Access);
Creating the REST client
Now it would be nice if we could get an operation that invokes the service provider API through an HTTP GET operation and put the result in our Ada object. The Facebook friends API returns a list of friends which correspond to our Friend_List.Vectors. To get our operation, we just have to instantiate the Rest_Get_Vector operation with our vector mapper (the generic parameter is a package name).
procedure Get_Friends is
  new Util.Http.Rest.Rest_Get_Vector (Vector_Mapper => Friend_Vector_Mapper);
Calling the REST client
Invoking the service provider API is now as simple as calling a procedure. The URI must include the access token as parameter. The HTTP GET operation must be made using SSL/TLS since this is part of OAuth 2.0.
 List  : Friend_List.List_Bean;
...
   Get_Friends ("https://graph.facebook.com/me/friends?access_token="
                      & Token,
                      Friend_Vector_Map'Access,
                      "/data",
                      List.List'Access);
Now you are ready to use and access the user's data as easily as other information...
References
To add a comment, you must be connected.
Login to add a comment
Process creation in Java and Ada
By Stephane Carrez2012-03-16 22:18:07
When developping and integrating applications together it is often useful to launch an external program. By doing this, many integration and implementation details are simplified (this integration technic also avoids license issues for some open source software integration).
This article explains how to launch an external program in Java and Ada and be able to read the process output to get the result.
Java Process Creation
The process creation is managed by the ProcessBuilder Java class. An instance of this class holds the necessary information to create and launch a new process. This includes the command line and its arguments, the standard input and outputs, the environment variables and the working directory.
The process builder instance is created by specifying the command and its arguments. For this the constructor accepts a variable list of parameters of type String.
import java.lang.ProcessBuilder;
...
  final String cmd = "ls";
  final String arg1 = "-l";
  final ProcessBuilder pb = new ProcessBuilder(cmd, arg1);
When the process builder is initialized, we can invoke the start method to create a new process. Each process is then represented by an instance of the Process class. It is possible to invoke start serveral times and each call creates a new process. It is necessary to catch the IOException which can be raised if the process cannot be created.
import java.lang.Process;
...
  try {
    final Process p = pb.start();
    ...

  } catch (final IOException ex) {
    System.err.println("IO error: " + ex.getLocalizedMessage());
  }
The Process class gives access to the process output through an input stream represented by the InputStream class. With this input stream, we can read what the process writes on its output. We will use a BufferedReader class to read that output line by line.
import java.io.*;
...
  final InputStream is = p.getInputStream();
  final BufferedReader reader = new BufferedReader(new InputStreamReader(is));
By using the readLine method, we can read a new line after each call. Once the whole stream is read, we have to close it. Closing the BufferedReader will close the InputStream associated with it.
  String line;
  while ((line = reader.readLine()) != null) {
    System.out.println(line);
  }
  reader.close();
Last step is to wait for the process termination and get the exit status: we can use the waitFor method. Since this method can be interrupted, we have to catch the InterruptedException.
  try {
    ...
    final int exit = p.waitFor();
    if (exit != 0) {
      System.err.printf("Command exited with status %d\n", exit);
    }
  }  catch (final InterruptedException ex) {
    System.err.println("Launch was interrupted...");
  }
You can get the complete source from the file: Launch.java
Ada Process Creation
For the Ada example, we will create an application that invokes the nslookup utility to resolve a set of host names. The list of host names is provided to nslookup by writing on its standard input and the result is collected by reading the output.
We will use the Pipe_Stream to launch the process, write on its input and read its output at the same time. The process is launched by calling the Open procedure and specifying the pipe redirection modes: READ is for reading the process output, WRITE is for writing to its input and READ_WRITE is for both.
with Util.Processes;
with Util.Streams.Pipes;
...
   Pipe    : aliased Util.Streams.Pipes.Pipe_Stream;

   Pipe.Open ("nslookup", Util.Processes.READ_WRITE);
We can read or write on the pipe directly but using a Print_Stream to write the text and the Buffered_Stream to read the result simplifies the implementation. Both of them are connected to the pipe: the Print_Stream will use the pipe output stream and the Buffered_Stream will use the pipe input stream.
with Util.Streams.Buffered;
with Util.Streams.Texts;
...
   Buffer  : Util.Streams.Buffered.Buffered_Stream;
   Print   : Util.Streams.Texts.Print_Stream;
begin
      --  Write on the process input stream
   Buffer.Initialize (null, Pipe'Unchecked_Access, 1024);
   Print.Initialize (Pipe'Unchecked_Access);
Before reading the process output, we send the input data to be solved by the process. By closing the print stream, we also close the pipe output stream, thus closing the process standard input.
   Print.Write ("www.google.com" & ASCII.LF);
   Print.Write ("set type=NS" & ASCII.LF);
   Print.Write ("www.google.com" & ASCII.LF);
   Print.Write ("set type=MX" & ASCII.LF);
   Print.Write ("www.google.com" & ASCII.LF);
   Print.Close;
We can now read the program output by using the Read procedure and get the result in the Content string. The Close procedure is invoked on the pipe to close the pipe (input and output) and wait for the application termination.
   Content : Unbounded_String;

   --  Read the 'nslookup' output.
   Buffer.Read (Content);
   Pipe.Close;
Once the process has terminated, we can get the exit status by using the Get_Exit_Status function.
   Ada.Text_IO.Put_Line ("Exit status: "
       & Integer'Image (Pipe.Get_Exit_Status));
References
launch.adb
util-streams-pipes.ads
util-streams-buffered.ads
util-streams-texts.ads
To add a comment, you must be connected.
Login to add a comment
Ada perfect hash generation with gperfhash
By Stephane Carrez2012-01-17 21:53:00
A perfect hash function is a function that returns a distinct hash number for each keyword of a well defined set. gperf is famous and well known perfect hash generator used for C or C++ languages. Ada is not supported.
The gperfhash is a sample from the Ada Utility Library which generates an Ada package that implements such perfect hash operation. It is not as complete as gperf but allows to easily get a hash operation. The gperfhash tool uses the GNAT package GNAT.Perfect_Hash_Generators.
Pre requisite
Since the gperfhash tool is provided by the Ada Util samples, you must build these samples with the following command:
$ gnatmake -Psamples
Define a keyword file
First, create a file which contains one keyword on each line. For example, let's write a keywords.txt file which contains the following three keywords:
int
select
print
Generate the package
Run the gperfhash tool and give it the package name.
$ gperfhash -p Hashing keywords.txt
The package defines a Hash and an Is_Keyword function. The Hash function returns a hash number for each string passed as argument. The hash number will be different for each string that matches one of our keyword. You can give a string not in the keyword list, in that case the hash function will return a number that collides with a hash number of one or our keyword.
The Is_Keyword function allows to check whether a string is a keyword of the list. This is very useful when you just want to know whether a string is a reserved keyword in some application.
The package specification is the following:
--  Generated by gperfhash
package Hashing is

   function Hash (S : String) return Natural;

   --  Returns true if the string <b>S</b> is a keyword.
   function Is_Keyword (S : in String) return Boolean;

   type Name_Access is access constant String;
   type Keyword_Array is array (Natural range <>) of Name_Access;
   Keywords : constant Keyword_Array;
private
...
end Hashing;
How to use the hash
Using the perfect hash generator is simple:
with Hashing;

  if Hashing.Is_Keyword (S) then
     -- 'S' is one of our keyword
  else
     -- No, it's not a keyword
  end if;
To add a comment, you must be connected.
Login to add a comment
Aunit vs Ahven
By Stephane Carrez2011-11-27 22:32:00
AUnit and Ahven are two testing frameworks for Ada. Both of them are inspired from the well known JUnit Java framework. Having some issues with the Aunit testing framework, I wanted to explore the use of Ahven. This article gives some comparison elements between the two unit test frameworks. I do not pretend to list all the differences since both frameworks are excellent.
Writing a unit test is equally simple in both frameworks. They however have some differences that may not be visible at the first glance.
AUnit
AUnit is a unit test framework developped by Ed Falis and maintained by AdaCore. It is distributed under the GNU GPL License.
Some good points:
- AUnit has a good support to report where a test failed. Indeed, the
Assertprocedures will report the source file and line number where the assertion failed. - AUnit is also able to dump the exception stack trace in symbolic form. This is useful to find out quickly the source of a problem.
Some bad points:
- AUnit has several memory leaks which is quite annoying when you want to track memory links with
valgrind. - AUnit does not integrate easily with JUnit-based XML tools. In particular the XML file it creates can be invalid in some cases (special characters in names). More annoying is the fact that the XML format is not compatible with JUnit XML format.
Ahven
Ahven is another unit test framework developed by Tero Koskinen. It is distributed under the permissive ISC License.
Some good points:
- Ahven license is a better model for proprietary unit tests.
- Ahven generates XML result files which are compatible with Junit XML result files. Integration with automatic build tools such as Jenkins is easier.
- Ahven XML result files can integrate the test output (as in JUnit). This is useful to analyze a problem.
- Ahven has a test case timeout which is useful to detect and stop blocking tests.
Some bad points:
- The lack of precise information in message (source line, exception trace) can be annoying to find out why a test failed.
Don't choose and be prepared to use both with Ada Util!
The unit tests I've written were done for AUnit and I had arround 329 tests to migrate. To help the migration to Ahven, I wrote a Util.XUnit package which exposes a common interface on top of AUnit or Ahven. It turns out that this is easy and quite small. The package has one specific implementation (spec+body) for both frameworks. All the unit tests have to use it instead of the AUnit or Ahven packages.
The Aunit implementation (util-xunit.ads) defines several types which are also defined in the Ahven implementation.
package Util.XUnit is
...
   subtype Status is AUnit.Status;

   Success : constant Status := AUnit.Success;
   Failure : constant Status := AUnit.Failure;

   subtype Message_String is AUnit.Message_String;
   subtype Test_Suite is AUnit.Test_Suites.Test_Suite;
   subtype Access_Test_Suite is AUnit.Test_Suites.Access_Test_Suite;

   type Test_Case is abstract new AUnit.Simple_Test_Cases.Test_Case with null record;
   type Test is abstract new AUnit.Test_Fixtures.Test_Fixture with null record;
...
end Util.XUnit;
The XUnit implementation for Ahven is a little bit more complex because all my tests were using AUnit interface, I decided to keep almost that API and thus I had to simulate what is missing or is different.
Ahven implementation: util-xunit.ads
package Util.XUnit is
...
   type Status is (Success, Failure);

   subtype Message_String is String;
   subtype Test_Suite is Ahven.Framework.Test_Suite;
   type Access_Test_Suite is access all Test_Suite;

   type Test_Case is abstract new Ahven.Framework.Test_Case with null record;
   type Test is new Ahven.Framework.Test_Case with null record;
...
end Util.XUnit;
The choice of the unit test framework is done when the Ada Utility library is configured.
To add a comment, you must be connected.
Login to add a comment
Thread safe object pool to manage scarce resource in application servers
By Stephane Carrez2011-05-29 21:31:58
Problem Description
In application servers some resources are expensive and they must be shared. This is the case for a database connection, a frame buffer used for image processing, a connection to a remote server, and so on. The problem is to make available these scarce resources in such a way that:
- a resource is used by only one thread at a time,
- we can control the maximum number of resources used at a time,
- we have some flexibility to define such maximum when configuring the application server,
- and of course the final solution is thread safe.
The common pattern used in such situation is to use a thread-safe pool of objects. Objects are picked from the pool when needed and restored back to the pool when they are no longer used.
Java thread safe object pool
Let's see how to implement our object pool in Java. We will use a generic class declaration into which we define a fixed array of objects. The pool array is allocated by the constructor and we will assume it will never change (hence the final keyword).
public class Pool<T> {
  private final T[] objects;

  public Pool<T>(int size) {
     objects = new T[size];
  }
  ...
}
First, we need a getInstance method that picks an object from the pool. The method must be thread safe and it is protected by the synchronized keyword. It there is no object, it has to wait until an object is available. For this, the method invokes wait to sleep until another thread releases an object. To keep track of the number of available objects, we will use an available counter that is decremented each time an object is used.
  private int available = 0;
  private int waiting = 0;
  public synchronized T getInstance() {
     while (available == 0) {
        waiting++;
        wait();
        waiting--;
     }
     available--;
     return objects[available];
  }
To know when to wakeup a thread, we keep track of the number of waiters in the waiting counter. A loop is also necessary to make sure we have an available object after being wakeup. Indeed, there is no guarantee that after being notified, we have an available object to return. The call to wait will release the lock on the pool and puts the thread is wait mode.
Releasing the object is provided by release. The object is put backed in the pool array and the available counter incremented. If some threads are waiting, one of them is awaken by calling notify.
  public synchronized void release(T obj) {
     objects[available] = obj;
     available++;
     if (waiting) {
        notify();
     }
  }
When the application is started, the pool is initialized and some pre-defined objects are inserted.
   class Item { ... };
...
   Pool<Item> pool = new Pool<Item>(10);
   for (int i = 0; i < 10; i++) {
       pool.release(new Item());
   }
Ada thread safe pool
The Ada object pool will be defined in a generic package and we will use a protected type. The protected type will guarantee the thread safe behavior of the implementation by making sure that only one thread executes the procedures.
generic
   type Element_Type is private;
package Util.Concurrent.Pools is
     type Element_Array_Access is private;
     Null_Element_Array : constant Element_Array_Access;
  ...
private
    type Element_Array is array (Positive range <>) of Element_Type;
    type Element_Array_Access is access all Element_Array;
     Null_Element_Array : constant Element_Array_Access := null;
end Util.Concurrent.Pools;
The Ada protected type is simple with three procedures, we get the Get_Instance and Release as in the Java implementation. The Set_Size will take care of allocating the pool array (a job done by the Java pool constructor).
protected type Pool is
  entry Get_Instance (Item : out Element_Type);
  procedure Release (Item : in Element_Type);
  procedure Set_Size (Capacity : in Positive);
private
  Available     : Natural := 0;
  Elements      : Element_Array_Access := Null_Element_Array;
end Pool;
First, the Get_Instance procedure is defined as an entry so that we can define a condition to enter in it. Indeed, we need at least one object in the pool. Since we keep track of the number of available objects, we will use it as the entry condition. Thanks to this entry condition, the Ada implementation is a lot easier.
protected body Pool is
  entry Get_Instance (Item : out Element_Type) when Available > 0 is
  begin
     Item := Elements (Available);
     Available := Available - 1;
  end Get_Instance;
...
end Pool;
The Release operation is also easier as there is no need to wakeup any thread: the Ada runtime will do that for us.
protected body Pool is
   procedure Release (Item : in Element_Type) is
   begin
      Available := Available + 1;
      Elements (Available) := Item;
   end Release;
end Pool;
The pool is instantiated:
type Connection is ...;
package Connection_Pool is new Util.Concurrent.Pools (Connection);
And a pool object can be declared and initialized with some default object:
P : Connection_Pool.Pool;
C : Connection;
...
   P.Set_Size (Capacity => 10);
   for I in 1 .. 10 loop
         ...
         P.Release (C);
   end loop;
References
To add a comment, you must be connected.
Login to add a comment
Ada Server Faces Application Example part 4: the server
By Stephane Carrez2011-05-18 19:56:59 1 comment
In previous articles, we have seen that an Ada Server Faces application has a presentation layer composed of XHTML and CSS files. Similar to Java Server Faces, Ada Server Faces is a component-based model and we saw how to write the Ada beans used by the application. Later, we also learnt how an action bean can have a procedure executed when a button is pressed. Now, how can all these stuff fit together?
Well, to finish our cylinder volume example, we will see how to put everything together and get our running web application.
Application Initialization
An Ada Server Faces Application is represented by the Application type which holds all the information to process and dispatch requests. First, let's declare a variable that represents our application.
Note: for the purpose of this article, we will assume that every variable is declared at some package level scope. If those variables are declared in another scope, the Access attribute should be replaced by Unchecked_Access.
with ASF.Applications.Main;
...
   App : aliased ASF.Applications.Main.Application;
To initialize the application, we will also need some configuration properties and a factory object. The configuration properties are used to configure the various components used by ASF. The factory allows to customize some behavior of Ada Server Faces. For now, we will use the default factory.
with ASF.Applications;
...
   C        : ASF.Applications.Config;
   Factory : ASF.Applications.Main.Application_Factory;
The initialization requires to define some configuration properties. The VIEW_EXT property indicates the URI extension that are recognized by ASF to associate an XHTML file (the compute.html corresponds to the XHTML file compute.xhtml). The VIEW_DIR property defines the root directory where the XHTML files are stored.
C.Set (ASF.Applications.VIEW_EXT, ".html");
C.Set (ASF.Applications.VIEW_DIR, "samples/web");
C.Set ("web.dir", "samples/web");
App.Initialize (C, Factory);
Servlets
Ada Server Faces uses the Ada Servlet framework to receive and dispatch web requests. It provides a Faces_Servlet servlet which can be plugged in the servlet container. This servlet is the entry point for ASF to process incoming requests. We will also need a File_Servlet to process the static files. Note that these servlets are implemented using tagged records and you can easily override the entry points (Do_Get or Do_Post) to implement specific behaviors.
with ASF.Servlets.Faces;
with ASF.Servlets.Files;
...
   Faces : aliased ASF.Servlets.Faces.Faces_Servlet;
   Files   : aliased ASF.Servlets.Files.File_Servlet;
The servlet instances are registered in the application.
App.Add_Servlet (Name => "faces", Server => Faces'Access);
App.Add_Servlet (Name => "files", Server => Files'Access);
Once registered, we have to define a mapping that tells which URI path is mapped to the servlet.
App.Add_Mapping (Name => "faces", Pattern => "*.html");
App.Add_Mapping (Name => "files", Pattern => "*.css");
For the purpose of debugging, ASF provides a servlet filter that can be plugged in the request processing flow. The Dump_Filter will produce a dump of the request with the headers and parameters.
with ASF.Filters.Dump;
...
   Dump    : aliased ASF.Filters.Dump.Dump_Filter;
The filter instance is registered as follows:
App.Add_Filter (Name => "dump", Filter => Dump'Access);
And a mapping is defined to tell which URL will trigger the filter.
App.Add_Filter_Mapping (Name => "dump", Pattern => "*.html");
Application and Web Container
The application object that we created is similar to a Java Web Application packaged in a WAR file. It represents the application and it must be deployed in a Web Container. With Ada Server Faces this is almost the same, the application needs a Web container. By default, ASF provides a web container based on the excellent Ada Web Server implementation (other web containers could be provided in the future based on other web servers).
with ASF.Server.Web;
...
   WS : ASF.Server.Web.AWS_Container;
To register the application, we indicate the URI context path to which the application is associated. Several applications can be registered, each of them having a unique URI context path.
CONTEXT_PATH : constant String := "/volume";
...
WS.Register_Application (CONTEXT_PATH, App'Access);
Global Objects
An application can provide some global objects which will be available during the request processing through the EL expression. First, we will expose the application context path which allows to write links in the XHTML page that match the URI used for registering the application in the web container.
App.Set_Global ("contextPath", CONTEXT_PATH);
Below is an example of use of this contextPath variable:
<link media="screen" type="text/css" rel="stylesheet"
      href="#{contextPath}/themes/main.css"/>
Now, we will register the bean that we created for our application! This was explained in the Ada beans previous article.
with Volume;
...
   Bean    : aliased Volume.Compute_Bean;
...
   App.Set_Global ("compute", Util.Beans.Objects.To_Object (Bean'Access));
''Note: For the purpose of this example, the Compute_Bean is registered as a global object. This means that it will be shared by every request. A future article will explain how to get a session or a request bean as in Java Server Faces.''
Starting the server
Once the application is registered, we can start our server. Note that since Ada Web Server starts several threads that listen to requests, the Start procedure does not block and returns as soon as the server is started. The delay is necessary to let the server wait for requests during some time.
WS.Start;
delay 1000.0;
What happens to a request?
Let's say the server receives a HTTP GET request on /volume/compute.html. Here is what happens:
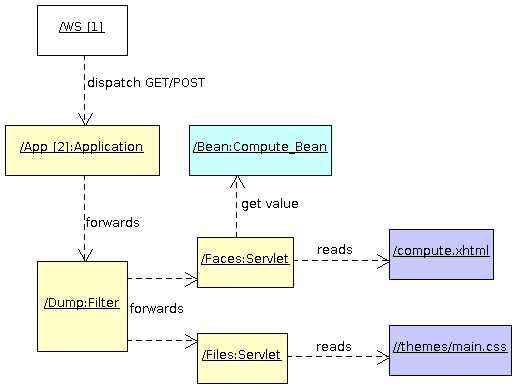
- Ada Web Server receives the HTTP request
- It identifies the application that matches
/volume(our context path) and gives the control to it - The application identifies the servlet that processes the remaining URI, which is
compute.html - It gives the control to the
Dump_Filterfilter and then to theFaces_Servletservlet, - The faces servlet identifies the XHTML facelet file and reads the
compute.xhtmlfile - ASF builds the component tree that describes the page and invokes the render response phase
- While rendering, the EL expressions such as
#{compute.radius}are evaluated and the value is obtained on ourBeanglobal instance. - The HTML content is produced as part of the rendering process and returned by AWS.
References
To add a comment, you must be connected.
Login to add a comment
Ada Server Faces Application Example part 3: the action bean
By Stephane Carrez2011-05-03 18:44:25
In a previous article, I presented in the cylinder volume example the Ada Server Faces presentation layer and then the Ada beans that link the presentation and ASF components together. This article explains how to implement an action bean and have a procedure executed when a button is pressed.
Command buttons and method expression
We have seen in the presentation layer how to create a form and have a submit button. This submit button can be associated with an action that will be executed when the button is pressed. The EL expression is the mechanism by which we create a binding between the XHTML presentation page and the component implemented in Java or Ada. A method expression is a simple EL expression that represents a bean and a method to invoke on that bean. This method expression represent our action.
A typical use is on the h:commandButton component where we can specify an action to invoke when the button is pressed. This is written as:
<h:commandButton id='run' value='Compute'
       action="#{compute.run}"/>
The method expression #{compute.run} indicates to execute the method run of the bean identified by compute.
Method Bean Declaration
Java implements method expressions by using reflection. It is able to look at the methods implemented by an object and then invoke one of these method with some parameters. Since we cannot do this in Ada, some developer help is necessary.
For this an Ada bean that implements an action must implement the Method_Bean interface. If we take the Compute_Bean type defined in the Ada beans previous article, we just have to extend that interface and implement the Get_Method_Bindings function. This function will indicate the methods which are available for an EL expression and somehow how they can be called.
with Util.Beans.Methods;
...
   type Compute_Bean is new Util.Beans.Basic.Bean
          and Util.Beans.Methods.Method_Bean with record
      Height : My_Float := -1.0;
      Radius : My_Float := -1.0;
      Volume: My_Float := -1.0;
   end record;
   --  This bean provides some methods that can be used in a Method_Expression
   overriding
   function Get_Method_Bindings (From : in Compute_Bean)
      return Util.Beans.Methods.Method_Binding_Array_Access;
Our Ada type can now define a method that can be invoked through a method expression. The action bean always receives the bean object as an in out first parameter and it must return the action outcome as an Unbounded_String also as in out.
 procedure Run (From    : in out Compute_Bean;
                         Outcome : in out Unbounded_String);
Implement the action
The implementation of our action is quite simple. The Radius and Height parameters submitted in the form have been set on the bean before the action is called. We can use them to compute the cylinder volume.
procedure Run (From    : in out Compute_Bean;
                        Outcome : in out Unbounded_String) is
      V : My_Float;
   begin
      V := (From.Radius * From.Radius);
      V := V * From.Height;
      From.Volume := V * 3.141;
      Outcome := To_Unbounded_String ("compute");
   end Run;
Define the action binding
To be able to call the Run procedure from an EL method expression, we have to create a binding object. This binding object will hold the method name as well as a small procedure stub that will somehow tie the method expression to the procedure. This step is easily done by instantiating the ASF.Events.Actions.Action_Method.Bind package.
with ASF.Events.Actions;
...
   package Run_Binding is
     new ASF.Events.Actions.Action_Method.Bind
        (Bean  => Compute_Bean,
         Method => Run,
         Name    => "run");
Register and expose the action bindings
The last step is to implement the Get_Method_Bindings function. Basically it has to return an array of method bindings which indicate the methods provided by the Ada bean.
Binding_Array : aliased constant Util.Beans.Methods.Method_Binding_Array
  := (Run_Binding.Proxy'Unchecked_Access, Run_Binding.Proxy'Unchecked_Access);

overriding
function Get_Method_Bindings (From : in Compute_Bean)
   return Util.Beans.Methods.Method_Binding_Array_Access is
begin
   return Binding_Array'Unchecked_Access;
end Get_Method_Bindings;
What happens now?
When the user presses the Compute button, the brower will submit the form and the ASF framework will do the following:
- It will check the validity of input parameters,
- It will save the input parameters on the
computebean, - It will execute the method expression
#{compute.run}:- It calls the
Get_Method_Bindingsfunction to get a list of valid method, - Having found the right binding, it calls the binding procedure
- The binding procedure invokes the
Runprocedure on the object.
- It calls the
Next time...
We have seen the presentation layer, how to implement the Ada bean and this article explained how to implement an action that is called when a button is pressed. The next article will explain how to initialize and build the web application.
To add a comment, you must be connected.
Login to add a comment
Ada Server Faces Application Example part 2: the Ada beans
By Stephane Carrez2011-04-10 21:25:17
The first article explained how to design the presentation page of an Ada Server Faces application. This article presents the Ada beans that are behind the presentation page.
Ada Bean and presentation layer
We have seen that the presentation page contains components that make references to Ada beans with an EL expression.
<h:inputText id='height' size='10' value='#{compute.height}'>
        <f:converter converterId="float" />
</h:inputText>
The #{compute.height} is an EL expression that refers to the height property of the Ada bean identified as compute.
Writing the Cylinder Ada Bean
The Ada bean is a instance of an Ada tagged record that must implement a getter and a setter operation. These operations are invoked through an EL expression. Basically the getter is called when the view is rendered and the setter is called when the form is submitted and validated. The Bean interface defines the two operations that must be implemented by the Ada type:
with Util.Beans.Basic;
with Util.Beans.Objects;
...
   type Compute_Bean is new Util.Beans.Basic.Bean with record
      Height : My_Float := -1.0;
      Radius : My_Float := -1.0;
   end record;

   --  Get the value identified by the name.
   overriding
   function Get_Value (From : Compute_Bean;
                       Name : String) return Util.Beans.Objects.Object;

   --  Set the value identified by the name.
   overriding
   procedure Set_Value (From  : in out Compute_Bean;
                        Name  : in String;
                        Value : in Util.Beans.Objects.Object);
The getter and setter will identify the property to get or set through a name. The value is represented by an Object type that can hold several data types (boolean, integer, floats, strings, dates, ...). The getter looks for the name and returns the corresponding value in an Object record. Several To_Object functions helps in creating the result value.
   function Get_Value (From : Compute_Bean;
                       Name : String) return Util.Beans.Objects.Object is
   begin
      if Name = "radius" and From.Radius >= 0.0 then
         return Util.Beans.Objects.To_Object (Float (From.Radius));

      elsif Name = "height" and From.Height >= 0.0 then
         return Util.Beans.Objects.To_Object (Float (From.Height));

      else
         return Util.Beans.Objects.Null_Object;
      end if;
   end Get_Value;
The setter is similar.
   procedure Set_Value (From  : in out Compute_Bean;
                        Name  : in String;
                        Value : in Util.Beans.Objects.Object) is
   begin
      if Name = "radius" then
         From.Radius := My_Float (Util.Beans.Objects.To_Float (Value));
      elsif Name = "height" then
         From.Height := My_Float (Util.Beans.Objects.To_Float (Value));
      end if;
   end Set_Value;
Register the Cylinder Ada Bean
The next step is to register the cylinder bean and associate it with the compute name. There are several ways to do that but for the purpose of this example, there will be a global instance of the bean. That instance must be aliased so that we can use the Access attributes.
Bean : aliased Compute_Bean;
The Ada bean is registered on the application object by using the Set_Global procedure. This creates a global binding between a name and an Object record. In our case, the object will hold a reference to the Ada bean.
App : aliased ASF.Applications.Main.Application;
...
   App.Set_Global ("compute", Util.Beans.Objects.To_Object (Bean'Unchecked_Access));
Next Time...
We have seen how the presentation layer and the Ada beans are associated. The next article will present the action binding that links the form submission action to an Ada bean method.
To add a comment, you must be connected.
Login to add a comment
- Page 1
- Next
Tags
- Facelet
- NetBSD
- framework
- Mysql
- generator
- firefox
- application
- interview
- ReadyNAS
- Security
- binutils
- ELF
- JSF
- Java
- bacula
- Tutorial
- Apache
- COFF
- collaboration
- planning
- project
- upgrade
- AWA
- C
- EL
- J2EE
- UML
- php
- symfony
- Ethernet
- Ada
- FreeBSD
- Go
- KVM
- MDE
- Proxy
- STM32
- Servlet
- backup
- lvm
- multiprocessing
- web
- Bean
- Jenkins
- release
- OAuth
- ProjectBar
- REST
- Rewrite
- Sqlite
- Storage
- USB
- Ubuntu
- bison
- cache
- crash
- Linux
- gcc
- performance
- lex