Postfix configuration on multihoming server

By Stephane Carrez

This article explains how to configure a Postfix server on a multihomed host and control the IP address used by the server.

What is multihoming

Multihoming is the configuration of multiple interfaces or IP addresses for the same host. It is used in failover environment to increase the reliability of the network.

A hosting service such as OVH provides a simple failover mechanism which allows to bind a failover IP address to several hosts and let the OVH routers redirect the traffic to one of these servers. The network traffic is re-routed from one host to the other in a transparent manner. In that case, each server has its own IP address but also another shared IP address (the IP failover).

To add an IP address to an existing interface, you can edit the /etc/network/interfaces file and add the following definition:

auto eth0:0
iface eth0:0 inet static
        address 87.98.146.48
        netmask 255.255.255.255

After restarting the network interface, you can check that the new interface is up:

$ ifconfig eth0:0
eth0:0    Link encap:Ethernet  HWaddr 00:1c:c0:9c:18:03  
          inet addr:87.98.146.48  Bcast:87.255.255.255  Mask:255.255.255.255
          UP BROADCAST RUNNING MULTICAST  MTU:1500  Metric:1
          Interrupt:27 Base address:0x8000 

Note that you can try this on a local network first.

What's the issue?

With multihomed interfaces, you don't control easily which IP address is used by the server. By default, postfix will listen on each network interface and when it will connect to other mail servers, it will use the IP address of the first interface.

Listening on several IP addresses is not a problem but on the other hand you could expose a mail server on an IP address which is not supposed to exist (ie, there could be no MX record to a DNS entry with that IP address).

Connection to other mail servers is more problematic as you expose to other servers an IP address that you may not want. Configured correctly, these servers could refuse the connection if the reverse is not set correctly.

Postfix Listening Addresses

To restrict the listening addresses, we have to tell postfix to listen to the IP addresses we want. Basically, the server has to listen to the IP failover. This is done by specifying the IP address to listen in the /etc/postfix/master.cf configuration file:

87.98.146.48:smtp   inet  n -   -   -  - smtpd
127.0.0.1:smtp       inet  n -  -  -  - smtpd

Postfix Connection Address

The next step is to make sure the mail server will use the good IP address when connecting to other mail servers. This is done by using the smtp_bind_address parameter in the /etc/postfix/main.cf configuration file:

smtp_bind_address=87.98.146.48

After changing the master.cf and main.cf configuration files, you have to restart the postfix daemon:

$ sudo /etc/init.d/postfix restart

References

Postfix Configuration

To add a comment, you must be connected. Login to add a comment

Migration of KVM virtual machine image to a raw disk partition

By Stephane Carrez 4 comments

This article explains how to move a KVM virtual disk image file from a plain file to a raw hard disk partition. It then explains how to grow the virtual disk to use the full partition size.

Why using a disk partition for the virtual machine image

Using a plain file for a virtual machine disk image is the easiest configuration when you setup some virtual machine environment. It allows to start quickly for the setup and you can copy easily the virtual machine for a backup.

However, using a raw disk partition for the virtual machine provides better performance in general. The overhead of the guest file system is avoided as we have a direct access to the partition.

Copy the virtual machine image on the partition

To copy the virtual machine image on our partition, the easiest way is to use the dd command. This step assumes that the virtual machine is stopped. In the example, the partition is /dev/sdb10, this partition is bigger than the image file (if this is not the case, the image will be truncated).

$ sudo dd if=windows-xp.img of=/dev/sdb10 bs=1048576
5120+1 records in
5120+1 records out
5368709121 bytes (5.4 GB) copied, 331.51 s, 16.2 MB/s

Resize the virtual disk to the full partition size

The virtual disk partition should be changed to use the full disk space provided by our /dev/sdb10 partition. For this, we can use the fdisk command:

$ sudo fdisk /dev/sdb10
Command (m for help): p
Disk /dev/sdb10: 22.0 GB, 22019042304 bytes
...
     Device Boot      Start         End      Blocks   Id  System
/dev/sdb10p1   *           1         651     5229126    7  HPFS/NTFS

You can easily change the partition to use the full disk by deleting the partition and creating it again so that you get something such as:

Device Boot Start End Blocks Id System

/dev/sdb10p1 1 2676 21494938+ 7 HPFS/NTFS

Now, we have to resize the file system on the virtual disk partition /dev/sdb10p1. For this, we will use kpartx to get access to the disk partitions provided by our /dev/sdb10 partition:

$ sudo kpartx -v -a /dev/sdb10
add map sdb10p1 (251:1): 0 42989877 linear /dev/sdb10 63

After the partitions are mapped, we can look at the filesystem before resizing it with the ntfsresize command. We use this command to know the good size for resizing the file system.

$ sudo ntfsresize --info /dev/mapper/sdb10p1
ntfsresize v2.0.0 (libntfs 10:0:0)
Device name        : /dev/mapper/sdb10p1
NTFS volume version: 3.1
Cluster size       : 4096 bytes
Current volume size: 5354623488 bytes (5355 MB)
Current device size: <b>22010817024</b> bytes (22011 MB)
Checking filesystem consistency ...
100.00 percent completed
Accounting clusters ...
Space in use       : 4786 MB (89.4%)
Collecting resizing constraints ...
You might resize at 4785565696 bytes or 4786 MB (freeing 569 MB).
Please make a test run using both the -n and -s options before real resizing!

And we can do the resize by using the Current device size as the new file system size.

$ sudo ntfsresize -s 22010817024 /dev/mapper/sdb10p1
ntfsresize v2.0.0 (libntfs 10:0:0)
Device name        : /dev/mapper/sdb10p1
NTFS volume version: 3.1
Cluster size       : 4096 bytes
Current volume size: 5354623488 bytes (5355 MB)
Current device size: 22010817024 bytes (22011 MB)
New volume size    : 22010810880 bytes (22011 MB)
Checking filesystem consistency ...
100.00 percent completed
Accounting clusters ...
Space in use       : 4786 MB (89.4%)
Collecting resizing constraints ...
WARNING: Every sanity check passed and only the dangerous operations left.
Make sure that important data has been backed up! Power outage or computer
crash may result major data loss!
Are you sure you want to proceed (y/[n])? y
Schedule chkdsk for NTFS consistency check at Windows boot time ...
Resetting $LogFile ... (this might take a while)
Updating $BadClust file ...
Updating $Bitmap file ...
Updating Boot record ...
Syncing device ...
Successfully resized NTFS on device '/dev/mapper/sdb10p1'.

At this stage, our virtual machine disk image was moved from a plain file to a raw disk partition that it uses entirely.

Change the virtual machine definition

The virtual machine definition must now be changed to use our partition. You can do this by copying the XML definition to another file, thus creating a new virtual machine. This is the best thing to do so that you can still use the old configuration. If you do such copy, you have to change the uuid as well as the network mac address.

The disk type parameter must be changed to block and the dev parameter must now point to the device partition.

<domain type='kvm'>
  ...
    <disk type='block' device='disk'>
      <source dev='/dev/sdb10'/>
      <target dev='hda' bus='ide'/>
    </disk>
    ...
</domain>

After this, start the virtual machine!

The next step is to setup virtio to boost performance by using paravirtualization.

4 comments
To add a comment, you must be connected. Login to add a comment

Connecting to a ReadyNAS duo using SSH

By Stephane Carrez 6 comments

Having acquired a ReadyNAS duo for my new backup system, I wanted to explore the system that runs on it and see if I could run more services on it. There is nothing terrific in this article as many people have already done

Read more
6 comments
To add a comment, you must be connected. Login to add a comment

Installing Mysql server on a ReadyNAS duo

By Stephane Carrez 11 comments

Being able to connect to my ReadyNAS duo using SSH (See Connecting to a ReadyNAS duo using SSH), the next step for setting up a Bacula backup solution was to setup a MySQL server. Th

Read more
11 comments
To add a comment, you must be connected. Login to add a comment

Tuning mysql configuration for the ReadyNAS duo

By Stephane Carrez

After installing mysql server on a Ready NAS duo, it is necessary to tune the configuration to make the server run well on this small hardware. This article describes a possible configuration for tuning the Mysql server.

Mysql Temporary directory

Mysql uses files in the temporary directory to store temporary tables. Depending on your database and your queries, temporary tables could be quite large. To avoid problems in the /tmp partition becomming full, the best thing is to use a directory in the /c partition

tmpdir          = /c/backup/tmp

Make sure the directory exist before starting mysql:

# mkdir -p /c/backup/tmp

Mysql storage engine

After playing with a reasonably big database and the MyISAM storage engine, it turns out that the mysql server was sometimes crashing and barking at some corrupted myisam tables. I switched to the InnoDB storage engine, which is better for transactions anyway. Since the readynas does not have a lot of memory I've used the following configuration:

default_storage_engine = InnoDB
thread_cache_size = 0

innodb_buffer_pool_size = 6M
innodb_thread_concurrency = 1

Other mysql settings

To reduce the resources used by the mysql server to the minimum, I changed the max number of connections to a small number.

key_buffer_size = 16k
sort_buffer_size = 100k
max_connection = 10

I'm using these settings for almost 6 months now; my bacula database now contains a table with 5 milions of rows. Of course you can't expect big performance but the mysql server is stable.

To add a comment, you must be connected. Login to add a comment

Simple mysql database backup for ReadyNAS duo

By Stephane Carrez

With a mysql database running on the ReadyNAS duo, it becomes necessary to put in place a backup of the database. This article describes a simple method to automatically backup the mysql database.

All actions described here require that you are connected to your ReadyNAS duo using SSH (See Connecting to a ReadyNAS duo using SSH)

ssh -l root pollux
root@pollux's password:
Last login: Sat Jan  9 12:59:54 2010 from zebulon
Last login: Sat Jan  9 15:34:19 2010 from zebulon on pts/0
Linux nas-D2-24-F2 2.6.17.8ReadyNAS #1 Fri Mar 20 04:41:57 PDT 2009 padre unknown
nas-D2-24-F2:~#

Backup Directory Preparation

First, we have to create a protected directory which will contain the backups:

nas-D2-24-F2:# mkdir /c/backup-mysql
nas-D2-24-F2:# chmod 700 /c/backup-mysql

Mysql Backup User

To make the backup, a special user should be used to restrict the rights to the minimum. Basically, the user only needs the SELECT and LOCK TABLES privileges. The database access should be protected with a password.

nas-D2-24-F2:# mysql -u root -p
Enter password:
Welcome to the MySQL monitor.  Commands end with ; or \g.
Your MySQL connection id is 7
Server version: 5.0.32-Debian_7etch5~bpo31+1-log Debian etch distribution

Type 'help;' or '\h' for help. Type '\c' to clear the buffer.

mysql> GRANT SELECT, LOCK TABLES ON *.* 
    TO 'dump'@'localhost' identified by 'XXXX';
Query OK, 0 rows affected (0.04 sec)

mysql> flush privileges;
Query OK, 0 rows affected (0.02 sec)

mysql> quit
Bye

Backup Script

To make the backup, you have to write a simple script which uses mysqldump and compresses the backup file. This script is written in /etc/cron.daily directory. This way it will be run automatically by the cron daemon each day at 6:25am (Look at the /etc/crontab file).

Create the file /etc/cron.daily/backup-mysql and put the content below.

#!/bin/sh
D=`date --iso-8601`
BKP_DIR=/c/backup-mysql
DB_LIST="bacula mysql"
for i in $DB_LIST; do
  mysqldump --user=dump \
    --password=XXXX \
    --opt $i | gzip -c > $BKP_DIR/$i-$D.sql.gz &&
  chmod 400 $BKP_DIR/$i-$D.sql.gz
done

You have to update the DB_LIST variable to put the name of the databases you want to backup.

You have to protect the script because it contains the password of our backup user. The script must be executable.

nas-D2-24-F2:# cd /etc/cron.daily
nas-D2-24-F2:# chmod 700 backup-mysql

Test the script

It's necessary to execute the script at least once to make sure it backups what you need.

nas-D2-24-F2:# ./backup-mysql

Then, check that a backup file was created correctly.

Test the database backup or restore

You may also test that the backup SQL file is correct by creating a fake database and importing the file. You can do this with the following command:

nas-D2-24-F2:# mysql -u root -p 
create database test-backup;

Then decompress the backup file and import it with the mysql command into new test (or the real database if you want to restore it).

nas-D2-24-F2:# gzip -c \
-d /c/backup-mysql/xxx.sql.gz | \
mysql --force --force -u root -p test-backup

Conclusion

This process remains simple and is very easy to put in place. However, it has some limitations because it is best to make sure no applications are writing to the database when the backup is running. Otherwise you may backup data which are not consistent.

To add a comment, you must be connected. Login to add a comment

One year of data backup with Bacula on a ReadyNAS duo

By Stephane Carrez

After one year of daily and weekly backup using Bacula on a ReadyNAS duo, I wanted to share information about this success story. Bacula is a network backup solution that I installed on a ReadyNAS duo. Bacula allows to make full as well as incremental backups of remote machines. It uses a MySQL database that also runs on the ReadyNAS (see Installing Mysql server on a ReadyNAS duo) and it stores backups on media such as tapes, CDs, DVDs or files.

Backup Architecture

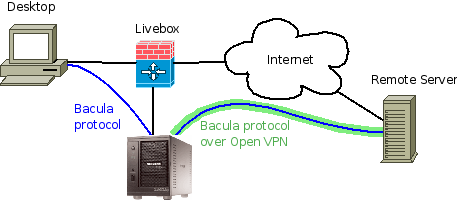
The Bacula software is running directly on the ReadyNAS duo. The backup is configured to backup my desktop which is accessed locally, and it also backups a server running on the Internet (vacs.fr). Since the ReadyNAS is behind my Livebox, it connects to the Internet server by using a secure tunnel with OpenVPN.

Network Backup with Bacula on a ReadyNAS

The ReadyNAS duo has two 1To hard disks configured as RAID 1 mirrors.

  • Bacula director and bacular storage daemons are running on the ReadyNAS duo
  • Bacula client is running on each machine that must be backed up (Desktop and Remote Server).

Backup Pools and Strategy

Bacula is configured to create backups on file tapes. Each tape is a flat file stored on the ReadyNAS duo in some directory. I've configured file tapes so that they do not extend 4.3G (so that copying and burning DVDs could be possible).

File tapes are grouped in several pools. Each pool represent a class of backup. My primary backup strategy is split in 3 backup grades:

A-Grade backups represent critical files that must not be lost at all. They represent the files that I really care and for which I want to have one year of backup. The retention policy is set to one year with one full backup per month. In short, it means I can restore the data I had anytime during the last year. Basically it contains my full desktop home directory as well as specific directories (private photos and so on).

B-Grade backups represent less critical files for which I may not need to restore an old version. The retention policy is 180 days. This backup grade is used for software or files that I download from Internet.

C-Grade backups have a 65-days retention policy and they are used for the system. Basically, re-installation of a server or desktop from scratch is always possible but keeping the configuration files in the backup is very helpful.

A Pool is defined for each of these grades:

# A-Grade pool: 1 year retention, 12 full backups (1 full bkp/month)
Pool {
  Name = A-Full-Pool
  Pool Type = Backup
  # Bacula can automatically recycle Volumes
  Recycle = yes 
  AutoPrune = yes # Prune expired volumes
  Volume Retention = 360 days
  Label Format=A-Full-
  # 100 volumes of 4G (expecting 8 volumes/full backup)
  Maximum Volumes=100
}

# B-Grade pool: 6 months retention, 3 full backups (1 full bkp/2 months)
Pool {
  Name = B-Full-Pool
  Pool Type = Backup
  Recycle = yes
  AutoPrune = yes # Prune expired volumes
  Volume Retention = 180 days
  Label Format=B-Full-
  Maximum Volumes=40
}

# C-Grade pool: 2 months retention, 2 full backups (1 full bkp/45 day)
Pool {
  Name = C-Full-Pool
  Pool Type = Backup
  Recycle = yes
  AutoPrune = yes
  Volume Retention = 65 days # 2 months
  Label Format=C-Full-
  # 5 volumes of 4G (expecting 2 volumes/full backup)
  Maximum Volumes=5
}

In addition to these pools, an incremental and a differential pool must be defined.

Bacula FileSet

The Bacula FileSet represent the file patterns that have to be backed up. I have defined one FileSet for each machine and backup grade combination. The filesets are compressed. Files matching some patterns are excluded (*.o, *.log, *.bak, *~). The FileSet below is for my desktop and for the A-Grade backup. Directories /home, /data and /photos will be taken into account in the backup.

# List of files to be backed up
FileSet {
  Name = "Zebulon A-Grade"     
  Include {                    
  Options {                  
      signature=SHA1           
      compression=GZIP         
      verify = pins1           
      onefs = yes              
      WildFile = "*~"          
      WildFile = "*.bak"       
      WildFile = "*.log"       
      WildFile = "*.o"         
      Exclude = yes            
    }
    File = /home
    File = /data
    File = /photos
  }
}

Other FileSets are defined for the same machine but for different files. They will be used for other backup grades.

Backup Schedule

The schedule defines when the backup has to be executed. Each backup grade has its own schedule. This allows to run B-Grade and C-Grade backups less frequently than A-Grade.

The A-Grade backups have a full backup schedule the first Saturday of each month. A full backup of the desktop takes arround 5 hours and uses 57Go (compressed). A differential backup takes arround 2 hours and uses 10Go (compressed). The incremental backup uses 2-4Go (compressed) and 5 to 15 minutes. (these numbers depend on what is being backed up). The schedule hours are defined according to this.

Schedule {
  Name = "Weekly-A-Grade"
  Run = Full 1st sat at 23:05
  Run = Differential 2nd-5th sun at 22:10
  Run = Incremental sun-fri at 22:10
}
Schedule {
  Name = "Weekly-B-Grade"
  Run = Full jan 1st sat at 23:05
  Run = Full mar 1st sat at 23:05
  Run = Full may 1st sat at 23:05
  Run = Full jul 1st sat at 23:05
  Run = Full sep 1st sat at 23:05
  Run = Full nov 1st sat at 23:05
  Run = Differential 2nd-5th sun at 22:10
  Run = Incremental wed at 22:10
}
Schedule {
  Name = "Weekly-C-Grade"
  Run = Full jan 1st sat at 2:05
  Run = Full mar 1st sat at 2:05
  Run = Full may 1st sat at 2:05
  Run = Full jul 1st sat at 2:05
  Run = Full sep 1st sat at 2:05
  Run = Full nov 1st sat at 2:05
  Run = Differential 2nd-5th sat at 2:10
  Run = Incremental sat at 2:10
}

Bacula Job

The Bacula Job describes what must be backed up (FileSets), when (Schedule) and where (Pools). There is one job definition for each fileset.

Job {
  Name = "Zebulon-A"
  Type = Backup
  Client = zebulon-fd
  FileSet = "Zebulon A-Grade"
  Schedule = "Weekly-A-Grade"
  Storage = File
  Messages = Standard
  Pool = Default
  Full Backup Pool = A-Full-Pool
  Incremental Backup Pool = Incr-Pool
  Differential Backup Pool = Diff-Pool
  Priority = 8
}

Some Statistics

After more than one year of backups, the total storage space used is now 599G, each tape is 4.3G. The storage space used by file pools is as follows:

A Grade Full Tapes  73  313Go
B Grade Full Tapes  28  120Go
C Grade Full Tapes   4   17Go
Differential tapes  22   94Go
Incremental tapes   13   55Go

The MySQL database has grown a lot and is quite large. The InnoDB database file only contains the bacula database and it has grown up to 2Go now. The filename table references 885527 records and the path table references 546784 rows.

Conclusion

Bacula is not easy to configure but when you do it right it provides a performant backup solution. To learn more about the configuration, have a look at Bacula Documentation. Installed on a ReadyNAS duo, it proved to be a robust solution for a backup of a small set of machines. You cannot expect big performances during backup or restore. The performance bottleneck is the MySQL database which runs on the ReadyNAS.

Restoring files from the backup is quite easy but this is another story...

To add a comment, you must be connected. Login to add a comment

Fault tolerant EJB interceptor: a solution to optimistic locking errors and other transient faults

By Stephane Carrez 4 comments

Fault tolerance is often necessary in application servers. The J2EE standard defines an interceptor mechanism that can be used to implement the first steps for fault tolerance. The pattern that I present in this article is the solution that I have implemented for the Planzone service and which is used with success for the last two years.

Identify the Fault to recover

The first step is to identify the faults that can be recovered from others. Our application is using MySQL and Hibernate and we have identified the following three transient faults (or recoverable faults).

StaleObjectStateException (Optimistic Locking)

Optimistic locking is a pattern used to optimize database transactions. Instead of locking the database tables and rows when values are updated, we allow other transactions to access these values. Concurrent writes are possible and they must be detected. For this optimistic locking uses a version counter, or a timestamp or state comparison to detect concurrent writes.

When a concurrent write is detected, Hibernate raises a StaleObjectStateException exception. When such exception occurs, the state of objects associated with the current hibernate session is unknown. (See Transactions and Concurrency)

As far as Planzone is concerned, we get 3 exceptions per 10000 calls.

LockAcquisitionException (Database deadlocks)

On the database side, the server can detect deadlock situation and report an error. When a deadlock is detected between two clients, the server generates an error for one client and the second one can proceed. When such error is reported, the client can retry the operation (See InnoDB Lock Modes).

As far as Planzone is concerned, we get 1 or 2 exceptions per 10000 calls.

JDBCConnectionException (Connection failure)

Sometimes the connection to the database is lost either because the database server crashed or because it was restarted due to maintenance reasons. Server crash is rare but it can occur. For Planzone, we had 3 crashes during the last 2 years (one crash every 240 day). During the same period we also had to stop and restart the server 2 times for a server upgrade.

Restarting the call after a database connection failure is a little bit more complex. It is necessary to sleep some time before retrying.

EJB Interceptor

To create our fault tolerant mechanism we use an EJB interceptor which is invoked for each EJB method call. For this the interceptor defines a method marked with the @ArroundInvoke annotation. Its role is to catch the transient faults and retry the call. The example below retries the call at most 10 times.

The EJB interceptor method receives an InvocationContext parameter which allows to have access to the target object, parameters and method to invoke. The proceed method allows to transfer the control to the next interceptor and to the EJB method. The real implementation is a little bit more complex due to logging but the overall idea is here.

class RetryInterceptor {
 @AroundInvoke
  public Object retry(InvocationContext context) throws Exception {
    for (int retry = 0; ; retry++) {
      try {
        return context.proceed();

      } catch (LockAcquisitionException ex) {
         if (retry > 10) {
          throw ex;
        }

     } catch (StaleObjectStateException ex) {
       if (retry > 10) {
        throw ex;
      }

    } catch (final JDBCConnectionException ex) {
      if (retry > 10) {
        throw ex;
      }
      Thread.sleep(500L + retry * 1000L);
   }
 }
}

EJB Interface

For the purpose of this article, the EJB interface is declared as follows. Our choice was to define an ILocal and an IRemote interface to allow the creation of local and remote services.

public interface Service {
    ...
    @Local
    interface ILocal extends Service {
    }

    @Remote
    interface IRemote extends Service {
    }
}

EJB Declaration

The interceptor is associated with the EJB implementation class by using the @Interceptors annotation. The same interceptor class can be associated with several EJBs.

@Stateless(name = "Service")
@Interceptors(RetryInterceptor.class)
public class ServiceBean
  implements Service.ILocal, Service.IRemote {
  ...
}

Testing

To test the solution, I recommend to write a unit test. The unit test I wrote did the following:

  • A first thread executes the EJB method call.
  • The transaction commit operation is overriden by the unit test.
  • When the commit is called, a second thread is activated to simulate the concurrent call before committing.
  • The second thread performs the EJB method call in such a way that it will trigger the StaleObjectStateException when the first thread resumes
  • When the second thread finished, the first thread can perform the real commit and the StaleObjectStateException is raised by Hibernate because the object was modified.
  • The interceptor catches the exception and retries the call which will succeed.

The full design of such test is outside of the scope of this article. It is also specific to each application.

4 comments
To add a comment, you must be connected. Login to add a comment

Solving Linux system lock up when intensive disk I/O are performed

By Stephane Carrez

When a system lock up occurs, we often blame applications but when you look carefully you may see that despite your multi-core CPU, your applications are sleeping! No cpu activity! So what happens then? Check the I/Os, it could be the root cause!

With Ubuntu 10.04, my desktop computer was freezing when the ReadyNAS Bacula backup was running. Indeed, the Bacula daemon was performing intensive disk operations (on a fast SATA hard disk). The situation was such that it was impossible to use the system, the interface was freezing for a several seconds then working for a few seconds and freezing again.

Linux I/O Scheduler

The I/O scheduler is responsible for organizing the order in which disk operations are performed. Some algorithms allow to minimize the disk head moves, other algorithms tend to anticipate read operations,

When I/O operations are not scheduled correctly, an interactive application such as a desktop or a browser can be blocked until its I/O operations are scheduled and executed (the situation can be even worse for those applications that use the O_SYNC writing mode).

By default, the Linux kernel is configured to use the Completely Fair Queuing scheduler. This I/O scheduler does not provide any time guarantee but it gives in general good performances. Linux provides other I/O schedulers such as the Noop scheduler, the Anticipatory scheduler and the Deadline scheduler.

The deadline scheduler puts an execution time limit to requests to make sure the I/O operation is executed before an expiration time. Typically, a read operation will wait at most 500 ms. This is the I/O scheduler we need to avoid the system lock up.

Checking the I/O Scheduler

To check which I/O scheduler you are using, you can use the following command:

$ cat /sys/block/sda/queue/scheduler
noop anticipatory deadline [cfq]

where sda is the device name of your hard disk (or try hda).

The result indicates the list of supported I/O scheduler as well as the current scheduler used (here the Completely Fair Queuing).

Changing the I/O Scheduler

To change the scheduler, you can echo the desired scheduler name to activate it (you must be root):

# echo deadline >  /sys/block/sda/queue/scheduler

To make sure the I/O scheduler is configured after each system startup, you can add the following lines to your /etc/rc.local startup script:

test -f /sys/block/sda/queue/scheduler &&
  echo deadline > /sys/block/sda/queue/scheduler

test -f /sys/block/sdb/queue/scheduler &&
   echo deadline > /sys/block/sdb/queue/scheduler

test -f /sys/block/hda/queue/scheduler &&
   echo deadline > /sys/block/hda/queue/scheduler

You may have to change the sda and sdb into hda and hdb if you have an IDE hard disk.

Conclusion

After changing the I/O scheduler to use the Deadline scheduler, the desktop was not freezing any more when backups are running.

To add a comment, you must be connected. Login to add a comment

Experience feedback in running a SaaS application

By Stephane Carrez

When you go in production for a new service you may not know whether your application will have the necessary performance to serve your customer. Can the application support the growth? Should you deploy early? What do you do if you reach performance pr

Read more
To add a comment, you must be connected. Login to add a comment

IPSec Meshed Network Configuration on the Cloud

By Stephane Carrez 3 comments

Having to manage several servers on the Internet, I needed a way to create a secure internal network. Our servers are somewhere in the cloud and the solution that was adopted was to setup the GNU/Linux IPsec stack and an IP-IP tunnel between each server.

The following article describes how to setup the IPSec network and IP-IP tunnel. These steps were executed on 9 servers running Ubuntu 8.0.4 and one server running Ubuntu 10.0.4.

IPSec Configuration

We must install the following packages. The ipsec-tools package provides the utilities to setup and configure the IPSec stack and the racoon package provides the IKE server to manage the security associations.

$ sudo apt-get install ipsec-tools racoon tcpdump

Configure /etc/ipsec-tools.conf

The /etc/ipsec-tools.conf configuration file must define the policy entries (SPD) that describe which traffic has to be encrypted. We must define one SPD for each direction (two SPDs for each tunnel).

On the 90.1.1.1 server and to setup the IPSec tunnel to 201.10.10.10, the configuration looks like:

spdadd 90.1.1.1 201.10.10.10 any -P out ipsec
    esp/transport//require
    ah/transport//require;

spdadd 201.10.10.10  90.1.1.1 any -P in ipsec
    esp/transport//require
    ah/transport//require;

Configure Racoon

The Racoon configuration is defined in /etc/racoon/racoon.conf. Racoon can use several authentication mechanisms to verify that an IPSec association can be created with a given peer. To make the configuration simple and identical on every server, I have used RSA certificate. RSA certificates are very easy to manage and they provide a really good authentication.

remote anonymous {
   exchange_mode main,base;
   lifetime time 12 hour ;

   certificate_type plain_rsa "/etc/racoon/ipsec.key";
   peers_certfile plain_rsa "/etc/racoon/ipsec.pub";
   proposal {
      encryption_algorithm 3des;
      hash_algorithm sha256;
      authentication_method rsasig;
      dh_group modp1024;
  }
  generate_policy off;
}

sainfo anonymous {
  pfs_group modp1024;
  encryption_algorithm 3des;
  authentication_algorithm hmac_sha256;
  compression_algorithm deflate;
}

RSA Key Generation

The RSA public and private keys have to be generated using the plainrsa-gen tool.

plainrsa-gen -b 4096 -f /etc/racoon/ipsec.key

The public key part must be extracted from the generate key file and is identified by : PUB. You must extract that line and, remove the # start character and put the line in the ipsec.pub file.

# : PUB 0sXXXXXXX

Test

To verify the configuration, connect to one server and run a ping command to the second server. Connect to the second server and run a tcpdump to observe the packets coming from the other server:

$ sudo  tcpdump -n host 
tcpdump: verbose output suppressed, use -v or -vv for full protocol decode
listening on eth0, link-type EN10MB (Ethernet), capture size 96 bytes
17:34:47.377153 IP 90.1.1.1 > 201.10.10.10: AH(spi=0x0c57e022,seq=0xab9): ESP(spi=0x093415ec,seq=0xab9), length 100
17:34:47.377316 IP 201.10.10.10 >90.1.1.1: AH(spi=0x02ff6158,seq=0x9e3): ESP(spi=0x01375aa7,seq=0x9e3), length 100
17:34:48.379033 IP 90.1.1.1 > 201.10.10.10: AH(spi=0x0c57e022,seq=0xaba): ESP(spi=0x093415ec,seq=0xaba), length 100
17:34:48.379186 IP 201.10.10.10 > 90.1.1.1: AH(spi=0x02ff6158,seq=0x9e4): ESP(spi=0x01375aa7,seq=0x9e4), length 100

IP-IP Tunnels

Now that the servers can connect with each other using IPSec, we create a local network with private addresses that our internal services are going to use. Each server will have its public IP address and an internal address.

In other words, the IP-IP tunnel simulates a local network.

Setup the endpoint (90.1.1.1)

Create the tunnel interface. The Linux kernel must have the tun module installed. The following command creates a tunnel on the host 90.1.1.1 to the remote host 201.10.10.10.

ip tunnel add tun0 mode ipip \
    remote  201.10.10.10 local 90.1.1.1

Bind the tunnel interface to an IP address and configure the target IP (10.0.0.1 is our local address, 10.0.0.2 is the remote endpoint):

ifconfig tun0 10.0.0.1 netmask 255.255.255.0 \
     pointopoint 10.0.0.2 

Setup the client (201.10.10.10)

Create the tunnel interface. The Linux kernel must have the tun module installed. The following command creates a tunnel on the host 201.10.10.10 to the remote host 90.1.1.1.

ip tunnel add tun0 mode ipip \
    remote 90.1.1.1 local 201.10.10.10

Bind the tunnel interface to an IP address and configure the target IP (10.0.0.2 is our local address, 10.0.0.1 is the remote endpoint):

ifconfig tun0 10.0.0.2 netmask 255.255.255.0 \
    pointopoint 10.0.0.1

Test

Once the tunnel is created, you should get the tun0 interface and be able to ping the remote peers in the 10.0 network.

$ ping 10.0.0.1
PING 10.0.0.1 (10.0.0.1) 56(84) bytes of data.
64 bytes from 10.0.0.1: icmp_seq=1 ttl=64 time=0.707 ms
64 bytes from 10.0.0.1: icmp_seq=2 ttl=64 time=0.541 ms
64 bytes from 10.0.0.1: icmp_seq=3 ttl=64 time=0.630 ms

Firewall Configuration

With the IPsec stack and tunnels in place, it is still necessary to get a good firewall configuration to allow the IPsec traffic, block the non-IPsec traffic (in case of miss-configuration) and protect the server.

The IPSec traffic needs the IKE protocol (UDP port 500) to establish the security associations. The ah protocol will be used to authenticate the peers and the esp protocol to encrypt the payload. The IPsec traffic is controlled by the following rules (for the 201.10.10.10 server):

ip=90.1.1.1
iptables -A INPUT -p ah -i eth0 -s $ip -j ACCEPT
iptables -A INPUT -p esp -i eth0 -s $ip -j ACCEPT
iptables -A INPUT -p udp --sport 500 --dport 500 \
           -s $ip -j ACCEPT

iptables -A OUTPUT -p ah -o eth0 -d $ip -j ACCEPT
iptables -A OUTPUT -p esp -o eth0 -d $ip -j ACCEPT
iptables -A OUTPUT -p udp --sport 500 --dport 500 \
          -d $ip -j ACCEPT

The IP-IP tunnel brings another problem to the firewall configuration. Once extracted, the packets have to match the firewall rules. The iptables ipsec policy is used to accept the packets that are associated with an IPSec policy.

iptables -A INPUT -m policy --pol ipsec --dir in \
           -p 4 -j ACCEPT
iptables -A OUTPUT -m policy --pol ipsec --dir out \
           -p 4 -j ACCEPT

Troubles

Setting up the IPsec stack is not easy and does not work immediately. The Linux kernel does not bring any clue to spot the issue.

  1. Make sure there is no firewall that block the AH/ESP/IKE packets (disable any firewall if necessary)
  2. Make sure the SPD associations correspond to the peers (Check /etc/ipsec-tools.conf on both servers)
  3. Make sure Racoon daemon is running and that it does not report any error (Check /var/log/daemon.log)
3 comments
To add a comment, you must be connected. Login to add a comment

Ada EL - The JSR-245 Unified Expression Language for Ada

By Stephane Carrez

Ada EL is a library that implements an expression language similar to JSP and JSF Unified Expression Languages (EL). EL is used to give access to Java bean components within a presentation page (JSP, XHTML). For JSF the expression language creates a bi-directional binding where the value can be obtained when displaying a page but also modified (after a POST). The Unified Expression Language is a component of the JavaServer Pages specification described in JSR-245.

The Ada EL is a library that implements the expression language and provides an Ada binding to use it. The example below shows a code extract to bind an Ada record Joe to the name user and evaluate the above expression.

Ctx    : EL.Contexts.Default.Default_Context;
E      : EL.Expressions.Expression;
Result : EL.Objects.Object;
...
E := Create_Expression("${user.firstName}",Ctx);
...
--  Bind the context to 'Joe' and evaluate
Ctx.Set_Variable ("user", Joe);
Result := E.Get_Value (Ctx);

Using Ada EL is fairly simple, see below.

Expression Context

The expression context defines the context for parsing and evaluating the expression. In short the expression context provides:

  • the definitions and access to functions,
  • the access to variables

The expression context is represented by the EL.Contexts.Context interface.

A default context implementation is provided and can be used as follows:

with EL.Contexts.Default;
   ...
   Ctx : EL.Contexts.Default.Default_Context;

Creating an expression

The expression must be parsed using Create_Expression and it is represented by an Expression object.

with EL.Expressions;
   ...

   E : EL.Expressions.Expression := 
Create_Expression("${user.firstName}", Ctx);

When parsing an expression, the context is used to resolve the functions used by the expression.

Evaluating an expression

Once parsed, the expression can be evaluated several times and on different expression contexts. The evaluation is done by invoking the Get_Value method which returns an EL.Objects.Object object. The Object record will contain the result either as a boolean, an integer, a floating point number, a string or something else.

with EL.Objects;

   ...
   Result : EL.Objects.Object := E.Get_Value (Ctx);

To access the value, several To_type functions are provided.

   Ada.Text_IO.Put_Line ("Result: "
        & EL.Objects.To_String (Result));

Learn More

Ada-El is a project hosted by Code Google under the name ada-el, you can get the sources which are distributed under the Apache License 2.0.

To learn more about Ada EL, read the Introduction page.

To add a comment, you must be connected. Login to add a comment

Repairing the Zalman Reserator 2 pump and get a silent PC

By Stephane Carrez 5 comments

The Zalman Reserator 2 is a water cooling kit to build a silent PC. After three years of good work, the pump had problems and the security was activated regularly stoping the pump and making the computer unusable. Indead, this is not new that Zalman has used a very weak pump...

Zalman Reserator 2

The Zalman pump is a 220V merged pump. Changing it is really not easy. Instead, I found that it was easier to add another pump in the cooling system. The two pumps are just serialized. The original Zalman pump still works but the second new pump really does the job.

Zalman Reserator 2

Bad luck or bad choice

First, I tried some Swiftech pump. It was an emergency I just needed my PC to work again. It was a really bad choice, not for the cooling but for the noise. After two months, I decided to get a new pump, a silent one. Yes, it exists for those who are searching!

Alphacool Ehiem 600 to the rescue

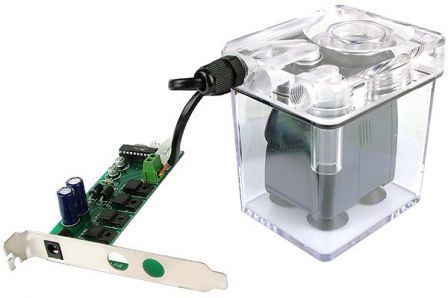
After investigating forums, reading many articles, studying noise (getting back to some old logarithmic computations...), I came to the conclusion that the merged pumps are the most silent ones. I bought the AGB-Eheim 600 Station II pump. This pump comes in two versions, a 12V version and a 220V version. The 12V version pump needs a small electronic board to create the alternating current that is required for the pump. The pump itself is within the reservoir.

Pump ehiem600

To plug the new pump, find a location in the PC case and cut the input tube (the one connected to the CPU and the reserator output). Connect the pump to the reserator and the CPU tube to the new pump. Plug the board and connect the 12V cable on it. The pump is using alternative current so there is no order for the pump cable connection.

Verify everything, put distilled water and the coollant and switch on the computer.

At first, the pump creates some noise due to the air. Quite soon, the air is replaced by water and the pump becomes silent. Look at the Reserator flow indicator, it should move very quickly now (Indeed, I was impressed how fast it was running).

Lessons learnt

The Zalman Reserator 2 pump was (and is) very very slow and weak. Watch the Zalman Reserator 2 - flow control failing video.

The Zalman Reserator 2 gave me some signs several months ago. The pump had not enough pressure and the security was sometimes activated. By slaping the reserator, it was working again. I stayed too much time in this situation. I should have tried to find a good pump before the real problem happen.

A pump is always making noise. Be very careful when you choose one.

5 comments
To add a comment, you must be connected. Login to add a comment

Planzone V2: the collaborative project management software

By Stephane Carrez

Augeo Software has released a new version of Planzone, the Collaborative Project Management Software. The new interface design makes your life easier by providing a better workflow, a fresh and modern design, and several major improvements in the project scheduling.

Collaborative Workspace

First of all, Planzone is a collaborative workspace designed for non-techies. No need to be an expert to manage your project!

Each collaborative workspace is organized arround a project which is shared by several members. The workspace contains an area to manage simple todos lists, another area to share files and write online documentation, a discussion area and last but not least a project schedule area to plan and track the progress.

Todos

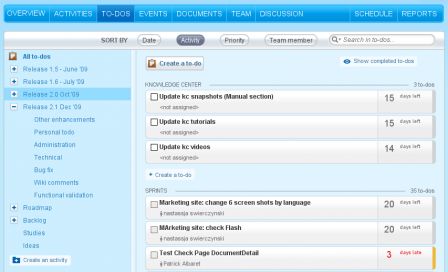
Beginners will start by using todos only. This is the easiest item to manage. In that manner, Planzone is very close to Basecamp. Planzone V2 brings several improvements on the todo area. First the design clearly shows what the todo is, the fact that it now has a shape makes you feel you can move and do something with it.

Second, project todos can now be grouped by date, priority and team member. Before a meeting, a project manager can group by team member, print the sheet and discuss with the team with a clear vision of tasks assigned to each other.

When the number of todos increases, it's easy to create a todo list (called activity in Planzone).

Planzone V2 todos

File and online documentation

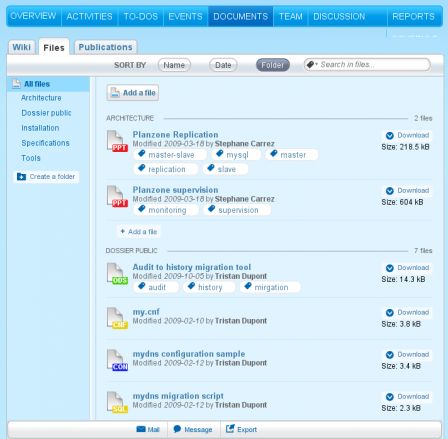
While the project evolves, team members will share files in the document storage area. You can upload and share any type of file and there is no real limit for the file size (you are limited by the license).

In Planzone V2, the file and online documentation are now grouped under the same area: Documentation.

Planzone V2 documents

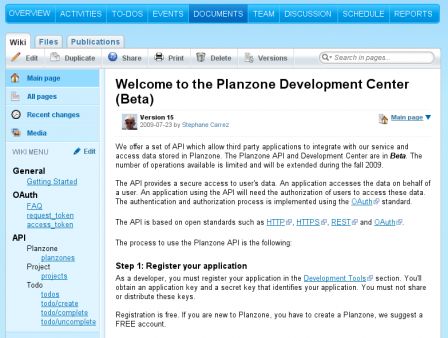
The online documentation is provided through a simple Wiki. Don't expect to write complex documents such as those you can write with Microsoft Words. Wikis are intended to be fast and efficient to write simple text, with sections, bullet lists and minimal formatting. Two editors are provided, a visual editor which allows you to write documentation without knowing the wiki language, and a text editor which is rather basic but more powerful if you know some wiki markers and best if you know some CSS (here, it's for expert!).

Planzone V2 wiki

Discussion

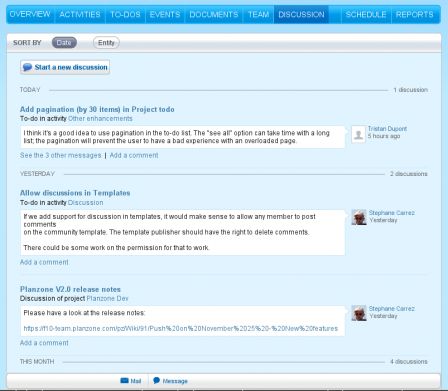
The discussion area provides a central point where team members will share comments on the project and the work to do. Discussions and comments are associated with the project , activities, todos, milestones and documents (comments on wiki will come shortly). The major change in Planzone V2 is the ability to see in one place all the comments related to the project.

Planzone V2 discussion

Project Scheduling

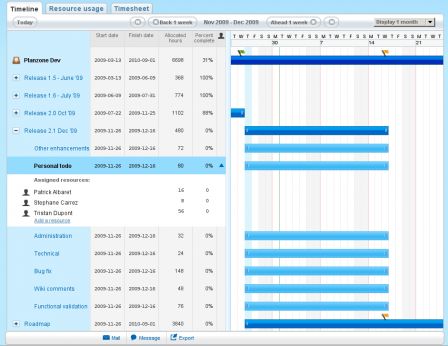
When the project grows or is complex, the project manager has to plan and split the work in several activities. Activities are scheduled over time, they can contain todos as well as milestones (A next version will allow to attached documents). The project schedule area is dedicated to this work.

The project scheduling contains many improvements that help the project manager. First, the resource assignments are now made exclusively from the project schedule page. It becomes easier to manage activity assignments and resource allocations. You expand or collapse the activity assignments and you can add, remove or change the resources while having the project schedule in front of you. This is a major improvement which makes the scheduling area a killer feature.

Planzone V2 schedule

On the project resource usage side, the timeline displays the consolidated remaining work for each resource and the expand collapse of each resource makes this part quite neat and easy to use.

Try Planzone!

Planzone offers a free version of the service. Of course the free version is limited but you can still manage complex projects with small teams (5 persons). Prices range from 9.90EUR/month for the individual license to 69.90EUR/month for the business license.

Give it a try and leave me some comments. Signup for a free Planzone.

To add a comment, you must be connected. Login to add a comment

New price list for Planzone service

By Stephane Carrez

project success depends on superior teamwork and the right set of tools. Planzone is a comfortable and efficient collaboration workspace for you and your team. A new price list is available with new features all this to cut the p

Read more
To add a comment, you must be connected. Login to add a comment

Upgrading Symfony projects to release 1.2

By Stephane Carrez 3 comments

Symfony is a PHP framework for building web application. I have two projects that use Symfony 1.1 and I wanted to upgrade to the new 1.2 release. This article lists some issues that I found and

Read more
3 comments
To add a comment, you must be connected. Login to add a comment

Planzone - A workspace for getting things done

By Stephane Carrez 2 comments

Planzone is a new project collaboration application available online. A project management, a document store and a wiki space per-project gives the first steps in sharing the project with team members or partners.

Read more
2 comments

Interviews of Planzone R&D development team the free online project management service

By Stephane Carrez

While managing Planzone R&D development team, I asked our marketing team to promote our team and give visibility of each team member through an interview. Interviews started with Imade Lakhlifi who developped ProjectBar during his internship. He was followed by Chris Immel who is our AJAX, Javascript, CSS wizard, Marc Heuveline who developed the Microsoft Project import and Excel reports, Patrick Albaret who put in place a testing quality suite composed of 1300 tests, Tristan Dupont who developed robust core backend features and Jean-Luc Bernette who defines the Planzone features.

Last interview is mine as manager and architect of R&D team.

Each interview give a different perspective of what is Planzone, how it is developed, and where it's going to fly.

To add a comment, you must be connected. Login to add a comment

New version of ProjectBar

By Stephane Carrez

Imade implemented a lot of new improvements in the ProjectBar plugin. We wanted to make a minor release but the changes are so nice and interesting that they were integrated in a new version. We are pleased to release this new ProjectBar 1.1 version which provides:

  • a clean design in which we integrated many user's remarks
  • the display of priority task
  • new tasks are now easily identified by a green marker
  • errors are now handled in a better way and report a clear message

Of course we plan other improvements and we will try to release them in the fall.

You can get the ProjectBar plugin in Mozilla at https://addons.mozilla.org/fr/firefox/addon/12555

To add a comment, you must be connected. Login to add a comment

Symfony cryptic error: Error importing plugins/sfPropelPlugin/lib/propel/builder/SfPeerBuilder.php

By Stephane Carrez 3 comments

Symfony is a nice PHP framework, when it works. Sometimes when you run symfony you get a cryptic error and you have no clue on how to fix the problem. The article shows one of them and how to solve it.

Read more
3 comments
To add a comment, you must be connected. Login to add a comment