Ada Web Application is a complete framework that allows to write web applications using the Ada language. Through a complete web application, the tutorial explains various aspects in setting up and building an application by using AWA. The tutorial is split in several articles and they are completed by short videos to show how easy the whole process is.
The tutorial assumes that you have already installed the following software on your computer:
- The GNAT Ada compiler,
- The Eclipse and GNATbench plugin,
- The ArgoUML modelization tool,
- The Ada Web Application framework and its associated dependencies (XML/Ada and AWS),
- The Dynamo code generator.
The review web application
The review web application allows users to write reviews about a product, a software or a web site and share them to the Internet community. The community can read the review, participate by adding comments and voting for the reviewed product or software.
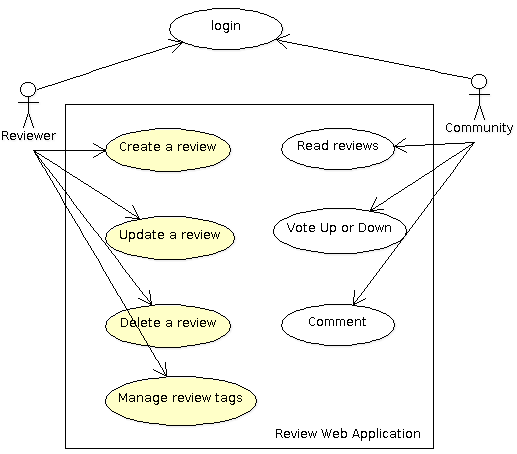
The AWA framework provides several modules that are ready to be used by our application. The login and user management is handled by the framework so this simplifies a lot the design of our application. We will see in the tutorial how we can leverage this to our review application.
Because users of our review web application have different roles, we will need permissions to make sure that only reviewers can modify a review. We will see how the AWA framework leverages the Ada Security library to enforce the permissions.
The AWA framework also integrates three other modules that we are going to use: the tags, the votes and the comments.
Since many building blocks are already provided by the Ada framework, we will be able to concentrate on our own review application module.
Project creation with Dynamo
The first step is to create the new project. Since creating a project from scratch is never easy we will use the Dynamo tool to build our initial review web application. Dynamo is a command line tool that provides several commands that help in several development tasks. For the project creation we will give:
- the output directory,
- the project name,
- the license to be used for the project,
- the project author's email address.
Choose the project name with care as it defines the name of the Ada root package that will be used by the project. For the license, you have the choice between GPL v2, GPL v3, MIT, BSD 3 clauses, Apache 2 or some proprietary license.
dynamo -o atlas create-project -l apache atlas Stephane.Carrez@gmail.com
(Of course, change the above email address by your own email address, this is an example!)
The Dynamo project creation will build the atlas directory and populate it with many files:
- A set of configure, Makefile, GNAT project files to build the project,
- A set of Ada files to build your Ada web application,
- A set of presentation files for the web application.
Once the project is created, we must configure it to find the Ada compiler, libraries and so on. This is done by the following commands:
cd atlas
./configure
At this step, you may even build your new project and start it. The make command will build the Ada files and create the bin/atlas-server executable that represents the web application.
make generate
make
bin/atlas-server
Once the server is started, you may point your browser to the following location: http://localhost:8080/atlas/index.html
Creating the review module with Dynamo
With the Ada Web Application framework, a web application is composed of modules where each module brings a specific functionality to the application. AWA provides a module for user management, another for comments, tags, votes, and many others. The application can decide to use these modules or not. The AWA module helps in defining the architecture and designing your web application.
For the review web application we will create our own module dedicated for the review management. The module will be an Ada child package of our root project package. From the Ada point of view, the final module will be composed of the following packages:
- A
Modulespackage represents the business logic of the module. It is provides operations to access and manage the data owned by the module. - A
Beanspackage holds the Ada beans that make the link between the presentation layer and business logic. - A
Modelspackage holds the data model to access the database content. This package is generated from UML and will be covered by a next tutorial.
To help in setting up a new AWA module, the Dynamo tool provides the add-module command. You just have to give the name of the module, which is the name of the Ada child package. Let's create our reviews module now:
dynamo add-module reviews
The command generates the new AWA module and modifies some existing files to register the new module in the application. You can build your web application at this stage even though the new module will not do anything yet for you.
Eclipse setup
Launch you Eclipse and create the new project by going to the File -> New -> Project menu. Choose the Ada Project and uncheck the Use default location checkbox so that you can browse your file system and select the atlas directory.
That's it. If everything went well, you should be able to see the projects files in the Eclipse project explorer.

The Review Web Application setup video
To help you in setting up and see how the whole process looks like in reality, I've created the following short video that details the above tutorial steps.
Conclusion
The whole process takes less than 3 minutes and gives you the basis to setup and build your new web application. The next tutorial will explain how to use the UML to design and generate the data model for our Review Web Application.
Add a comment
To add a comment, you must be connected. Login