When developping and integrating applications together it is often useful to launch an external program. By doing this, many integration and implementation details are simplified (this integration technic also avoids license issues for some open source software integration).
This article explains how to launch an external program in Java and Ada and be able to read the process output to get the result.
Java Process Creation
The process creation is managed by the ProcessBuilder Java class. An instance of this class holds the necessary information to create and launch a new process. This includes the command line and its arguments, the standard input and outputs, the environment variables and the working directory.
The process builder instance is created by specifying the command and its arguments. For this the constructor accepts a variable list of parameters of type String.
import java.lang.ProcessBuilder;
...
  final String cmd = "ls";
  final String arg1 = "-l";
  final ProcessBuilder pb = new ProcessBuilder(cmd, arg1);
When the process builder is initialized, we can invoke the start method to create a new process. Each process is then represented by an instance of the Process class. It is possible to invoke start serveral times and each call creates a new process. It is necessary to catch the IOException which can be raised if the process cannot be created.
import java.lang.Process;
...
  try {
    final Process p = pb.start();
    ...

  } catch (final IOException ex) {
    System.err.println("IO error: " + ex.getLocalizedMessage());
  }
The Process class gives access to the process output through an input stream represented by the InputStream class. With this input stream, we can read what the process writes on its output. We will use a BufferedReader class to read that output line by line.
import java.io.*;
...
  final InputStream is = p.getInputStream();
  final BufferedReader reader = new BufferedReader(new InputStreamReader(is));
By using the readLine method, we can read a new line after each call. Once the whole stream is read, we have to close it. Closing the BufferedReader will close the InputStream associated with it.
Last step is to wait for the process termination and get the exit status: we can use the waitFor method. Since this method can be interrupted, we have to catch the InterruptedException.
  try {
    ...
    final int exit = p.waitFor();
    if (exit != 0) {
      System.err.printf("Command exited with status %d\n", exit);
    }
  }  catch (final InterruptedException ex) {
    System.err.println("Launch was interrupted...");
  }
You can get the complete source from the file: Launch.java
Ada Process Creation
For the Ada example, we will create an application that invokes the nslookup utility to resolve a set of host names. The list of host names is provided to nslookup by writing on its standard input and the result is collected by reading the output.
We will use the Pipe_Stream to launch the process, write on its input and read its output at the same time. The process is launched by calling the Open procedure and specifying the pipe redirection modes: READ is for reading the process output, WRITE is for writing to its input and READ_WRITE is for both.
with Util.Processes;
with Util.Streams.Pipes;
...
   Pipe    : aliased Util.Streams.Pipes.Pipe_Stream;

   Pipe.Open ("nslookup", Util.Processes.READ_WRITE);
We can read or write on the pipe directly but using a Print_Stream to write the text and the Buffered_Stream to read the result simplifies the implementation. Both of them are connected to the pipe: the Print_Stream will use the pipe output stream and the Buffered_Stream will use the pipe input stream.
with Util.Streams.Buffered;
with Util.Streams.Texts;
...
   Buffer  : Util.Streams.Buffered.Buffered_Stream;
   Print   : Util.Streams.Texts.Print_Stream;
begin
      --  Write on the process input stream
   Buffer.Initialize (null, Pipe'Unchecked_Access, 1024);
   Print.Initialize (Pipe'Unchecked_Access);
Before reading the process output, we send the input data to be solved by the process. By closing the print stream, we also close the pipe output stream, thus closing the process standard input.
We can now read the program output by using the Read procedure and get the result in the Content string. The Close procedure is invoked on the pipe to close the pipe (input and output) and wait for the application termination.
JSF and ASF use a component-based model for the design and implementation of a web application. The presentation layer is implemented using XML or XHTML files and the component layer is implemented in Ada 05 for ASF and in Java for JSF.
A new version of ASF is available which provides:
New components used in HTML forms (textarea, select, label, hidden),
New components for the AJAX framework,
Support for dialog boxes with jQuery UI,
Pre-defined beans in ASF contexts: param, header,
A complete set of example and documentation for each tag.
A perfect hash function is a function that returns a distinct hash number for each keyword of a well defined set. gperf is famous and well known perfect hash generator used for C or C++ languages. Ada is not supported.
The gperfhash is a sample from the Ada Utility Library which generates an Ada package that implements such perfect hash operation. It is not as complete as gperf but allows to easily get a hash operation. The gperfhash tool uses the GNAT package GNAT.Perfect_Hash_Generators.
Pre requisite
Since the gperfhash tool is provided by the Ada Util samples, you must build these samples with the following command:
$ gnatmake -Psamples
Define a keyword file
First, create a file which contains one keyword on each line. For example, let's write a keywords.txt file which contains the following three keywords:
int
select
print
Generate the package
Run the gperfhash tool and give it the package name.
$ gperfhash -p Hashing keywords.txt
The package defines a Hash and an Is_Keyword function. The Hash function returns a hash number for each string passed as argument. The hash number will be different for each string that matches one of our keyword. You can give a string not in the keyword list, in that case the hash function will return a number that collides with a hash number of one or our keyword.
The Is_Keyword function allows to check whether a string is a keyword of the list. This is very useful when you just want to know whether a string is a reserved keyword in some application.
The package specification is the following:
--  Generated by gperfhash
package Hashing is

   function Hash (S : String) return Natural;

   --  Returns true if the string <b>S</b> is a keyword.
   function Is_Keyword (S : in String) return Boolean;

   type Name_Access is access constant String;
   type Keyword_Array is array (Natural range <>) of Name_Access;
   Keywords : constant Keyword_Array;
private
...
end Hashing;
How to use the hash
Using the perfect hash generator is simple:
with Hashing;

  if Hashing.Is_Keyword (S) then
     -- 'S' is one of our keyword
  else
     -- No, it's not a keyword
  end if;
AUnit and Ahven are two testing frameworks for Ada. Both of them are inspired from the well known JUnit Java framework. Having some issues with the Aunit testing framework, I wanted to explore the use of Ahven. This article gives some comparison elements between the two unit test frameworks. I do not pretend to list all the differences since both frameworks are excellent.
Writing a unit test is equally simple in both frameworks. They however have some differences that may not be visible at the first glance.
AUnit
AUnit is a unit test framework developped by Ed Falis and maintained by AdaCore. It is distributed under the GNU GPL License.
Some good points:
AUnit has a good support to report where a test failed. Indeed, the Assert procedures will report the source file and line number where the assertion failed.
AUnit is also able to dump the exception stack trace in symbolic form. This is useful to find out quickly the source of a problem.
Some bad points:
AUnit has several memory leaks which is quite annoying when you want to track memory links with valgrind.
AUnit does not integrate easily with JUnit-based XML tools. In particular the XML file it creates can be invalid in some cases (special characters in names). More annoying is the fact that the XML format is not compatible with JUnit XML format.
Ahven
Ahven is another unit test framework developed by Tero Koskinen. It is distributed under the permissive ISC License.
Some good points:
Ahven license is a better model for proprietary unit tests.
Ahven generates XML result files which are compatible with Junit XML result files. Integration with automatic build tools such as Jenkins is easier.
Ahven XML result files can integrate the test output (as in JUnit). This is useful to analyze a problem.
Ahven has a test case timeout which is useful to detect and stop blocking tests.
Some bad points:
The lack of precise information in message (source line, exception trace) can be annoying to find out why a test failed.
Don't choose and be prepared to use both with Ada Util!
The unit tests I've written were done for AUnit and I had arround 329 tests to migrate. To help the migration to Ahven, I wrote a Util.XUnit package which exposes a common interface on top of AUnit or Ahven. It turns out that this is easy and quite small. The package has one specific implementation (spec+body) for both frameworks. All the unit tests have to use it instead of the AUnit or Ahven packages.
package Util.XUnit is
...
   subtype Status is AUnit.Status;

   Success : constant Status := AUnit.Success;
   Failure : constant Status := AUnit.Failure;

   subtype Message_String is AUnit.Message_String;
   subtype Test_Suite is AUnit.Test_Suites.Test_Suite;
   subtype Access_Test_Suite is AUnit.Test_Suites.Access_Test_Suite;

   type Test_Case is abstract new AUnit.Simple_Test_Cases.Test_Case with null record;
   type Test is abstract new AUnit.Test_Fixtures.Test_Fixture with null record;
...
end Util.XUnit;
The XUnit implementation for Ahven is a little bit more complex because all my tests were using AUnit interface, I decided to keep almost that API and thus I had to simulate what is missing or is different.
package Util.XUnit is
...
   type Status is (Success, Failure);

   subtype Message_String is String;
   subtype Test_Suite is Ahven.Framework.Test_Suite;
   type Access_Test_Suite is access all Test_Suite;

   type Test_Case is abstract new Ahven.Framework.Test_Case with null record;
   type Test is new Ahven.Framework.Test_Case with null record;
...
end Util.XUnit;
The choice of the unit test framework is done when the Ada Utility library is configured.
This article describes the process to increase the disk capacity of a ReadyNAS Duo configuration from 1 TB to 2 TB In my case, my X-RAID configuration was broken due to a faulty disk. I took the opportunity to repair the redundancy and also to increase the capacity. The process is simple but very long. It took me 4 days, several reboots and many disk synchronisation.
To replace the 1TB disks, I bought two Seagate ST2000DL003-9VT166 hard disks which offer 2TB (they are referenced in the hardware compatibility list). I then followed the following process :
Upgrade to the latest RAIDiator firmware (4.1.7)
Replace a first disk by the new larger disk (in my case the faulty disk)
Wait until the disks are fully synchronized (Status should be Redundant)
Shutdown properly and restart the ReadyNAS
Make sure the disks are fully synchronized. If not, wait for synchronization to finish.
Replace the second disk by the larger disk
Wait until the disks are fully synchronized (Status should be Redundant)
Shutdown properly and restart the ReadyNAS
After the reboot, the ReadyNAS triggers a disk expand
Another reboot is necessary after which ReadyNAS triggers the file system expansion
ReadyNAS Disk Expansion
The disk expansion happens at the very end and is fairly quick. Before the disk expansion, and when the new disks are installed, you will see that the disk partition table has not changed. The fdisk /dev/hdc command reports:
Device Boot   Start      End      Blocks   Id  System
/dev/hdc1         1      255     2048000   83  Linux
/dev/hdc2       255      287      256000   82  Linux swap
/dev/hdc3       287   121575   974242116    5  Extended
/dev/hdc5       287   121575   974242115+  8e  Linux LVM
Since ReadyNAS uses LVM to manage the disks, you can use pvdisplay to look at the available space. At this stage, everything is used.
nas-D2-24-F2:/var/log/frontview# pvdisplay
  --- Physical volume ---
  PV Name           /dev/hdc5
  VG Name           c
  PV Size           929.09 GB / not usable 0
  Allocatable       yes (but full)
  PE Size (KByte)   32768
  Total PE          29731
  Free PE           0
  Allocated PE      29731
  PV UUID           huL1xb-0v0O-vJ6K-LqaK-P4kf-q4Wm-SFeYCX
After the reboot, the ReadyNAS will start the disk expand process. It will do this only if the two disks are redundant. After expand, the partition looks as follows:
Device Boot    Start       End      Blocks   Id  System
/dev/hdc1        1       255     2048000   83  Linux
/dev/hdc2      255       287      256000   82  Linux swap
/dev/hdc3      287    243201  1951200343    5  Extended
/dev/hdc5      287    121575   974242115+  8e  Linux LVM
/dev/hdc6   121575    243200   976950032   8e  Linux LVM
Once the partition table is fixed, you are asked to reboot:
The first stage of the in-place volume expansion is done.
Please reboot the device to complete the volume expansion.
After the reboot, the LVM volumes are increased. You can check with pvdisplay which now reports the new disk partition and with lvdisplay which takes into account the two physical volumes.
nas-D2-24-F2:~# pvdisplay
  --- Physical volume ---
  PV Name               /dev/hdc5
  VG Name               c
  PV Size               929.09 GB / not usable 0
  Allocatable           yes (but full)
  PE Size (KByte)       32768
  Total PE              29731
  Free PE               0
  Allocated PE          29731
  PV UUID               huL1xb-0v0O-vJ6K-LqaK-P4kf-q4Wm-SFeYCX

  --- Physical volume ---
  PV Name               /dev/hdc6
  VG Name               c
  PV Size               931.69 GB / not usable 0
  Allocatable           yes (but full)
  PE Size (KByte)       32768
  Total PE              29814
  Free PE               0
  Allocated PE          29814
  PV UUID               TOqmR2-fYOq-jf0q-n1ka-N9K1-B2CB-oyU23Y

nas-D2-24-F2:~# lvdisplay
  --- Logical volume ---
  LV Name                /dev/c/c
  VG Name                c
  LV UUID                2CzUXf-uzSD-DGcS-KePF-6elz-XveS-xePwHf
  LV Write Access        read/write
  LV Status              available
  # open                 2
  LV Size                1.82 TB
  Current LE             59545
  Segments               2
  Allocation             inherit
  Read ahead sectors     0
  Block device           254:0
The last step is now to resize the file system. The ReadyNAS reports the following alter the LVM volume is expanded:
Your system will now begin online expansion.
Please do not reboot until you receive notification that the expansion is complete.
And while the expansion is in progress, you will see that the ReadyNAS uses resize2fs to grow the file system. If you look at the running processes, you will see the following:
root 1371  ?  S    21:41   0:00 /bin/bash /frontview/bin/expand_online
root 1537  ?  Ss   21:41   0:00 /frontview/bin/blink_expand
root 1538  ?  S    21:41   0:42 resize2fs -pf /dev/c/c
Data volume has been successfully expanded to 1853 GB.
If at some point, the ReadyNAS enter in re-synchronization after a reboot even if disks are already synchronized. Check that the disks are in good health. Look at the /etc/rc3.d directory and make sure the rc3 script is called only once through the Sxxx symbolic links (See Frontview shows 100% disk usage)
If you suspect something wrong, use ssh to connect to the ReadyNAS and look at /var/log/messages or /var/log/kern.log to see if there is not some hardware issue.
Check the file /etc/frontview/raid.conf and verify that the two lines are similar and indicate the reference of your new disk (this file is rebuilt after each reboot).
Look at the /proc/xraid/configuration file. It indicates a lot of information about the current X-RAID status and synchronisation process.
At the last resort, read and understand the /etc/hotplug/sata.agent script which contains the details of the resynchronisation and expansion process.
In application servers some resources are expensive and they must be shared. This is the case for a database connection, a frame buffer used for image processing, a connection to a remote server, and so on. The problem is to make available these scarce resources in such a way that:
a resource is used by only one thread at a time,
we can control the maximum number of resources used at a time,
we have some flexibility to define such maximum when configuring the application server,
and of course the final solution is thread safe.
The common pattern used in such situation is to use a thread-safe pool of objects. Objects are picked from the pool when needed and restored back to the pool when they are no longer used.
Java thread safe object pool
Let's see how to implement our object pool in Java. We will use a generic class declaration into which we define a fixed array of objects. The pool array is allocated by the constructor and we will assume it will never change (hence the final keyword).
public class Pool<T> {
  private final T[] objects;

  public Pool<T>(int size) {
     objects = new T[size];
  }
  ...
}
First, we need a getInstance method that picks an object from the pool. The method must be thread safe and it is protected by the synchronized keyword. It there is no object, it has to wait until an object is available. For this, the method invokes wait to sleep until another thread releases an object. To keep track of the number of available objects, we will use an available counter that is decremented each time an object is used.
  private int available = 0;
  private int waiting = 0;
  public synchronized T getInstance() {
     while (available == 0) {
        waiting++;
        wait();
        waiting--;
     }
     available--;
     return objects[available];
  }
To know when to wakeup a thread, we keep track of the number of waiters in the waiting counter. A loop is also necessary to make sure we have an available object after being wakeup. Indeed, there is no guarantee that after being notified, we have an available object to return. The call to wait will release the lock on the pool and puts the thread is wait mode.
Releasing the object is provided by release. The object is put backed in the pool array and the available counter incremented. If some threads are waiting, one of them is awaken by calling notify.
  public synchronized void release(T obj) {
     objects[available] = obj;
     available++;
     if (waiting) {
        notify();
     }
  }
When the application is started, the pool is initialized and some pre-defined objects are inserted.
   class Item { ... };
...
   Pool<Item> pool = new Pool<Item>(10);
   for (int i = 0; i < 10; i++) {
       pool.release(new Item());
   }
Ada thread safe pool
The Ada object pool will be defined in a generic package and we will use a protected type. The protected type will guarantee the thread safe behavior of the implementation by making sure that only one thread executes the procedures.
generic
   type Element_Type is private;
package Util.Concurrent.Pools is
     type Element_Array_Access is private;
     Null_Element_Array : constant Element_Array_Access;
  ...
private
    type Element_Array is array (Positive range <>) of Element_Type;
    type Element_Array_Access is access all Element_Array;
     Null_Element_Array : constant Element_Array_Access := null;
end Util.Concurrent.Pools;
The Ada protected type is simple with three procedures, we get the Get_Instance and Release as in the Java implementation. The Set_Size will take care of allocating the pool array (a job done by the Java pool constructor).
protected type Pool is
  entry Get_Instance (Item : out Element_Type);
  procedure Release (Item : in Element_Type);
  procedure Set_Size (Capacity : in Positive);
private
  Available     : Natural := 0;
  Elements      : Element_Array_Access := Null_Element_Array;
end Pool;
First, the Get_Instance procedure is defined as an entry so that we can define a condition to enter in it. Indeed, we need at least one object in the pool. Since we keep track of the number of available objects, we will use it as the entry condition. Thanks to this entry condition, the Ada implementation is a lot easier.
protected body Pool is
  entry Get_Instance (Item : out Element_Type) when Available > 0 is
  begin
     Item := Elements (Available);
     Available := Available - 1;
  end Get_Instance;
...
end Pool;
The Release operation is also easier as there is no need to wakeup any thread: the Ada runtime will do that for us.
protected body Pool is
   procedure Release (Item : in Element_Type) is
   begin
      Available := Available + 1;
      Elements (Available) := Item;
   end Release;
end Pool;
The pool is instantiated:
type Connection is ...;
package Connection_Pool is new Util.Concurrent.Pools (Connection);
And a pool object can be declared and initialized with some default object:
P : Connection_Pool.Pool;
C : Connection;
...
   P.Set_Size (Capacity => 10);
   for I in 1 .. 10 loop
         ...
         P.Release (C);
   end loop;
In previous articles, we have seen that an Ada Server Faces application has a presentation layer composed of XHTML and CSS files. Similar to Java Server Faces, Ada Server Faces is a component-based model and we saw how to write the Ada beans used by the application. Later, we also learnt how an action bean can have a procedure executed when a button is pressed. Now, how can all these stuff fit together?
Well, to finish our cylinder volume example, we will see how to put everything together and get our running web application.
Application Initialization
An Ada Server Faces Application is represented by the Application type which holds all the information to process and dispatch requests. First, let's declare a variable that represents our application.
Note: for the purpose of this article, we will assume that every variable is declared at some package level scope. If those variables are declared in another scope, the Access attribute should be replaced by Unchecked_Access.
with ASF.Applications.Main;
...
   App : aliased ASF.Applications.Main.Application;
To initialize the application, we will also need some configuration properties and a factory object. The configuration properties are used to configure the various components used by ASF. The factory allows to customize some behavior of Ada Server Faces. For now, we will use the default factory.
with ASF.Applications;
...
   C        : ASF.Applications.Config;
   Factory : ASF.Applications.Main.Application_Factory;
The initialization requires to define some configuration properties. The VIEW_EXT property indicates the URI extension that are recognized by ASF to associate an XHTML file (the compute.html corresponds to the XHTML file compute.xhtml). The VIEW_DIR property defines the root directory where the XHTML files are stored.
Ada Server Faces uses the Ada Servlet framework to receive and dispatch web requests. It provides a Faces_Servlet servlet which can be plugged in the servlet container. This servlet is the entry point for ASF to process incoming requests. We will also need a File_Servlet to process the static files. Note that these servlets are implemented using tagged records and you can easily override the entry points (Do_Get or Do_Post) to implement specific behaviors.
with ASF.Servlets.Faces;
with ASF.Servlets.Files;
...
   Faces : aliased ASF.Servlets.Faces.Faces_Servlet;
   Files   : aliased ASF.Servlets.Files.File_Servlet;
The servlet instances are registered in the application.
App.Add_Servlet (Name => "faces", Server => Faces'Access);
App.Add_Servlet (Name => "files", Server => Files'Access);
Once registered, we have to define a mapping that tells which URI path is mapped to the servlet.
For the purpose of debugging, ASF provides a servlet filter that can be plugged in the request processing flow. The Dump_Filter will produce a dump of the request with the headers and parameters.
with ASF.Filters.Dump;
...
   Dump    : aliased ASF.Filters.Dump.Dump_Filter;
The application object that we created is similar to a Java Web Application packaged in a WAR file. It represents the application and it must be deployed in a Web Container. With Ada Server Faces this is almost the same, the application needs a Web container. By default, ASF provides a web container based on the excellent Ada Web Server implementation (other web containers could be provided in the future based on other web servers).
with ASF.Server.Web;
...
   WS : ASF.Server.Web.AWS_Container;
To register the application, we indicate the URI context path to which the application is associated. Several applications can be registered, each of them having a unique URI context path.
An application can provide some global objects which will be available during the request processing through the EL expression. First, we will expose the application context path which allows to write links in the XHTML page that match the URI used for registering the application in the web container.
App.Set_Global ("contextPath", CONTEXT_PATH);
Below is an example of use of this contextPath variable:
''Note: For the purpose of this example, the Compute_Bean is registered as a global object. This means that it will be shared by every request. A future article will explain how to get a session or a request bean as in Java Server Faces.''
Starting the server
Once the application is registered, we can start our server. Note that since Ada Web Server starts several threads that listen to requests, the Start procedure does not block and returns as soon as the server is started. The delay is necessary to let the server wait for requests during some time.
WS.Start;
delay 1000.0;
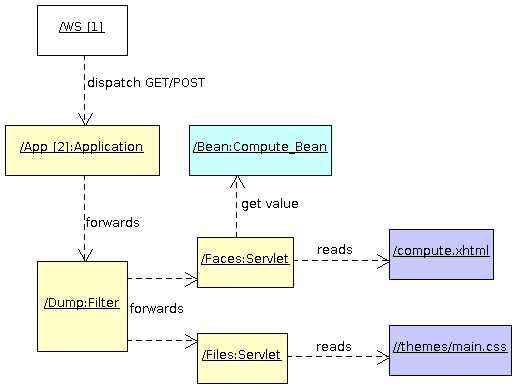
What happens to a request?
Let's say the server receives a HTTP GET request on /volume/compute.html. Here is what happens:
In a previous article, I presented in the cylinder volume example the Ada Server Faces presentation layer and then the Ada beans that link the presentation and ASF components together. This article explains how to implement an action bean and have a procedure executed when a button is pressed.
Command buttons and method expression
We have seen in the presentation layer how to create a form and have a submit button. This submit button can be associated with an action that will be executed when the button is pressed. The EL expression is the mechanism by which we create a binding between the XHTML presentation page and the component implemented in Java or Ada. A method expression is a simple EL expression that represents a bean and a method to invoke on that bean. This method expression represent our action.
A typical use is on the h:commandButton component where we can specify an action to invoke when the button is pressed. This is written as:
The method expression #{compute.run} indicates to execute the method run of the bean identified by compute.
Method Bean Declaration
Java implements method expressions by using reflection. It is able to look at the methods implemented by an object and then invoke one of these method with some parameters. Since we cannot do this in Ada, some developer help is necessary.
For this an Ada bean that implements an action must implement the Method_Bean interface. If we take the Compute_Bean type defined in the Ada beans previous article, we just have to extend that interface and implement the Get_Method_Bindings function. This function will indicate the methods which are available for an EL expression and somehow how they can be called.
with Util.Beans.Methods;
...
   type Compute_Bean is new Util.Beans.Basic.Bean
          and Util.Beans.Methods.Method_Bean with record
      Height : My_Float := -1.0;
      Radius : My_Float := -1.0;
      Volume: My_Float := -1.0;
   end record;
   --  This bean provides some methods that can be used in a Method_Expression
   overriding
   function Get_Method_Bindings (From : in Compute_Bean)
      return Util.Beans.Methods.Method_Binding_Array_Access;
Our Ada type can now define a method that can be invoked through a method expression. The action bean always receives the bean object as an in out first parameter and it must return the action outcome as an Unbounded_String also as in out.
 procedure Run (From    : in out Compute_Bean;
                         Outcome : in out Unbounded_String);
Implement the action
The implementation of our action is quite simple. The Radius and Height parameters submitted in the form have been set on the bean before the action is called. We can use them to compute the cylinder volume.
procedure Run (From    : in out Compute_Bean;
                        Outcome : in out Unbounded_String) is
      V : My_Float;
   begin
      V := (From.Radius * From.Radius);
      V := V * From.Height;
      From.Volume := V * 3.141;
      Outcome := To_Unbounded_String ("compute");
   end Run;
Define the action binding
To be able to call the Run procedure from an EL method expression, we have to create a binding object. This binding object will hold the method name as well as a small procedure stub that will somehow tie the method expression to the procedure. This step is easily done by instantiating the ASF.Events.Actions.Action_Method.Bind package.
with ASF.Events.Actions;
...
   package Run_Binding is
     new ASF.Events.Actions.Action_Method.Bind
        (Bean  => Compute_Bean,
         Method => Run,
         Name    => "run");
Register and expose the action bindings
The last step is to implement the Get_Method_Bindings function. Basically it has to return an array of method bindings which indicate the methods provided by the Ada bean.
Binding_Array : aliased constant Util.Beans.Methods.Method_Binding_Array
  := (Run_Binding.Proxy'Unchecked_Access, Run_Binding.Proxy'Unchecked_Access);

overriding
function Get_Method_Bindings (From : in Compute_Bean)
   return Util.Beans.Methods.Method_Binding_Array_Access is
begin
   return Binding_Array'Unchecked_Access;
end Get_Method_Bindings;
What happens now?
When the user presses the Compute button, the brower will submit the form and the ASF framework will do the following:
It will check the validity of input parameters,
It will save the input parameters on the compute bean,
It will execute the method expression #{compute.run}:
It calls the Get_Method_Bindings function to get a list of valid method,
Having found the right binding, it calls the binding procedure
The binding procedure invokes the Run procedure on the object.
Next time...
We have seen the presentation layer, how to implement the Ada bean and this article explained how to implement an action that is called when a button is pressed. The next article will explain how to initialize and build the web application.
The problem is to update a cache that is almost never modified and only read in multi-threaded context. The read performance is critical and the goal is to reduce the thread contention as much as possible to obtain a fast and non-blocking path when reading the cache.
Cache Declaration
Java Implementation
Let's define the cache using the HashMap class.
public class Cache {
   private HashMap<String,String> map = new HashMap<String, String>();
}
Ada Implementation
In Ada, let's instantiate the Indefinite_Hashed_Maps package for the cache.
with Ada.Strings.Hash;
with Ada.Containers.Indefinite_Hashed_Maps;
...
  package Hash_Map is
    new Ada.Containers.Indefinite_Hashed_Maps (Key_Type => String,
                       Element_Type => String,
                       Hash => Hash,
                       "=" => "=");

  Map : Hash_Map.Map;
Solution 1: safe and concurrent implementation
This solution is a straightforward solution using the language thread safe constructs. In Java this solution does not allow several threads to look at the cache at the same time. The cache access will be serialized. This is not a problem with Ada, where multiple concurrent readers are allowed. Only writing locks the cache object
Java Implementation
The thread safe implementation is protected by the synchronized keyword. It guarantees mutual exclusions of threads invoking the getCache and addCache methods.
   public synchronized String getCache(String key) {
      return map.get(key);
   }
   public synchronized void addCache(String key, String value) {
      map.put(key, value);
   }
Ada Implementation
In Ada, we can use the protected type. The cache could be declared as follows:
  protected type Cache is
    function Get(Key : in String) return String;
    procedure Put(Key, Value: in String);
  private
    Map : Hash_Map.Map;
  end Cache;
and the implementation is straightforward:
  protected body Cache is
    function Get(Key : in String) return String is
    begin
       return Map.Element (Key);
    end Get;
    procedure Put(Key, Value: in String) is
    begin
       Map.Insert (Key, Value);
    end Put;
  end Cache;
Pros and Cons
+: This implementation is thread safe.
-: In Java, thread contention is high as only one thread can look in the cache at a time.
-: In Ada, thread contention occurs only if another thread updates the cache (which is far better than Java but could be annoying for realtime performance if the Put operation takes time).
-: Thread contention is high as only one thread can look in the cache at a time.
Solution 2: weak but efficient implementation
The Solution 1 does not allow multiple threads to access the cache at the same time, thus providing a contention point. The second solution proposed here, removes this contention point by relaxing some thread safety condition at the expense of cache behavior.
In this second solution, several threads can read the cache at the same time. The cache can be updated by one or several threads but the update does not guarantee that all entries added will be present in the cache. In other words, if two threads update the cache at the same time, the updated cache will contain only one of the new entry. This behavior can be acceptable in some cases and it may not fit for all uses. It must be used with great care.
Java Implementation
A cache entry can be added in a thread-safe manner using the following code:
   private volatile HashMap<String, String> map = new HashMap<String, String>();
   public String getCache(String key) {
      return map.get(key);
   }
   public void addCache(String key, String value) {
      HashMap<String, String> newMap = new HashMap<String, String>(map);

      newMap.put(newKey, newValue);
      map = newMap;
   }
This implementation is thread safe because the hash map is never modified. If a modification is made, it is done on a separate hash map object. The new hash map is then installed by the map = newMap assignment operation which is atomic. Again this code extract does not guarantee that all the cache entries added will be part of the cache.
Ada Implementation
The Ada implementation is slightly more complex basically because there is no garbage collector. If we allocate a new hash map and update the access pointer, we still have to free the old hash map when no other thread is accessing it.
The first step is to use a reference counter to automatically release the hash table when the last thread finishes its work. The reference counter will handle memory management issues for us. An implementation of thread-safe reference counter is provided by Ada Util. In this implementation, counters are updated using specific instruction (See Showing multiprocessor issue when updating a shared counter).
with Util.Refs;
...
   type Cache is new Util.Refs.Ref_Entity with record
      Map : Hash_Map.Map;
   end record;
   type Cache_Access is access all Cache;

   package Cache_Ref is new Util.Refs.References (Element_Type => Cache,
                Element_Access => Cache_Access);

  C : Cache_Ref.Atomic_Ref;
The References package defines a Ref type representing the reference to a Cache instance. To be able to replace a reference by another one in an atomic manner, it is necessary to use the Atomic_Ref type. This is necessary because the Ada assignment of an Ref type is not atomic (the assignment copy and the call to the Adjust operation to update the reference counter are not atomic). The Atomic_Ref type is a protected type that provides a getter and a setter. Their use guarantees the atomicity.
    function Get(Key : in String) return String is
      R : constant Cache_Ref.Ref := C.Get;
    begin
       return R.Value.Map.Element (Key); -- concurrent access
    end Get;
    procedure Put(Key, Value: in String) is
       R : constant Cache_Ref.Ref := C.Get;
       N : constant Cache_Ref.Ref := Cache_Ref.Create;
    begin
       N.Value.all.Map := R.Value.Map;
       N.Value.all.Insert (Key, Value);
       C.Set (N); -- install the new map atomically
    end Put;
Pros and Cons
+: high performance in SMP environments +: no thread contention in Java -: cache update can loose some entries -: still some thread contention in Ada but limited to copying a reference (C.Set)
The first article explained how to design the presentation page of an Ada Server Faces application. This article presents the Ada beans that are behind the presentation page.
Ada Bean and presentation layer
We have seen that the presentation page contains components that make references to Ada beans with an EL expression.
The #{compute.height} is an EL expression that refers to the height property of the Ada bean identified as compute.
Writing the Cylinder Ada Bean
The Ada bean is a instance of an Ada tagged record that must implement a getter and a setter operation. These operations are invoked through an EL expression. Basically the getter is called when the view is rendered and the setter is called when the form is submitted and validated. The Bean interface defines the two operations that must be implemented by the Ada type:
with Util.Beans.Basic;
with Util.Beans.Objects;
...
   type Compute_Bean is new Util.Beans.Basic.Bean with record
      Height : My_Float := -1.0;
      Radius : My_Float := -1.0;
   end record;

   --  Get the value identified by the name.
   overriding
   function Get_Value (From : Compute_Bean;
                       Name : String) return Util.Beans.Objects.Object;

   --  Set the value identified by the name.
   overriding
   procedure Set_Value (From  : in out Compute_Bean;
                        Name  : in String;
                        Value : in Util.Beans.Objects.Object);
The getter and setter will identify the property to get or set through a name. The value is represented by an Object type that can hold several data types (boolean, integer, floats, strings, dates, ...). The getter looks for the name and returns the corresponding value in an Object record. Several To_Object functions helps in creating the result value.
   function Get_Value (From : Compute_Bean;
                       Name : String) return Util.Beans.Objects.Object is
   begin
      if Name = "radius" and From.Radius >= 0.0 then
         return Util.Beans.Objects.To_Object (Float (From.Radius));

      elsif Name = "height" and From.Height >= 0.0 then
         return Util.Beans.Objects.To_Object (Float (From.Height));

      else
         return Util.Beans.Objects.Null_Object;
      end if;
   end Get_Value;
The setter is similar.
   procedure Set_Value (From  : in out Compute_Bean;
                        Name  : in String;
                        Value : in Util.Beans.Objects.Object) is
   begin
      if Name = "radius" then
         From.Radius := My_Float (Util.Beans.Objects.To_Float (Value));
      elsif Name = "height" then
         From.Height := My_Float (Util.Beans.Objects.To_Float (Value));
      end if;
   end Set_Value;
Register the Cylinder Ada Bean
The next step is to register the cylinder bean and associate it with the compute name. There are several ways to do that but for the purpose of this example, there will be a global instance of the bean. That instance must be aliased so that we can use the Access attributes.
Bean : aliased Compute_Bean;
The Ada bean is registered on the application object by using the Set_Global procedure. This creates a global binding between a name and an Object record. In our case, the object will hold a reference to the Ada bean.
We have seen how the presentation layer and the Ada beans are associated. The next article will present the action binding that links the form submission action to an Ada bean method.
Ada Server Faces is a framework which allows to write and build web applications. This article presents through a simple example how to use ASF to write a simple web application.
ASF Overview
Ada Server Faces uses a model which is very close to Java Server Faces. JSF and ASF use a component-based model for the design and implementation of a web application. Like traditional MVC models, the presentation layer is separated from the control and model parts. Unlike the MVC model, JSF and ASF are not request-based meaning there is not a specific controller associated with the request. Instead, each component that is part of the page (view) participate in the control and each component brings a piece of the model.
This first article will focus on the presentation layer through a simple example.
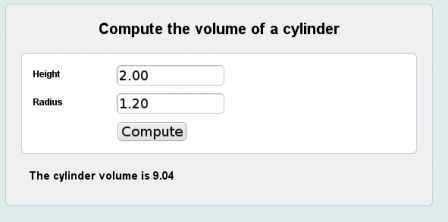
Cylinder Volume Example
The example computes the volume of a cylinder. A simple form with two input fields allows to enter the cylinder dimensions (the unit does not matter).
Volume form, mar. 2011
ASF Templating
The presentation part is implemented by a facelet file and a CSS file. The facelet file is an XML file which contains XHTML elements as well as facelets and JSF/ASF components. The facelets and ASF components are specified in their own XML namespace. The ASF components form a tree of components (UIComponent) which is then used for displaying and processing form submissions.
At the root of the XML file is an f:view component which represents the root of the component tree. The typical page layout looks as follows. Note the #{contextPath} notation in the link reference. This is an EL expression that will be evaluated when the view is displayed (rendered in JSF terminology).
The form, input fields and submit buttons have to be specified using a JSF/ASF component. The JSF/ASF component will make the link between the presentation (view) and the controller (beans). The h:form is the JSF/ASF component that represents our form. Note that there is no need to specify any form action attribute: the form action will be managed by JSF/ASF.
The input fields are identified by the h:input components. The input field is linked to the bean through the value EL expression. This expression specifies the bean name and attribute. When rendering the view, JSF/ASF will fetch the value from the named bean. On form submission, JSF/ASF will populate the bean with the submitted value.
The h:input component can contain a f:converter element which indicates a conversion operation to call when displaying or before populating the bean value.
At the form end, the h:commandButton represents the submit button and the controller action to invoke on form submission. The method to invoke is defined with an EL method expression in the action attribute. Before invoking the method, JSF/ASF will verify the submitted values, convert them according to associated converters, populate the beans with the values.
Style
The page style is provided by a specific CSS file. The dl/dt/dd list is rendered as a table using the following CSS definitions. By changing the CSS file, a new presentation can be provided to users.
In this article, I've shown how to write the presentation and style part of an Ada Server Faces application. The next article will present the Ada beans that are associated with this example.
In software development it is often necessary to know the revision number that was used to build an application or a library. This is specially useful when a problem occurred to get and look at the good sources. Integrating this information automatically in the build process is a common practice. This article explains how an Ada application can report the subversion repository and revision in an application log.
Subversion keyword substitution
Subversion provides a substitution feature which allows to replace some pre-defined keywords by the file revision, the last modified date or the last author. In an Ada source, we could declare the following string variables:
package Version is
   Revision : constant String := "$Rev$";
   Head_URL : constant String := "$HeadURL$";
end Version;
To activate the keyword substitution you have to set some subversion property on the file:
The issue with subversion keyword substitution is that the information reported only concerns the file changed not the revision of the project (as returned by svnversion for example). In other words, it is necessary to change the version.ads file to get an updated revision number.
Keyword substitution with gnatprep
The gnatprep tool is a pre-processor provided by the GNAT Ada compiler. It reads an input file, evaluates some conditions and expressions (similar to cpp but slightly different) and produces an output file with substituted values. The file to pre-process is an Ada file that will have the .gpb extension to differentiate it from regular Ada files. For our concern we will use gnatprep to substitute some variables, a String and a number. The declaration could be the following:
package Version is
   Head_URL : constant String := $URL;
   Revision : constant Positive := $REVISION;
end Version;
To produce the expanded .ads file, we will invoke gnatprep and give it the URL and REVISION variables. The manual command would look like:
Running such command by hand can be cumbersome. It is easy to use a Makefile with a make target that will do the full job of extracting the latest revision and invoke gnatprep. The make target is the following (make sure to have a tab as first character in the gnatprep command):
version:
        gnatprep `svn info | grep '^[UR][eR][Lv]' | sed -e 's,URL: \(.*\),-DURL="\1",' -e 's,Revision: ,-DREVISION=,'` \
                  src/version.gpb src/version.ads
This make target could be run manually or be integrated as part of the build process so that it is executed each time a release build is performed.
Writing the log
The easy part is to report the application revision number either in a log or on the standard output.
with Ada.Text_IO;
...
   Ada.Text_IO.Put_Line ("Revision " & Positive'Image (Revision));
When you use the GNAT symbolic traceback feature with gcc 4.4 on Ubuntu 10.04, a segmentation fault occurs. This article explains why and proposes a workaround until the problem is fixed in the distribution.
Symbolic Traceback
The GNU Ada Compiler provides a support package to dump the exception traceback with symbols.
with Ada.Exceptions;
  use Ada.Exceptions;
with GNAT.Traceback.Symbolic;
  use GNAT.Traceback.Symbolic;
with Ada.Text_IO; use Ada.Text_IO;
...
exception
  when E : others =>
    Put_Line ("Exception: " & Exception_Name (E));
    Put_Line (Symbolic_Traceback (E));
GNAT Symbolic Traceback crash
On Ubuntu 10.04 and probably on other Debian distributions, the symbolic traceback crashes in convert_addresses:
Program received signal SIGSEGV, Segmentation fault.
0xb7ab20a6 in convert_addresses () from /usr/lib/libgnat-4.4.so.1
(gdb) where
#0  0xb7ab20a6 in convert_addresses () from /usr/lib/libgnat-4.4.so.1
#1  0xb7ab1f2c in gnat__traceback__symbolic__symbolic_traceback () from /usr/lib/libgnat-4.4.so.1
#2  0xb7ab2054 in gnat__traceback__symbolic__symbolic_traceback__2 () from /usr/lib/libgnat-4.4.so.1
The problem is caused by a patch that was applied on GCC 4.4 sources and which introduces a bug in convert_addresses function. Basically, the function is missing a filename argument which causes other arguments to be incorrect.
Since convert_addresses is provided by the libgnat-4.4.so dynamic library, we can easily replace this function by linking our program with the correct implementation. Get the convert_addresses.c, compile it and add it when you link your program:
To write a web application, Java developers can use the servlet API. The servlet technology, created around 1997, is a simple and powerful framework on top of which many web applications and higher web frameworks have been created. This article shows how to write the same kind of web application in Ada.
Ada Servlet Framework
The Ada Servlet framework is provided by Ada Server Faces. It is an adaptation and implementation of the JSR 315 (Java Servlet Specification) for the Ada 05 language. The Ada API is very close to the Java API as it provides the Servlet, Filter, Request, Response and Session types with quite the same methods. It should be quite easy for someone who is familiar with Java servlets to write an Ada servlet.
The Ada Servlet implementation uses the Ada Web Server as a web server. In the future other other web servers such as Apache or Lighthttpd could be used.
Servlet Declaration
The servlet API is represented by the Servlet tagged type which represents the root of all servlets. A servlet must extend this Servlet tagged type and it can override one of the Do_Get, Do_Post, Do_HeadDo_Delete, Do_Put, Do_Options or Do_Trace procedure. Each Do_XXX procedure receives a request object and a response object.
with ASF.Servlets;
with ASF.Requests;
with ASF.Responses;

package Volume_Servlet is
   use ASF;
   type Servlet is new Servlets.Servlet with null record;

   --  Called by the servlet container when a GET request is received.
   procedure Do_Get (Server   : in Servlet;
                     Request  : in out Requests.Request'Class;
                     Response : in out Responses.Response'Class);
end Volume_Servlet;
Servlet Implementation
The Do_Get procedure receives the request and response as parameter. Both objects are in out parameters because the servlet implementation can modify them. Indeed, the Java servlet API allows the servlet developer to set specific attributes on the request object (This allows to associate any kind of data to the request for later use when rendering the response).
Similar to the Java API, the response is written by using the Print_Stream object that is returned by the Get_Output_Stream function.
with ASF.Streams;
package body Volume_Servlet is
   procedure Do_Get (Server   : in Servlet;
                     Request  : in out Requests.Request'Class;
                     Response : in out Responses.Response'Class) is
      Output : Streams.Print_Stream := Response.Get_Output_Stream;
   begin
      Output.Write ("...");
      Response.Set_Status (Responses.SC_OK);
   end Do_Get;
end Volume_Servlet;
Note: the complete content is omitted for the clarity of this post.
Servlet Registration
With Java servlet 2.5 specification, servlets are registered exclusively through the web.xml application descriptor file. Since Java servlet 3.0, one can register servlets programmatically. With our Ada servlet, this is was we will do with the use of the Add_Servlet method.
Since the Ada runtime is not able to create dynamically an instance of any class (such as the Java newInstance method of the Java Class class), we have to create ourselves the servlet instance object and register it. The servlet instance is associated with a name.
Once registered, we have to define a mapping that tells which URL path is mapped to the servlet. This is done by the call to Add_Mapping: every URL that ends in .html will be handled by the servlet.
The Ada Server Faces framework provides a Web container in which the application must be registered (similar to the Java Web container). The registration is done by the Register_Application call which also specifies the URL prefix for the web application (Every URL starting with /volume will be served by this application).
with ASF.Server.Web;
with ASF.Servlets;
with Volume_Servlet;

procedure Volume_Server is
   Compute : aliased Volume_Servlet.Servlet;
   App     : aliased ASF.Servlets.Servlet_Registry;
   WS      : ASF.Server.Web.AWS_Container;
begin
   --  Register the servlets and filters
   App.Add_Servlet (Name => "compute",
                    Server => Compute'Unchecked_Access);

   --  Define servlet mappings
   App.Add_Mapping (Name => "compute",
                    Pattern => "*.html");

   WS.Register_Application ("/volume",
                            App'Unchecked_Access);

   WS.Start;

   delay 600.0;

end Volume_Server;
Compilation and Execution
The compilation of the Ada servlet example is done using a GNAT project file.
$ gnatmake -Psamples
It produces the volume_server which is our web server.
When working on several Ada concurrent counter implementations, I was interested to point out the concurrent issue that exists in multi-processor environment. This article explains why you really have to take this issue seriously in multi-tasks applications, specially because multi-core processors are now quite common.
What's the issue
Let's say we have a simple integer shared by several tasks:
Counter : Integer;
And several tasks will use the following statement to increment the counter:
Counter := Counter + 1;
We will see that this implementation is wrong (even if a single instruction is used).
Multi task increment sample
To show up the issue, let's define two counters. One not protected and another protected from concurrent accesses by using a specific data structure provided by the Ada Util library.
In our testing procedure, let's declare a task type that will increment both versions of our counters. Several tasks will run concurrently so that the shared counter variables will experience a lot of concurrent accesses. The task type is declared in a declare block inside our procedure so that we will benefit from task synchronisation at the end of the block (See RM 7.6, and RM 9.3).
Each task will increment both counters in a loop. We should expect the two counters to get the same value at the end. We will see this is not the case in multi-processor environments.
declare
  task type Worker is
    entry Start (Count : in Natural);
  end Worker;

  task body Worker is
    Cnt : Natural;
  begin
      accept Start (Count : in Natural) do
        Cnt := Count;
      end;
      for I in 1 .. Cnt loop
        Util.Concurrent.Counters.Increment (Counter);
        Unsafe := Unsafe + 1;
      end loop;
  end Worker;
Now, in the same declaration block, we will define an array of tasks to show up the concurrency.
   type Worker_Array is array (1 .. Task_Count) of Worker;
   Tasks : Worker_Array;
Our tasks are activated and they are waiting to get the counter. Let's make our tasks count 10 million times.
begin
  for I in Tasks'Range loop
    Tasks (I).Start (10_000_000);
  end loop;
end;
Before leaving the declare scope, Ada will wait until the tasks have finished. (yes, there is no need to write any pthread_join code). After this block, we can just print out the value stored in the two counters and compare them:
Log.Info ("Counter value at the end       : " & Integer'Image (Value (Counter)));
Log.Info ("Unprotected counter at the end : " & Integer'Image (Unsafe));
Starting  1 tasks
Expected value at the end      :  10000000
Counter value at the end       :  10000000
Unprotected counter at the end :  10000000
With two tasks, the problem appears:
Starting  2 tasks
Expected value at the end      :  10000000
Counter value at the end       :  10000000
Unprotected counter at the end :  8033821
And it aggravates as the number of tasks increases.
Starting  16 tasks
Expected value at the end      :  10000000
Counter value at the end       :  10000000
Unprotected counter at the end :  2496811
(The above results have been produced on an Intel Core Quad; Similar problems show up on Atom processors as well)
Explanation
On x86 processors, the compiler can use an incl instruction for the unsafe counter increment. So, one instruction for our increment. You thought it was thread safe. Big mistake!
incl %(eax)
This instruction is atomic in a mono-processor environment meaning that it cannot be interrupted. However, in a multi-processor environment, each processor has its own memory cache (L1 cache) and will read and increment the value into its own cache. Caches are synchronized but this is almost always too late. Indeed, two processors can read their L1 cache, increment the value and save it at the same time (thus, loosing one increment). This is what is happening with the unprotected counter.
Let's see how to do the protection.
Protection with specific assembly instruction
To avoid this, it is necessary to use special instructions that will force the memory location to be synchronized and locked until the instruction completes. On x86, this is achieved by the lock instruction prefix. The following is guaranteed to be atomic on multi-processors:
  lock
  incl %(eax)
The lock instruction prefix introduces a delay to the execution of the instruction it protects. This delay increases slightly when concurrency occurs but it remains acceptable (up to 10 times slower).
For Sparc, Mips and other processors, the implementation requires to loop until either a lock is get (Spinlock) or it is guaranteed that no other processor has modified the counter at the same time.
A safe and portable counter implementation can be made by using Ada protected types. The protected type allows to define a protected procedure Increment which provides an exclusive read-write access to the data (RM 9.5.1). The protected function Value will offer a concurrent read-only access to the data.
package Util.Concurrent.Counters is
    type Counter is limited private;
    procedure Increment (C : in out Counter);
    function Value (C : in Counter) return Integer;
private
  protected type Cnt is
      procedure Increment;
      function Get return Integer;
   private
      N : Integer := 0;
   end Cnt;
   type Counter is limited record
      Value : Cnt;
   end record;
end Util.Concurrent.Counters;
This article explains the steps for the installation of an SSD device on an existing Ubuntu desktop PC.
Disk Performances
First of all, let's have a look at the disk read performance with the hdparm utility. The desktop PC has three disks, /dev/sda being the new SSD device (an OCZ Vertex 2 SATA II 3.5" SSD).
The SSD device appears to be 2 times faster than a 10000 rpm disk.
Plan for the move
The first step is to plan for the move and define what files should be located on the SSD device.
Identify files used frequently
To benefit of the high read performance, files used frequently could be moved to the SSD device. To identify them, you can use the find command and the -amin option. This option will not work if the file system is mounted with noatime. The -amin option indicates a number of minutes. To find the files that were accessed during the last 24 hours, you may use the following command:
$ sudo find /home -amin -1440
In most cases, files accessed frequently are the system files (in /bin, /etc, /lib, ..., /usr/bin, /usr/lib, /usr/share, ...) and users' files located in /home.
Identify Files that change frequently
Some people argue that files modified frequently should not be located on an SSD device (write endurance and write performance).
On a Linux system, the system files that are changed on regular basis are in general grouped together in the /var directory. Some configuration files are modified by system daemons while they are running. The list of system directories that changes can be limited to:
On Linux temporary files are stored in one of the following directories. Several KDE applications are saving temporary files in the .kde/tmp-host directory for each user. These temporary files could be moved to a ram file system.
/tmp
/var/tmp
/home/$user/.kde/tmp-$host
Move plan
The final plan was to create one partition for the root file system and three LVM partitions for /usr, /var and /home directories.
Partition the drive
The drive must be partitioned with fdisk. I created one bootable partition and a second partition with what remains.
Format the file system with ext4 as it integrates various improvements which are useful for the SSD storage (Extents, Delayed allocation). Other file systems will work very well too.
$ sudo mkfs -t ext4 /dev/vg01/sys
Move the files
To move files from one system to another place, it is safer to use the tar command instead of a simple cp. Indeed, the tar command is able to copy special files without problems while not all cp commands support the copy of special files.
$ sudo mount /dev/vg01/sys /target
$ sudo -i
# cd /usr
# tar --one-file-system -cf - . | (cd /target; tar xf -)
If the file system to move is located on another LVM partition, it is easier and safer to use the pvmove utility to move physical extents from one physical volume to another one.
Change the mount point
Edit the /etc/fstab file and change the old mount point to the new one. The noatime mount option tells the kernel to avoid updating the file access time when it is read.
For the SSD drive, it is best to disable the Linux IO scheduler. For this, we will activate the noop IO scheduler. Other disks will use the default IO scheduler or another one. Add the following lines in /etc/rc.local file:
test -f /sys/block/sda/queue/scheduler &&
  echo noop > /sys/block/sda/queue/scheduler
Several Samsung Galaxy phones seem to have USB connection problems. Sometimes the USB connection stops working and even rebooting the phone does not solve the problem. This article gives the symptoms and explains how to fix that.
Symptoms
It took me a long time to figure out and fix the problem (looking at many forums, trying many solutions that never worked). The problem was not a driver problem on the PC, nor some dust on the USB connector but really a software/configuration problem on the Android phone itself. The symptoms were the following:
The phone is correctly configured in Settings -> Applications -> Development to USB mode (no development)
Plugging and unplugging the USB cable does not produce any event on the phone (it is as though you plug the charger: no USB icon in the status bar)
Rebooting the phone has no effect. USB is still not recognized (the USB icon does not appear in the status bar).
Rebooting the phone with the USB cable connected to the PC is better. The USB icon appears but it never disappears after unplug and the connection still does not work.
Under Windows, Samsung Kies tries to connect but the connection process never ends. Windows sees the USB device.
Under Ubuntu, the dmesg command reports an error when the USB cable is plugged:
[62752.296029] usb 2-6: new high speed USB device using ehci_hcd and address 38
[62752.429897] usb 2-6: configuration #1 chosen from 1 choice
[62752.431442] hub 2-6:1.0: bad descriptor, ignoring hub
[62752.431450] hub: probe of 2-6:1.0 failed with error -5
[62752.431543] cdc_acm 2-6:1.0: ttyACM0: USB ACM device
[62752.432560] hub 2-6:1.2: bad descriptor, ignoring hub
[62752.432567] hub: probe of 2-6:1.2 failed with error -5
However the device is recognized. Indeed, you can see it with lsusb.
You can even use the lsusb -D command to look at the details of the device. BUT, this command reports an error (can't get hub descriptor: Broken pipe) within its output:
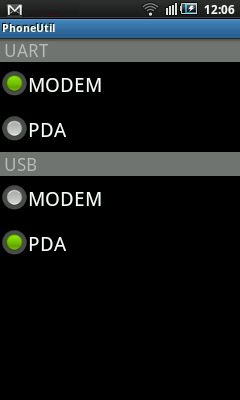
2. On the cell phone, dial the following number: *#7284#
Once the last # is hit, the PhoneUtil application is launched. Choose USB -> Modem and then USB -> PDA mode.
The good mode should be PDA. Even if the mode is PDA, switch to Modem and then back to PDA.
3. Plug the USB cable.
Results
Once the cable is plugged, the USB device is recognized and the following messages are reported by dmesg:
[62941.921435] usb 2-6: new high speed USB device using ehci_hcd and address 39
[62942.054057] usb 2-6: configuration #2 chosen from 1 choice
[62942.086841] Initializing USB Mass Storage driver...
[62942.087128] scsi8 : SCSI emulation for USB Mass Storage devices
[62942.087310] usbcore: registered new interface driver usb-storage
[62942.087314] USB Mass Storage support registered.
[62942.087340] usb-storage: device found at 39
[62942.087344] usb-storage: waiting for device to settle before scanning
[62947.084396] usb-storage: device scan complete
[62947.085230] scsi 8:0:0:0: Direct-Access     SAMSUNG  GT-I5800 Card    0000 PQ: 0 ANSI: 2
[62947.088053] sd 8:0:0:0: Attached scsi generic sg4 type 0
[62947.096526] sd 8:0:0:0: [sdd] Attached SCSI removable disk
The lsusb -D command should now work without any problem (the can't get hub descriptor: Broken pipe error has gone).
Mounting the sdcard
Before mounting the sdcard, activate the USB mount connection on the phone by clicking on the USB icon in the status bar. Once this is done, dmesg will report more messages such as:
On Ubuntu, the sdcard is mounted with the following command:
$ sudo mount -t vfat /dev/sdd1 /mnt/storage
Android Device Development
For Android development, it is necessary to configure the udev (dynamic device management) service. It should be done before connecting the device. For this you have to create a rules file for udev. Create the following file /etc/udev/rules.d/51-android.rules and put:
Seven years after this initial post, people still have many problems with their USB connection. The solution presented here may not work anymore for some of you. You may checkout the following article that gives you more Android secret codes:
This article explains how to setup and use phpMyAdmin with a MySQL server running on the ReadyNAS duo. This configuration does not require installing phpMyAdmin on the ReadyNAS. Instead it provides a secure configuration while allowing to administer the database remotely. The idea is to use an SSH tunnel to establish a secure connection to the MySQL server. This article deals with the ReadyNAS duo but it can be applied to any MySQL server (I've used this mechanism for the administration of Planzone).
Creating the SSH Tunnel
The ssh tunnel is created when we use the ssh -L option. The first port (3307) specifies the local port and localhost:3306 specifies the MySQL port on the remote endpoint. The tunnel is active only when we are connected with ssh. This is useful to guarantee that nobody can access the MySQL server while we are not connected. The MySQL traffic will also be encrypted by SSH. On your host, type the following command (replace pollux by your ReadyNAS host name).
$ ssh -L 3307:localhost:3306 -l root pollux
root@pollux's password:
Linux nas-D2-24-F2 2.6.17.8ReadyNAS #1 Tue Jun 9 13:59:28 PDT 2009 padre unknown
nas-D2-24-F2:~#
Keep this connection open until you don't need the tunnel any more. As soon as you exit, the tunnel will be closed.
Setting up MySQL server
By default the MySQL server does not listen on any TCP/IP port but instead it uses Unix sockets (Unix sockets are faster and listening on TCP/IP ports could create security leaks if not done correctly). For the ssh tunnel to work, the MySQL server must listen on the a TCP/IP port on the localhost address.
Look at the configuration file /etc/mysql/my.cnf and make sure it contains the following lines (uncomment bind-address and comment the skip-networking):
socket        = /var/run/mysqld/mysqld.sock

port          = 3306
bind-address  = 127.0.0.1
#skip-networking
You should then restart MySQL if you changed the configuration file:
A grant definition is necessary so that we can connect to MySQL server on the TCP/IP port. From the MySQL server point of view, the connection is from the localhost (the tunnel endpoint on the ReadyNAS). Connect to MySQL and type the following commands (you can use pwgen to make a password on Ubuntu):
mysql> grant all privileges on *.* to 'root'@'127.0.0.1' identified by 'Lugo6cho';
Query OK, 0 rows affected (0.04 sec)

mysql> flush privileges;
Query OK, 0 rows affected (0.02 sec)
Testing the connection
On another terminal window, try to connect to the MySQL server through the tunnel.
zebulon $ mysql -u root --host 127.0.0.1 --port 3307
If the client fails with Can't connect to MySQL server on '127.0.0.1' (111), verify that the tunnel is up and that the port is correct. If the client fails with Access denied for user 'root'@'127.0.0.1' , verify the MySQL access rights and update the grant.
Update phpMyAdmin configuration
Now, we just need to add the tunnel local endpoint to the phpMyAdmin configuration. For this, add the following lines to the phpMyAdmin configuration file (/etc/phpmyadmin/config.inc.php on Ubuntu).