A small tutorial explains how you can easily setup a project, design the UML model, and use the features provided by the Ada Web Application framework.
Jenkins will use ssh to connect to the build node so it is good practice to setup a private/public key to allow the Jenkins master node to connect to the slave. On the master, copy the jenkins user's key:
ssh-copy-id target-host
The Ada build node is then added through the Jenkins UI in Manage Jenkins/Manage Nodes.
Jenkins jobs
The jenkins master is now building 7 projects automatically for Ubuntu 14.04: Trusty Ada Jobs
In previous tutorials we have seen how to create and setup the project, design the UML model to generate the Ada implementation and the database schema. In this tutorial we will see how to design the page to create a review, implement the operations to create and populate the database with the new review.
In the Ada Web Application: Setting up the project we have seen how to create a new AWA project. In this second article, we will see how to design the UML model, generate the Ada code and create the database tables from our UML design.
Introduction
A Model driven engineering or MDE promotes the use of models to ease the development of software and systems. The Unified Modeling Language is used to modelize various parts of the software. UML is a graphical type modelling language and it has many diagrams but we are only going to use one of them: the Class Diagram.
The class diagram is probably the most powerful diagram to design, explain and share the data model of any application. It defines the most important data types used by an application with the relation they have with each other. In the class diagram, a class represents an abstraction that encapsulates data member attributes and operations. The class may have relations with others classes.
For the UML model, we are going to use ArgoUML that is a free modelization tool that works pretty well. For the ArgoUML setup, we will use two profiles:
The Dynamo profile that describes the base data types for our UML model. These types are necessary for the code generator to work correctly.
The AWA profile that describes the tables and modules provided by AWA. We will need it to get the user UML class definition.
These UML profiles are located in the /usr/share/dynamo/base/uml directory after Dynamo and AWA are installed. To configure ArgoUML, go in the Edit -> Settings menu and add the directory in the Default XMI directories list. Beware that you must restart ArgoUML to be able to use the new profiles.
ArgoUML profile setup
Modelize the domain model in UML
The UML model must use a number of Dynamo artifacts for the code generation to work properly. The artifact describes some capabilities and behavior for the code generator to perform its work. Stereotype names are enclosed within markers. Dynamo uses the following stereotypes:
The DataModel stereotype must be applied on the package which contains the model to generate. This stereotype activates the code generation (other packages are not generated).
The Table stereotype must be applied to the class. It controls which database table and Ada type will be generated.
The PK stereotype must be defined in at most one attribute of the class. This indicates the primary key for the database table. The attribute type must be an integer or a string. This is a limitation of the Ada code generator.
The Version stereotype must be applied on the attribute that is used for the optimistic locking implementation of the database layer.
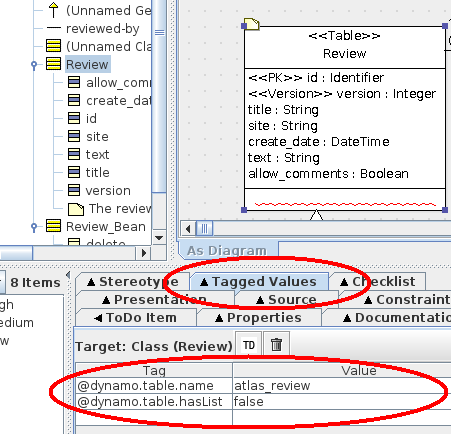
The Review Table UML Model
In our UML model, the Review table is assigned the Table stereotype so that an SQL table will be created as well as an Ada tagged type to represent our table. The id class attribute represents the primary key and thus has the PK stereotype. The version class attribute is the database column used by the optimistic locking implementation provided by ADO. This is why is has the Version stereotype. The title, site, create_date, text and allow_comments attributes represent the information we want to store in the database table. They are general purpose attributes and thus don't need any specific stereotype. For each attribute, the Dynamo code generator will generate a getter and a setter operation that can be used in the Ada code.
To tune the generation, several UML tagged values can be selected and added on the table or on a table attribute. By applying a stereotype to the class, several tagged values can be added. By selecting the Tagged Values tab in ArgoUML we can edit and setup new values. For the Review table, the dynamo.table.name tagged value defines the name of the SQL database table, in our case atlas_review.
The tagged value for the Review table
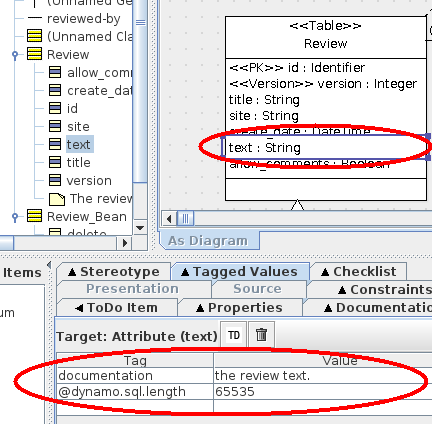
The text attribute in the Review table is a string that can hold some pretty long text. To control the length of the SQL column, we can set the dynamo.sql.length tagged value and tell what is that length.
The tagged value for the text column in review table
Once the UML model is designed, it is saved in the project directory uml. Dynamo will be able to read the ArgoUML file format (.zargo extension) so there is no need to export the UML in XMI.
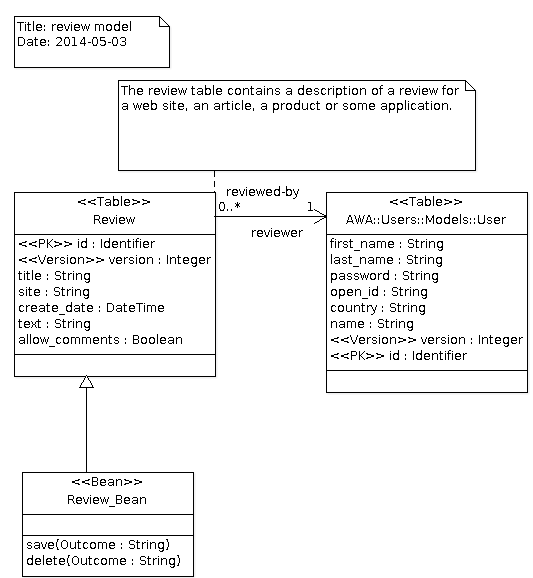
The Review application UML model
The final UML model of our review application is fairly simple. We just added a table and a bean declaration. To benefit from the user management in AWA, we can use the AWA::Users::Models::User class that is defined in the AWA UML model. The reviewed-by association will create an attribute reviewer in our class. The code generator will generate a Get_Reviewer and Set_Reviewer operation in the Ada code. The SQL table will contain an additional column reviewer that will hold the primary key of the reviewer.
The Review Web Application UML Model
The Review_Bean class is an Ada Bean abstract class that will be generated by the code generator. The Bean stereotype activates the bean code generator and the generator will generate some code support that is necessary to turn the Review_Bean tagged record into an Ada Bean aware type. We will see in the next tutorial that we will only have to implement the save and delete operation that are described in this UML model.
Makefile setup
The Makefile.in that was generated by the Dynamocreate-project command must be updated to setup a number of generation arguments for the UML to Ada code generator. Edit the Makefile.in to change:
DYNAMO_ARGS=--package Atlas.Reviews.Models db uml/atlas.zargo
The --package option tells Dynamo to generate only the model for the specified package. The db directory is the directory that will contain the SQL model files.
Once the Makefile.in is updated, the Makefile must be updated by using the following command:
./config.status
Or if you prefer, you may run again the configure script to re-configure the whole project.
We need the code!!
To run the generator, we can use the generate make target:
make generate
The Dynamo code generator reads the file uml/atlas.zargo and the UML model it contains and generates:
the Ada package Atlas.Reviews.Models which contains the definition of the Review table. The model files are created in the directory src/models which is separate from your Ada sources.
the SQL files to create the MySQL or SQLite database. Depending on the AWA modules which are used, the generated SQL files will contain additional tables that are used by the AWA modules. The SQL files are generated in the db/mysql and db/sqlite directories.
Let's create the database
Until now we designed our application UML model, we have our Ada code generated, but we need a database with the tables for our application. We can do this by using the create-database command in Dynamo. This command needs several arguments:
The directory that contains the SQL model files. In our case, this is db.
The information to connect to the database, the database name, the user and its password. This information is passed in the form of a database connection string.
The name of the database administration account to connect to the server and create the new database.
The optional password for the database administration account.
If the MySQL server is running on your host and the admin account does not have any password, you can use the following command:
dynamo create-database db 'mysql://localhost/demo_atlas?user=demo&password=demo' root
The create-database creates the database (demo_atlas) with the tables that are necessary for the application. It also creates the demo user and give it the necessary MySQL grants to connect to the demo_atlas database.
The Review Web Application UML video
To help you in building the UML model and see who the whole process looks like in reality, I've created the following short video that details the above tutorial steps.
Conclusion
Thanks to ArgoUML and Dynamo, generating the Ada model and database tables becomes a simple and fun task. We have not written any line of code yet in this Review Web Application project, everything has been generated but we achieved a big progress:
The Review Web Application server is built and can be launched,
The database is initialized and contains our application data model schema.
The next tutorial will explain how to design the review form, implement the operations to create and populate the database with the new review.
Ada Web Application is a complete framework that allows to write web applications using the Ada language. Through a complete web application, the tutorial explains various aspects in setting up and building an application by using AWA. The tutorial is split in several articles and they are completed by short videos to show how easy the whole process is.
The tutorial assumes that you have already installed the following software on your computer:
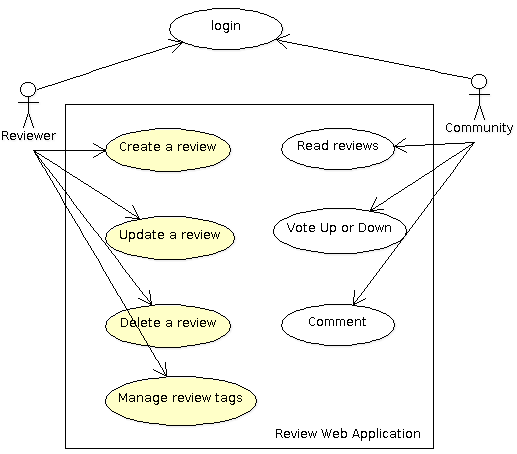
The review web application allows users to write reviews about a product, a software or a web site and share them to the Internet community. The community can read the review, participate by adding comments and voting for the reviewed product or software.
Review Web Application Use Cases
The AWA framework provides several modules that are ready to be used by our application. The login and user management is handled by the framework so this simplifies a lot the design of our application. We will see in the tutorial how we can leverage this to our review application.
Because users of our review web application have different roles, we will need permissions to make sure that only reviewers can modify a review. We will see how the AWA framework leverages the Ada Security library to enforce the permissions.
The AWA framework also integrates three other modules that we are going to use: the tags, the votes and the comments.
Since many building blocks are already provided by the Ada framework, we will be able to concentrate on our own review application module.
Project creation with Dynamo
The first step is to create the new project. Since creating a project from scratch is never easy we will use the Dynamo tool to build our initial review web application. Dynamo is a command line tool that provides several commands that help in several development tasks. For the project creation we will give:
the output directory,
the project name,
the license to be used for the project,
the project author's email address.
Choose the project name with care as it defines the name of the Ada root package that will be used by the project. For the license, you have the choice between GPL v2, GPL v3, MIT, BSD 3 clauses, Apache 2 or some proprietary license.
dynamo -o atlas create-project -l apache atlas Stephane.Carrez@gmail.com
(Of course, change the above email address by your own email address, this is an example!)
The Dynamo project creation will build the atlas directory and populate it with many files:
A set of configure, Makefile, GNAT project files to build the project,
A set of Ada files to build your Ada web application,
A set of presentation files for the web application.
Once the project is created, we must configure it to find the Ada compiler, libraries and so on. This is done by the following commands:
cd atlas
./configure
At this step, you may even build your new project and start it. The make command will build the Ada files and create the bin/atlas-server executable that represents the web application.
With the Ada Web Application framework, a web application is composed of modules where each module brings a specific functionality to the application. AWA provides a module for user management, another for comments, tags, votes, and many others. The application can decide to use these modules or not. The AWA module helps in defining the architecture and designing your web application.
For the review web application we will create our own module dedicated for the review management. The module will be an Ada child package of our root project package. From the Ada point of view, the final module will be composed of the following packages:
A Modules package represents the business logic of the module. It is provides operations to access and manage the data owned by the module.
A Beans package holds the Ada beans that make the link between the presentation layer and business logic.
A Models package holds the data model to access the database content. This package is generated from UML and will be covered by a next tutorial.
To help in setting up a new AWA module, the Dynamo tool provides the add-module command. You just have to give the name of the module, which is the name of the Ada child package. Let's create our reviews module now:
dynamo add-module reviews
The command generates the new AWA module and modifies some existing files to register the new module in the application. You can build your web application at this stage even though the new module will not do anything yet for you.
Eclipse setup
Launch you Eclipse and create the new project by going to the File -> New -> Project menu. Choose the Ada Project and uncheck the Use default location checkbox so that you can browse your file system and select the atlas directory.
That's it. If everything went well, you should be able to see the projects files in the Eclipse project explorer.
Eclipse project explorer
The Review Web Application setup video
To help you in setting up and see how the whole process looks like in reality, I've created the following short video that details the above tutorial steps.
Conclusion
The whole process takes less than 3 minutes and gives you the basis to setup and build your new web application. The next tutorial will explain how to use the UML to design and generate the data model for our Review Web Application.
I'm using NetBSD for few years now but I've never took time to upgrade the system to a new version. To remember what I did for the upgrade, I've collected below the main steps.
Setup
The system upgrade can be made from the running NetBSD system by using the sysupgrade tool. I have installed the tool by using:
sudo pkgin install sysupgrade
Edit the file /usr/pkg/etc/sysupgrade.conf and setup the RELEASEDIR to point to the new release:
After the recent announcement of the GCC 4.9 Ada compiler availability on FreeBSD by John Marino, I decided to do the upgrade and give it some try.
After a quick investigation, I´ve performed the following two simple steps on my FreeBSD host:
sudo pkg update
sudo pkg upgrade
Among several upgrade notifications, I've noted the following messages. The gcc-aux package corresponds to the GCC 4.9 compiler and the gnat-aux package contains the GCC 4.6.4 compiler.
It worked so well that I wasn't sure whether the right compiler was used. Looking at the generated ALI file there was the V "GNAT Lib v4.9" tag that identifies the new compiler.
Next step is to perform a similar upgrade on NetBSD...
I've created and setup a Debian repository to give access to several Debian packages for several Ada projects that I manage. The goal is to provide some easy and ready to use packages to simplify and help in the installation of various Ada libraries. The Debian repository includes the binary and development packages for Ada Utility Library, Ada EL, Ada Security, and Ada Server Faces.
Access to the repository
The repository packages are signed with PGP. To get the verification key and setup the apt-get tool, you should run the following command:
A first repository provides Debian packages targeted at Ubuntu 13.04 raring. They are built with the gnat-4.6 package and depend on libaws-2.10.2-4 and libxmlada4.1-dev. Add the following line to your /etc/apt/sources.list configuration:
deb http://apt.vacs.fr/ubuntu-raring raring main
Ubuntu 12.04 LTS Precise
A second repository contains the Debian packages for Ubuntu 12.04 precise. They are built with the gnat-4.6 package and depend on libaws-2.10.2-1 and libxmlada4.1-dev. Add the following line to your /etc/apt/sources.list configuration:
deb http://apt.vacs.fr/ubuntu-precise precise main
Installation
Once you've added the configuration line, you can install the packages:
Ada Server Faces is a framework that allows to create Web applications using the same design patterns as the Java Server Faces (See JSR 252, JSR 314, or JSR 344). The presentation pages benefit from the FaceletsWeb template system and the runtime takes advantages of the Ada language safety and performance.
A new release is available with several features that help writing online applications:
Add support for Facebook and Google+ login
Javascript support for popup and editable fields
Added support to enable/disable mouseover effect in lists
New EL function util:iso8601
New component <w:autocomplete> for input text with autocompletion
New component <w:gravatar> to render a gravatar image
New component <w:like> to render a Facebook, Twitter or Google+ like button
New component <w:panel> to provide collapsible div panels
New components <w:tabView> and <w:tab> for tabs display
New component <w:accordion> to display accordion tabs
Add support for JSF <f:facet>, <f:convertDateTime>, <h:doctype>
Ada EL is a library that implements an expression language similar to JSP and JSF Unified Expression Languages (EL). The expression language is the foundation used by Java Server Faces and Ada Server Faces to make the necessary binding between presentation pages in XML/HTML and the application code written in Java or Ada.
The presentation page uses an UEL expression to retrieve the value provided by some application object (Java or Ada). In the following expression:
#{questionInfo.question.rating}
the EL runtime will first retrieve the object registered under the name questionInfo and look for the question and then rating data members. The data value is then converted to a string.
OVH is providing new offers that are cheaper and provide more CPU power so it was time for me to migrate and pick another server and reduce the cost by 30%. I'm using 7 virtual machines that run either NetBSD, OpenBSD, FreeBSD, Ubuntu or Debian. Most are Intel based, but some of them are Sparc or Arm virtual machines. I've colllected below the main steps that must be done for the migration.
LVM volume creation on the new server
The first step is to create the LVM volume on the new server. The volume should have the same size as the original. The following command creates a 20G volume labeled netbsd.
$ sudo lvcreate -L 20G -Z n -n netbsd vg01
  WARNING: "netbsd" not zeroed
  Logical volume "netbsd created
Copying the VM image
After stopping the VM, we can copy the system image from one server to another server by using a combination of dd and ssh. The command must be executed as root otherwise some temporary file and additional copy steps could be necessary.
$ sudo dd if=/dev/vg01/netbsd bs=8192 |
  ssh root@master.vacs.fr dd bs=8192 of=/dev/vg01/netbsd
root@master.vacs.fr's password:
2621440+0 records in
2621440+0 records out
21474836480 bytes (21 GB) copied, 1858.33 s, 11.6 MB/s
2621440+0 records in
2621440+0 records out
21474836480 bytes (21 GB) copied, 1848.62 s, 11.6 MB/s
By compressing the image on the fly, the remote copy is faster (4 times faster). The following command does this:
$ sudo dd if=/dev/vg01/netbsd bs=8192 |
gzip -c | ssh root@master.vacs.fr \
'gzip -c -d | dd bs=8192 of=/dev/vg01/netbsd'
root@master.vacs.fr's password:
2621440+0 records in
2621440+0 records out
21474836480 bytes (21 GB) copied, 427.313 s, 50.3 MB/s
2621440+0 records in
2621440+0 records out
21474836480 bytes (21 GB) copied, 436.128 s, 49.2 MB/s
Once the copy is done, it's good to verify the integrity of the copy. For this, we can run the sha1sum on the source image and on the destination image and compare the SHA1 checksum: they must match.
(run this command on both servers and compare the result).
Importing the virtual machine definition
The last step is to copy the virtual machine definition from one server to the other. The definition is an XML file located in the /etc/libvirt/qemu directory. Once copied, run the virsh command on the target server and import the definition:
A few days ago, I did a fresh installation of my Jenkins build environment for my Ada projects (this was necessary after a disk crash on my OVH server). I took this opportunity to setup a FreeBSD build node. This article is probably incomplete but tends to collect a number of tips for the installation.
Virtual machine setup
The FreeBSD build node is running within a QEMU virtual machine. The choice of the host turns out to be important since not all versions of QEMU are able to run a FreeBSD/NetBSD or OpenBSD system. There is a bug in QEMU PCI emulation that prevents the NetBSD network driver to recognize the emulated network cards (See qemu-kvm 1.0 breaks openbsd, netbsd, freebsd). Ubuntu 12.04 and 12.10 provide a version of Qemu that has the problem. This is solved in Ubuntu 13.04, so this is the host linux distribution that I've installed.
For the virtual machine disk, I've setup some LVM partition on the host as follows:
sudo lvcreate -Z n -L 20G -n freebsd vg01
this creates a disk volume of 20G and label it freebsd.
The next step is to download the FreeBSD Installation CD (I've installed the FreeBSD-10.0-RC2). To manage the virtual machines, one can use the virsh command but the virt-manager graphical front-end provides an easier setup.
sudo virt-manager
The virtual machine is configured with:
CPU: x86_64
Memory: 1048576
Disk type: raw, source: /dev/vg01/freebsd
Network card model: e1000
Boot on the CD image
After the virtual machine starts, the FreeBSD installation proceeds (it was so simple that I took no screenshot at all).
Post installation
After the FreeBSD system is installed, it is almost ready to be used. Some additional packages are added by using the pkg install command (which is very close to the Debian apt-get command).
pkg install jed
pkg install sudo bash tcpdump
By default the /proc is not setup and some application like the OpenJDK need to access it. Edit the file /etc/fstab and add the following lines:
Jenkins uses a Java application that runs on each build node. It is necessary to install some Java JRE. To use subversion on the build node, we must make sure to install some 1.6 version since the 1.8 and 1.7 version have incompatibilities with the Jenkins master. The following packages are necessary:
Jenkins needs a user to connect to the build node. The user is created by the adduser command. The Jenkins user does not need any privilege.
Jenkins master will use SSH to connect to the slave node. During the first connection, it installs the slave.jar file which manages the launch of remote builds on the slave. For the SSH connection, the password authentication is possible but I've setup a public key authentication that I've setup on the FreeBSD node by using ssh-copy-id.
At this stage, the FreeBSD build node is ready to be added on the Jenkins master node (through the Jenkins UI Manage Jenkins/Manage Nodes).
MySQL Installation
The MySQL installation is necessary for some of my projects. This is easily done as follows:
If you install the ShowIP Firefox plugin, you will know the IP address of web sites while you browse and therefore quickly know whether you navigate using IPv4 or IPv6.
Below are some basic performance results between IPv4 and IPv6. Since most routers are tuned for IPv4, the IPv6 flow path is not yet as fast as IPv4. The (small) performance degradation has nothing to do with the IPv6 protocol.
Google IPv4 vs IPv6 ping
$ ping -n www.google.com
PING www.l.google.com (209.85.146.103) 56(84) bytes of data.
64 bytes from 209.85.146.103: icmp_seq=1 ttl=55 time=9.63 ms
$ ping6 -n www.google.com
PING www.google.com(2a00:1450:400c:c00::67) 56 data bytes
64 bytes from 2a00:1450:400c:c00::67: icmp_seq=1 ttl=56 time=11.6 ms
Yahoo IPv4 vs IPv6 ping
$ ping -n www.yahoo.com
PING fpfd.wa1.b.yahoo.com (87.248.122.122) 56(84) bytes of data.
64 bytes from 87.248.122.122: icmp_seq=1 ttl=58 time=25.7 ms
$ ping6 -n www.yahoo.com
PING www.yahoo.com(2a00:1288:f00e:1fe::3000) 56 data bytes
64 bytes from 2a00:1288:f00e:1fe::3000: icmp_seq=1 ttl=60 time=31.3 ms
Facebook IPv4 vs IPv6 ping
$ ping -n www.facebook.com
PING www.facebook.com (66.220.156.25) 56(84) bytes of data.
64 bytes from 66.220.156.25: icmp_seq=1 ttl=247 time=80.6 ms
$ ping6 -n www.facebook.com
PING www.facebook.com(2620:0:1c18:0:face:b00c:0:1) 56 data bytes
64 bytes from 2620:0:1c18:0:face:b00c:0:1: icmp_seq=1 ttl=38 time=98.6 ms
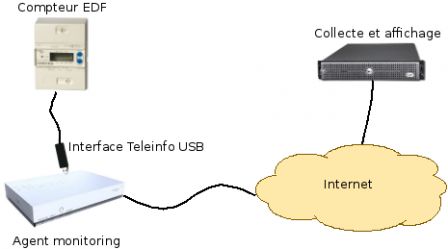
Les compteurs EDF récent disposent d'un module émettant périodiquement des informations sur la consommation éléctrique. Le compteur utilise un protocol série à 1200 baud, le signal est modulé par une porteuse à 50Khz (Voir téléinformation EDF pour les détails ainsi que la Spécification Technique EDF). Cet article explique comment récupérer ces informations et les rendre visibles è travers plusieurs graphes. En deux mots, le principe est de récupérer les informations EDF, d'envoyer ces informations sur un serveur et afficher tous les graphes et résultats à travers une interface Web accessible depuis Internet.
bbox-teleinfo.png, sept. 2013
Téléinformation avec clef USB ADTEK
La société Adtek propose un petit module Téléinfo USB permettant de récupérer la téléinformation via un port série. La communication se fait à 9600 baud, 8-bits, sans parité. Sous Linux, il faut charger les deux modules usbserial et ftdi_sio. Suivant la version du driver ftdi, la clef USB peut ne pas eÌ‚tre reconnue, il faut alors indiquer les identifiants du fabricant et du produit lors du chargement du driver.
Si tout se passe bien le driver va créer le device /dev/ttyUSB0 lorsque la clef est montée:
usbserial: USB Serial Driver core
USB Serial support registered for FTDI USB Serial Device
ftdi_sio 2-2:1.0: FTDI USB Serial Device converter detected
usb 2-2: Detected FT232RL
usb 2-2: FTDI USB Serial Device converter now attached to ttyUSB0
usbcore: registered new interface driver ftdi_sio
ftdi_sio: v1.4.3:USB FTDI Serial Converters Driver
Petit agent de monitoring
Un petit agent de monitoring va lire en permanence les trames EDF de téléinformation via le port série. Il doit collecter les données et envoyer les résultats toutes les 5 minutes en utilisant un POST HTTP vers le serveur qui lui est donné au démarrage.
Cet agent peut tourner dans un Raspberry Pi, un BeagleBone Black. Dans mon cas, je le fais tourner sur ma Bbox Sensation ADSL. A défaut, on peut utiliser un PC standard mais ce n'est pas optimal pour la consommation éléctrique. Source de l'agent: edf-teleinfo.c
La compilation de l'agent se fait simplement avec l'une des commandes suivantes:
Le compteur EDF envoie une mesure toutes les 2 secondes (option -s de rrdtool). La consommation éléctrique est enregistrée sous deux data sources: hc (Heures creuses) et hp (Heures pleines). Les min, max et average sont calculés pour des périodes de 1 mn (30 mesures), 5mn (150 mesures) et 15 mn (450 mesures).
Alors que les Heures creuses et Heures pleines sont définies comme COUNTER, l'intensité instantanée et la puissance apparente sont représentées avec des gauges variant de 0 à 70A ou 0 à 15000W.
La création des fichiers est à faire une seule fois sur le serveur. Si la création est faite dans un répertoire /var/lib/collectd/rrd alors on peut facilement utiliser Collectd Graph Panel pour l'affichage des graphes.
Collecte des informations
Sur le serveur, une page fait l'extraction des paramètres de la requête POST et remplit la base de donnés RRDtool.
L'agent envoie les informations suivantes:
date: le temps Unix correspondant à la première mesure,
end: le temps Unix de la dernière mesure,
hc: la valeur du compteur sur les heures creuses,
hp: la valeur du compteur sur les heures pleines,
ic: le courant instantané,
pap: la puissance apparente.
Comme l'agent envoie les données par lot de 150 valeurs (ou plus si il y a eu des problèmes de connection), la mise à jour se fait en insérant plusieurs valeurs à la fois. Dans ce cas, rrdupdate s'attend à avoir le timestamp Unix suivit des valeurs des deux data sources (courant et puissance). Voici un extrait de la commande:
Pour l'installation de la collecte, copier le fichier edf-collect.php sur le serveur en s'arrangeant pour rendre accessible la page via le serveur web. Source: edf-collect.php.txt
Affichage des informations
Collectd Graph Panel est une application web écrite en PHP et Javascript permettant d'afficher les graphes collectés par collectd. Si les graphes sont crées au bon endroit, alors cette application les reconnaitra et permettra de les afficher. Pour cela, il faut ajouter le plugin teleinfo.php dans le répertoire plugin. Source: teleinfo.php.txt
Voir sa consommation éléctrique a un petit coté ludique. Parfois c'est surprenant de constater que la consommation éléctrique ne descend pas en dessous de 200W. Ceci dit c'est normal avec toutes ces Box, décodeurs, switch et autres appareils qui même en veille consomme quelques watts.